Deploy Cloud Native Apps Using GitLab CI/CD and Cloud Native Buildpacks
Samer Akkoub
GitLab is a single application built from the ground up for all stages of the DevOps lifecycle that enables product, development, QA, security, and operations teams to work on the same project concurrently. It provides teams with a single data store, user interface, and permission model across the DevOps lifecycle. Teams can collaborate and work on a project utilizing a single conversation, which significantly reduces cycle time, allowing developers to focus exclusively on building great software quickly. This tutorial will explain how to create a sample CI/CD pipeline in GitLab and use Cloud Native Buildpacks to package the project source code into deployable containers.
What Are Cloud Native Buildpacks?
Traditionally, in the build stage of the CI/CD cycle, the source code and its dependencies are packaged into containers that can be deployed against any proper container-hosting platform, either on-prem or in the cloud. A Dockerfile is usually used to pass all the commands required to assemble an image.
The challenge with this process—especially for large-scale deployments done frequently—is making sure that each and every build is identical and complies with the security, software currency, and build rules of the organization.
This is where buildpacks come in. A buildpack represents a package of all the tools and scripts required to produce a standards-based, compliant container runtime. The result is that developers no longer need to worry about maintaining Dockerfiles, and operators can make sure that all the containers are built using standard, preconfigured, tested, and approved images. Not only that, because the software development is now abstracted from the underlying build process, it is possible to run a complete rebase for a whole environment (dev, test, staging, production) whether as part of a planned OS upgrade/patching process or in response to a newly identified vulnerability.
How to Use Cloud Native Buildpacks with GitLab CI/CD
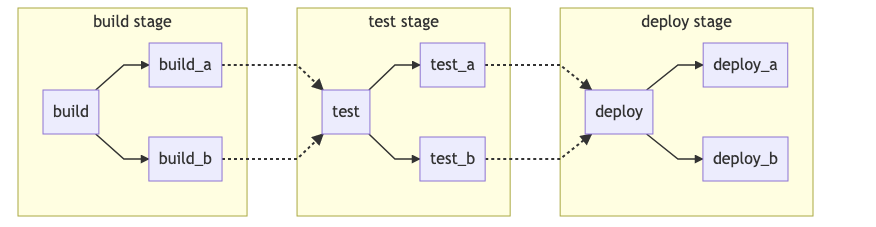
GitLab pipelines are defined in the .gitlab-ci.yml file; they consist of one or more jobs grouped into stages. If no stages are defined in a pipeline, the following three are assumed: build, test, and deploy. The jobs defined in the .gitlab-ci.yml file handle the CI/CD tasks required to get the code built, tested, verified, staged, and deployed to one or more target platforms.
Create a New Project in GitLab SaaS (or Using Your GitLab Instance If You Have a Self-Managed One)
-
Log in to GitLab.com.
-
Click on “New Project.”

- As we are going to use Cloud Native Buildpacks, let’s create the new project based on the Spring project template by clicking “Create from Template” and then choosing the Spring template. This will create a sample Java Spring project, which by default will include a Dockerfile.


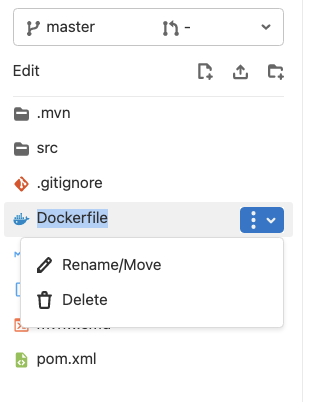
- As we are going to use a buildpack to build the project, let’s rename the Dockerfile to
backup-dockerfileto ensure it won’t be used during the build process. The easiest way to do this is to click the Web IDE link in the top right.

- Click the down arrow next to
Dockerfile, and renameDockerfiletobackup-dockerfile.
- In GitLab, the project pipeline is configured in the
.gitlab-ci.ymlfile. To add a pipeline file to the project, click the new file icon, and in the “Create New File” dialog click.gitlab-ci.yml


-
To add GitLab Auto DevOps templates, click the template dropdown and choose “Auto DevOps Template.”
-
This is the whole GitLab Auto DevOps template, which was built by GitLab engineers based on CI/CD best practices. Auto DevOps aims to simplify the setup and execution of a mature and modern software development lifecycle, but as using the whole Auto DevOps template covers every stage in the CI/CD lifecycle and requires a GitLab Ultimate license, we will trim down the
.gitlab-ci.ymlfile to only include the build stage. To that end, remove all but the following in theincludesection:
include:
  - template: Jobs/Build.gitlab-ci.yml  # https://gitlab.com/gitlab-org/gitlab/blob/master/lib/gitlab/ci/templates/Jobs/Build.gitlab-ci.yml
-
In order to instruct the build job to use Cloud Native Buildpacks, add
AUTO_DEVOPS_BUILD_IMAGE_CNB_ENABLED: "true"under the variables section. -
By default, the
heroku/buildpacks:18builder will be used to build the output containers. This can be changed by assigning a different builder to theAUTO_DEVOPS_BUILD_IMAGE_CNB_BUILDERvariable, for example,AUTO_DEVOPS_BUILD_IMAGE_CNB_BUILDER: paketobuildpacks/builder:base. If you have thepackCLI installed locally, you can see all of the suggested buildpacks by runningpack builder suggest.
Suggested builders:
	Google:                gcr.io/buildpacks/builder:v1      Ubuntu 18 base image with buildpacks for .NET, Go, Java, Node.js, and Python
	Heroku:                heroku/buildpacks:18              heroku-18 base image with buildpacks for Ruby, Java, Node.js, Python, Golang, and PHP
	Paketo Buildpacks:     paketobuildpacks/builder:base     Ubuntu bionic base image with buildpacks for Java, .NET Core, NodeJS, Go, Ruby, NGINX, and Procfile
	Paketo Buildpacks:     paketobuildpacks/builder:full     Ubuntu bionic base image with buildpacks for Java, .NET Core, NodeJS, Go, PHP, Ruby, Apache HTTPD, NGINX, and Procfile
	Paketo Buildpacks:     paketobuildpacks/builder:tiny     Tiny base image (bionic build image, distroless-like run image) with buildpacks for Java Native Image and Go
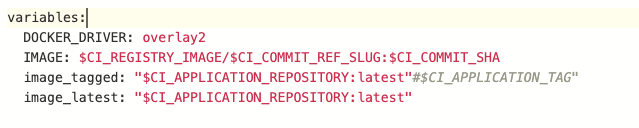
- Pass the environment variables to the running jobs. This can be accomplished several ways:
- Directly adding them in the pipeline file (
.gitlab-ci.yml):
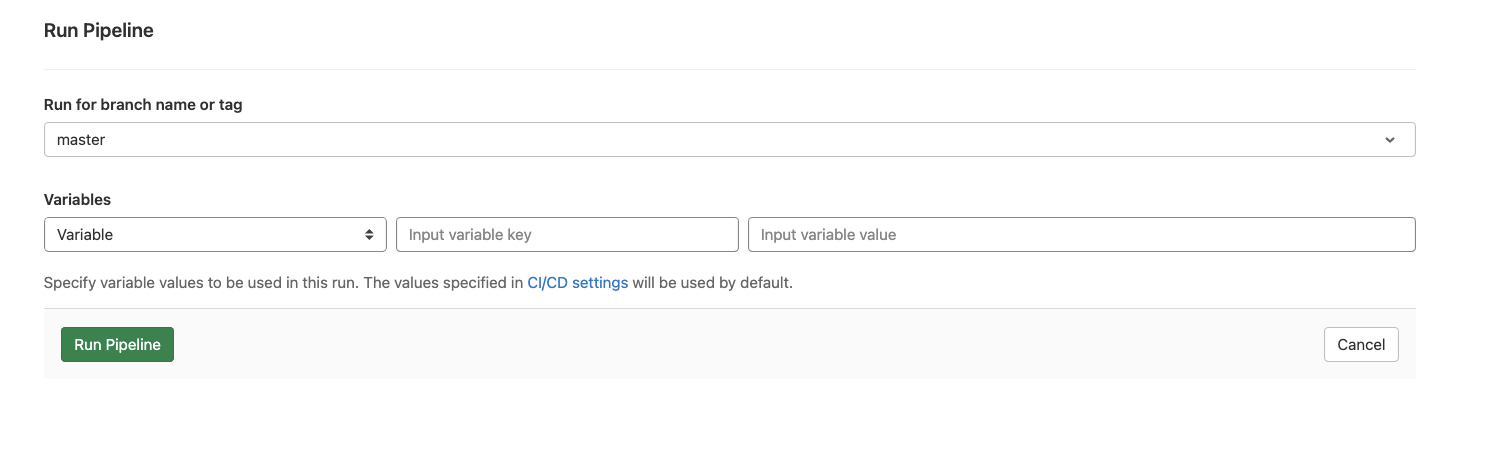
- Defining them on the pipeline level before running the pipeline:
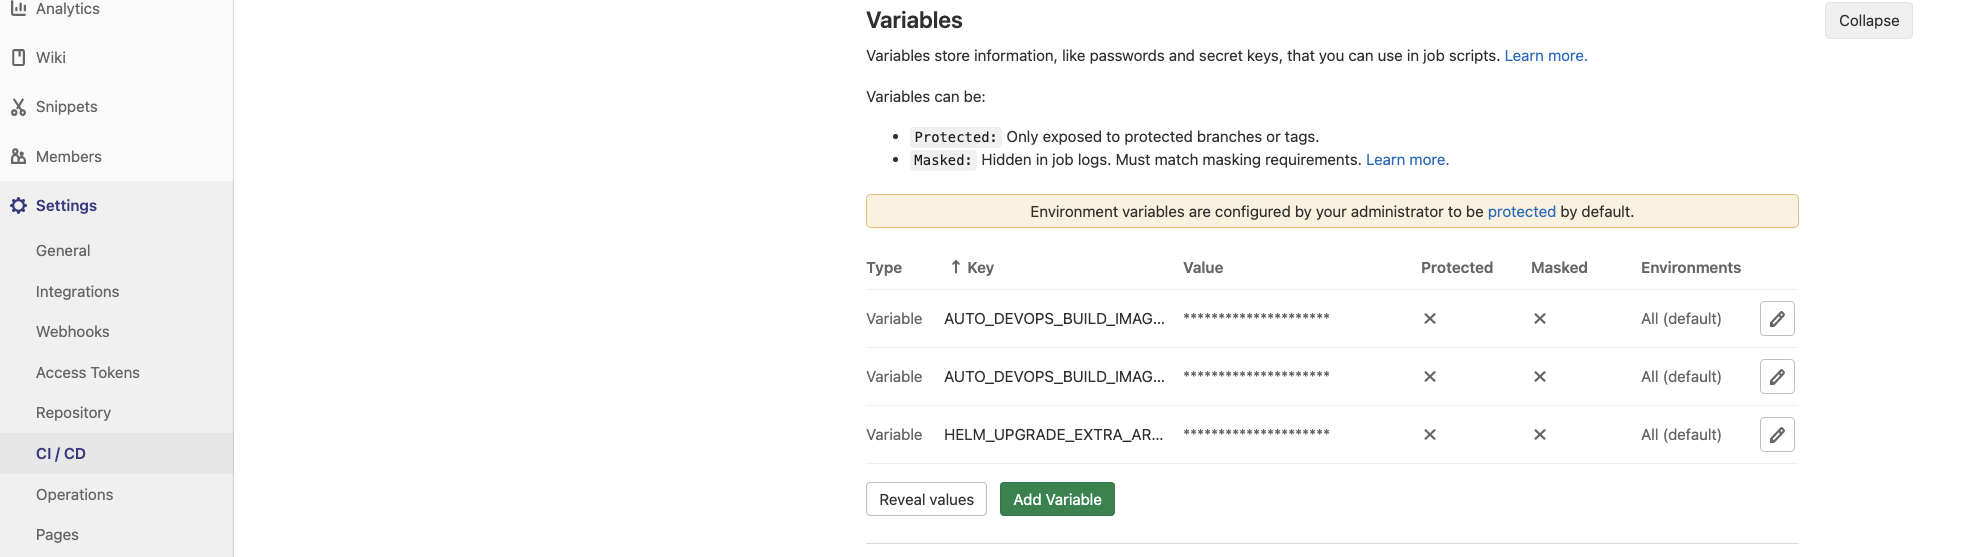
- Adding them under “Settings” in the left menu -> CI/CD, expanding the “Variables” tab, clicking the edit pen and changing the value to any other buildpack URL (diagram below), then triggering the pipeline again.
- Some buildpacks, like Google and Paketo, make the generated container available on port 8080. So if you are using the Gitlab Deploy template (part of GitLab Auto DevOps), you will need to change the listening port for the readiness probe from
5000(the default in the template) to8080. This can be done easily by setting an environment variable namedHELM_UPGRADE_EXTRA_ARGSvalue to--set service.internalPort=8080 --set service.externalPort=8080

Use Cloud Native Buildpacks with GitLab in GitLab Build Job WITHOUT Using the GitLab Build Template
GitLab CI/CD also allows you to use your own build script if you so wish. Let’s look at a build script that reads the AUTO_DEVOPS_BUILD_IMAGE_CNB_BUILDER environment variable to determine which buildpack to use, which we saw how to set in Step 11:
build_using_passed_builder:
    stage: build
    script:
      - >-
        if ! docker info &>/dev/null; then
          if [ -z "$DOCKER_HOST" ] && [ "$KUBERNETES_PORT" ]; then
            export DOCKER_HOST='tcp://localhost:2375'
          fi
        fi
      - echo $AUTO_DEVOPS_BUILD_IMAGE_CNB_BUILDER
      - >-
        if [  -z "$AUTO_DEVOPS_BUILD_IMAGE_CNB_BUILDER"]; then
          export AUTO_DEVOPS_BUILD_IMAGE_CNB_BUILDER='heroku/buildpacks:18'
        fi
      - docker login -u gitlab-ci-token -p $CI_JOB_TOKEN $CI_REGISTRY
      - wget https://github.com/buildpacks/pack/releases/download/v0.17.0/pack-v0.17.0-linux.tgz
      - tar -xvf pack-v0.17.0-linux.tgz
      - chmod +x pack
      - mv pack /usr/local/bin/
      - pack build $IMAGE --builder $AUTO_DEVOPS_BUILD_IMAGE_CNB_BUILDER
      - docker push $IMAGE
Let’s walk through this step by step to make sure we understand exactly what’s happening:
- We first determine where Docker, which will be used to build our code, is running.
- We then look at the
AUTO_DEVOPS_BUILD_IMAGE_CNB_BUILDERenvironment variable to determine which buildpack to use. If this variable isn’t set, we default to usingheroku/buildpacks:18. - Next, we authenticate against Docker using the
CI_JOB_TOKENvariable provided automatically to us by GitLab. - We then download the
packCLI and make sure it has the proper permissions to make it executable. - The
packCLI is uses the buildpack defined in theAUTO_DEVOPS_BUILD_IMAGE_CNB_BUILDERenvironment variable to build our code, tagging the container with the name we expect to be provided in theIMAGEvariable. - Finally, we
docker pushthe image to the GitLab container registry.
If you save this at jobs/build.gitlab-ci.yml, for example, you can update your .gitlab-ci.yml file to use this custom build job instead, with the following change:
include:
  - jobs/build.gitlab-ci.yml
Add Kubernetes Clusters to the GitLab Project
Kubernetes clusters can be added to the GitLab project so that applications can be deployed to them directly from the CI/CD pipeline. To add to the K8s cluster project, please follow the steps in the Add and Removing Kubernetes Cluster guide.
Deploy the Packaged Container to the Kubernetes Clusters
GitLab automates and simplifies the deployment of containers to Kubernetes through the provided AutoDeploy template. Similar to the AutoBuild template, it’s based on CI/CD best practices and can save operators/developers the hassle of composing and maintaining long deployment scripts and Helm charts. To use the AutoDeploy template we’ll include the Deploy.gitlab-ci.yml template under the “include” section in the .gitlab-ci.yml file, so it will look like this:
include:
  - template: Jobs/Build.gitlab-ci.yml  # https://gitlab.com/gitlab-org/gitlab/blob/master/lib/gitlab/ci/templates/Jobs/Build.gitlab-ci.yml
  - template: Jobs/Deploy.gitlab-ci.yml  # https://gitlab.com/gitlab-org/gitlab/blob/master/lib/gitlab/ci/templates/Jobs/Deploy.gitlab-ci.yml
Including the template will once again kick off the pipeline, this time adding a second job to deploy to your Kubernetes cluster. While the use of the AutoDeploy template requires a GitLab Ultimate license, you can get one by starting a 30-day trial license. Whether you use the AutoDeploy template or write your own build step, you can build CI/DI pipelines for your GitLab projects for free.