Create a Continuous Integration Pipeline with GitLab and Kubernetes
Vikram Vaswani
As development velocity increases, it’s now become essential for enterprises to have a reliable and readily-available Continuous Integration/Continuous Delivery (CI/CD) pipeline integrated with cloud infrastructure. But although the requirements of such infrastructure are well understood, setting up this pipeline is still a complex task involving knowledge of cloud platforms, containerization tools like Docker, Docker Compose and others, container orchestration tools like Kubernetes and Helm, and DevOps tools and techniques.
Bitnami eases the task of building an enterprise-ready CI/CD pipeline with its application stacks and container images.
-
Bitnami’s GitLab CE stack lets you deploy a secure and fully-functional GitLab instance on the cloud in a matter of minutes and integrate it with a Kubernetes cluster.
-
Bitnami’s containers for Node.js, Ruby, Java and others makes it easy to containerize your applications in a secure and reliable manner.
Put the two together, and you have everything you need to create a modern, enterprise-grade CI/CD pipeline that leverages the scalability of Kubernetes with the flexibility of GitLab and the development agility of Bitnami containers. This guide walks you through the process.
Overview
This guide shows you how to set up a CI/CD pipeline between GitLab (deployed using the Bitnami GitLab CE stack) and a Kubernetes cluster with GitLab’s Auto DevOps feature. With this configuration, every change to application code is automatically built as a Docker container (based on a Bitnami Node.js base container) and deployed to the Kubernetes cluster for review and test.
Communication and monitoring between the GitLab deployment and the Kubernetes cluster is achieved through the use of Helm, Ingress and GitLab Runner. When GitLab deploys each built container to the cluster, it also makes it available for review at an auto-generated sub-domain of your main domain name.
Assumptions and prerequisites
This guide makes the following assumptions:
- You have deployed the Bitnami GitLab CE stack on a cloud server and have the GitLab CE administrator credentials. Learn about deploying Bitnami applications and obtaining credentials.
- You have a multi-node Kubernetes cluster running. Learn about deploying a Kubernetes cluster on different cloud platforms.
- You have the kubectl command line (kubectl CLI) installed. Learn about kubectl.
- You have Git installed.
- You have a domain name and the ability to configure a wildcard DNS record for that domain name. Learn about wildcard DNS records.
- You have an SSH key pair which you can use for repository commits. To generate a new SSH key pair, use PuTTYgen (Windows) or the ssh-keygen command (Linux and Mac OS X). Learn about PuTTYgen and ssh-keygen.
Step 1: Configure DNS and SSL for GitLab
As a first step, you must configure a domain name and SSL certificate for GitLab, such that browsing to the domain directs you to a secure page for your GitLab deployment. If you already have an SSL certificate for your domain, you can continue to use that or, if not, you can follow the approach below and generate a free Let’s Encrypt SSL certificate.
- Follow the instructions to configure a custom domain for GitLab.
- While logged in to the server console, manually generate and install a Let’s Encrypt certificate using lego as described in our guide.
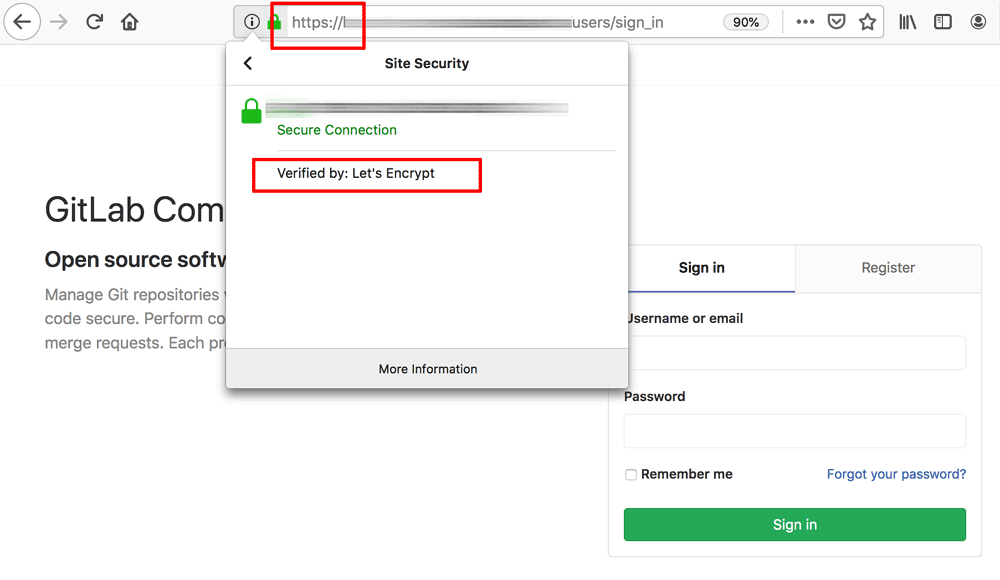
- Test the configuration by browsing to https://DOMAIN (replace the DOMAIN placeholder with the correct domain name) and confirming that you see a secure GitLab login page, as shown below:
Step 2: Configure and activate the GitLab registry
The next step is to activate the GitLab registry, as follows:
-
Log in to the server console using SSH (if you’re not already logged in).
-
Edit the /etc/gitlab/gitlab.rb file and uncomment and update the registry_external_url parameter as below, remembering to replace the DOMAIN placeholder with the GitLab domain name:
registry_external_url 'https://DOMAIN:5005' -
In the same file, uncomment and update the external_url parameter as below, replacing the DOMAIN placeholder with the GitLab domain name:
external_url 'https://DOMAIN' -
Save your changes to the file.
-
Configure the GitLab registry to use the SSL certificates generated in the previous step. Replace the DOMAIN placeholder with the GitLab domain name.
cd /etc/gitlab/ssl sudo ln -sf server.crt DOMAIN.crt sudo ln -sf server.key DOMAIN.key -
Execute the commands below to reconfigure and restart GitLab with the changes.
sudo gitlab-ctl reconfigure sudo /opt/bitnami/ctlscript.sh restart -
Open port 5005 in the server firewall so that GitLab can connect to, and push built containers, to its internal registry. Learn about opening firewall ports for your cloud platform.
Step 3: Create a new GitLab project
You can now log in to GitLab and prepare a new project. This project will host the code that you will eventually run through your CI/CD pipeline to build and deploy on Kubernetes.
- Browse to your GitLab domain and log in using the administrator credentials.
- On the welcome page, select the “Create a project” option.

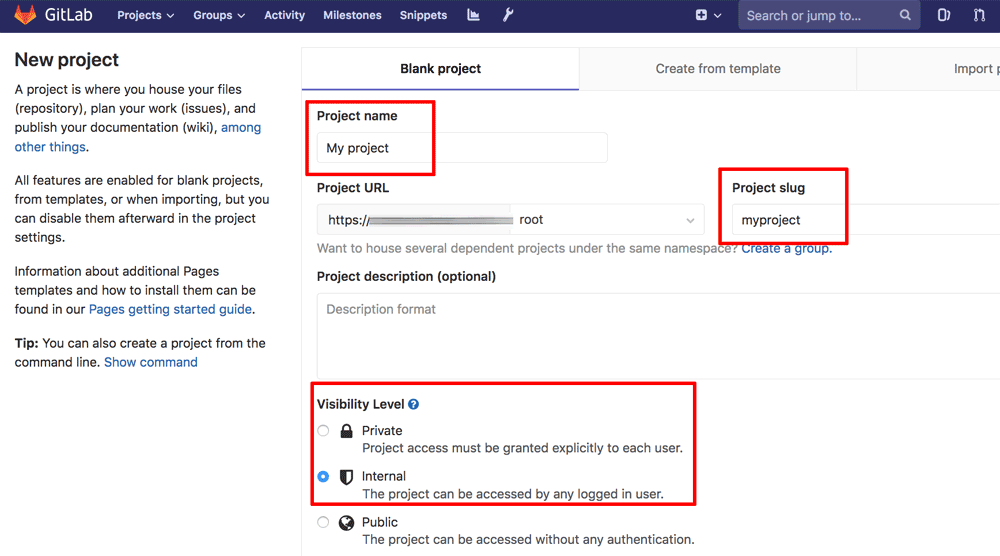
- Enter a name and slug for your project. Set the visibility level to “Internal”. Click “Create project”.
Your project is created and you should see the project page, as shown below:

Click the “Clone” button and note the clone URL for the repository, which will be needed in Step 6.

Before you can commit any code to the project repository, you must add your SSH key to your profile, as follows:
- Click your user profile icon in the top right corner of the navigation bar.
- Select the “Settings” menu icon.
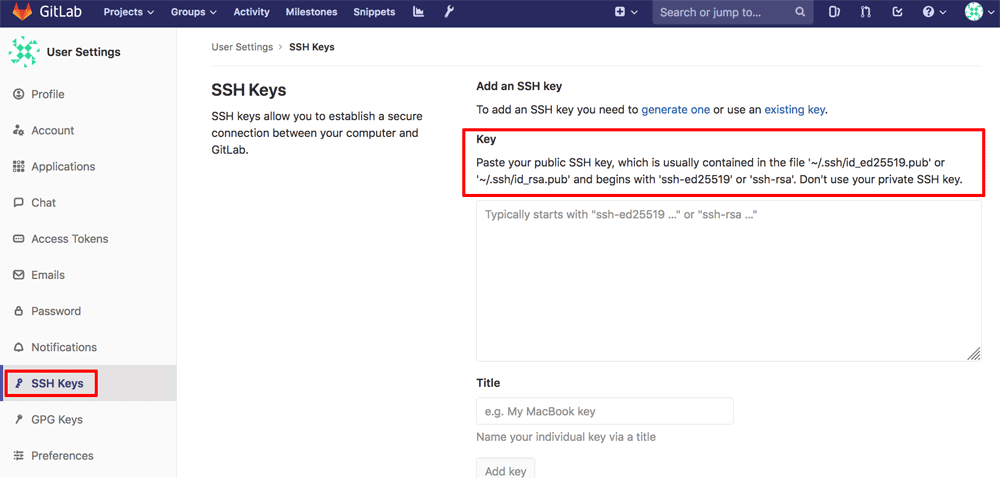
- On the “User Settings” page, select the “SSH Keys” menu item.
- Paste the public key component of your SSH key pair in the “Key” field. Add an optional label and click the “Add Key” button to save the changes.
Step 4: Configure a Kubernetes cluster for the project
GitLab comes with built-in support for Kubernetes, making it easy to build and test your projects using a Kubernetes cluster. Learn more about Kubernetes support in GitLab.
First, allow outbound requests from GitLab hooks and services, as follows:
- Navigate to the GitLab administration panel by selecting the “Admin Area” link.
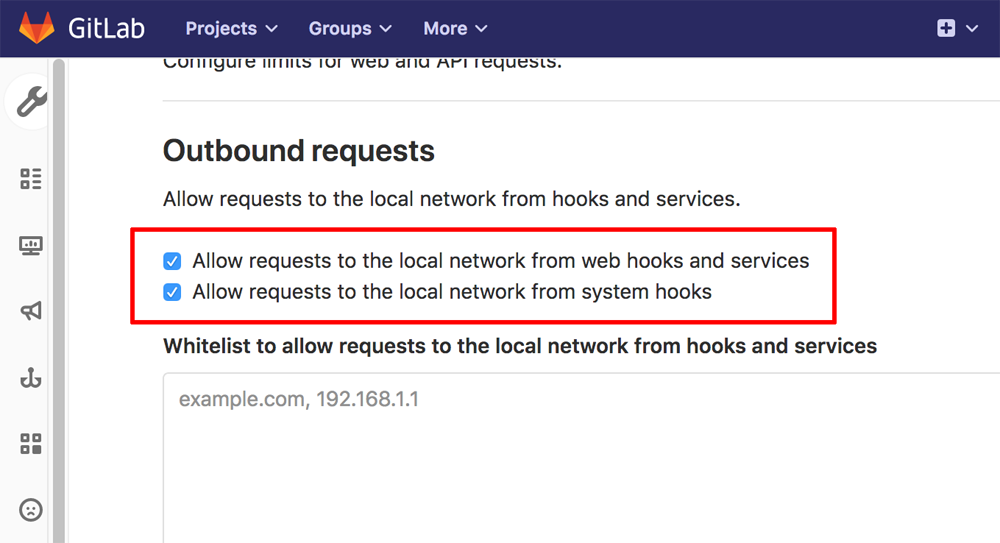
- Navigate to the “Settings -> Network” page and select the “Outbound requests” section.
- Tick the checkboxes to allow requests to the local network from hooks and services.
Then, configure your Kubernetes cluster in GitLab by following these steps:
- Use the kubectl command-line tool to obtain the following details for your Kubernetes cluster using the instructions in the GitLab documentation:
- Cluster API URL
- Cluster CA certificate
- Cluster service token
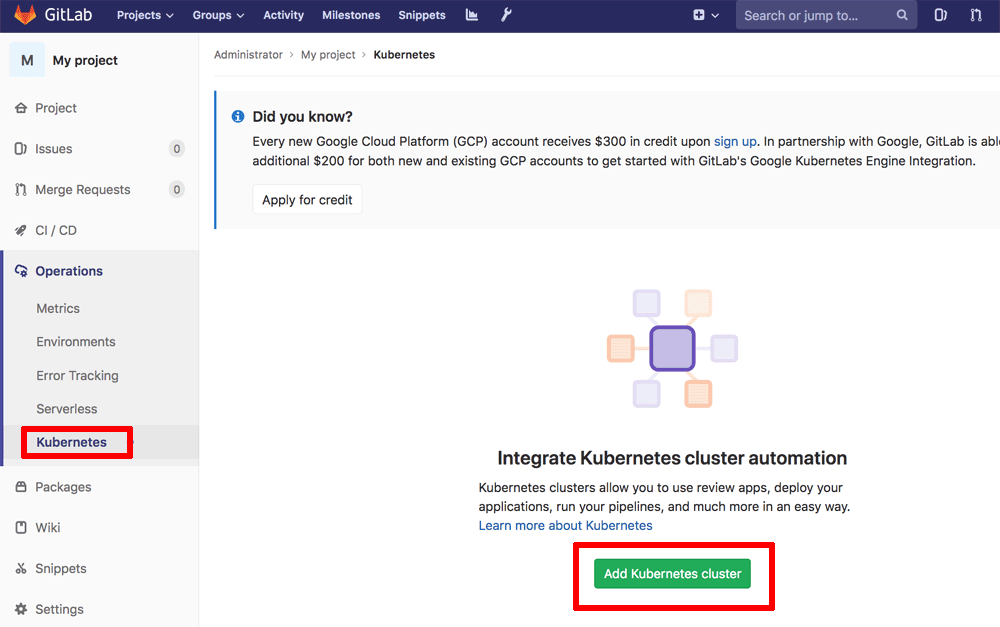
- From the project page in GitLab, select the “Operations -> Kubernetes” menu item.
- On the resulting page, click the “Add Kubernetes cluster” button.
- Select the “Add existing cluster” tab.
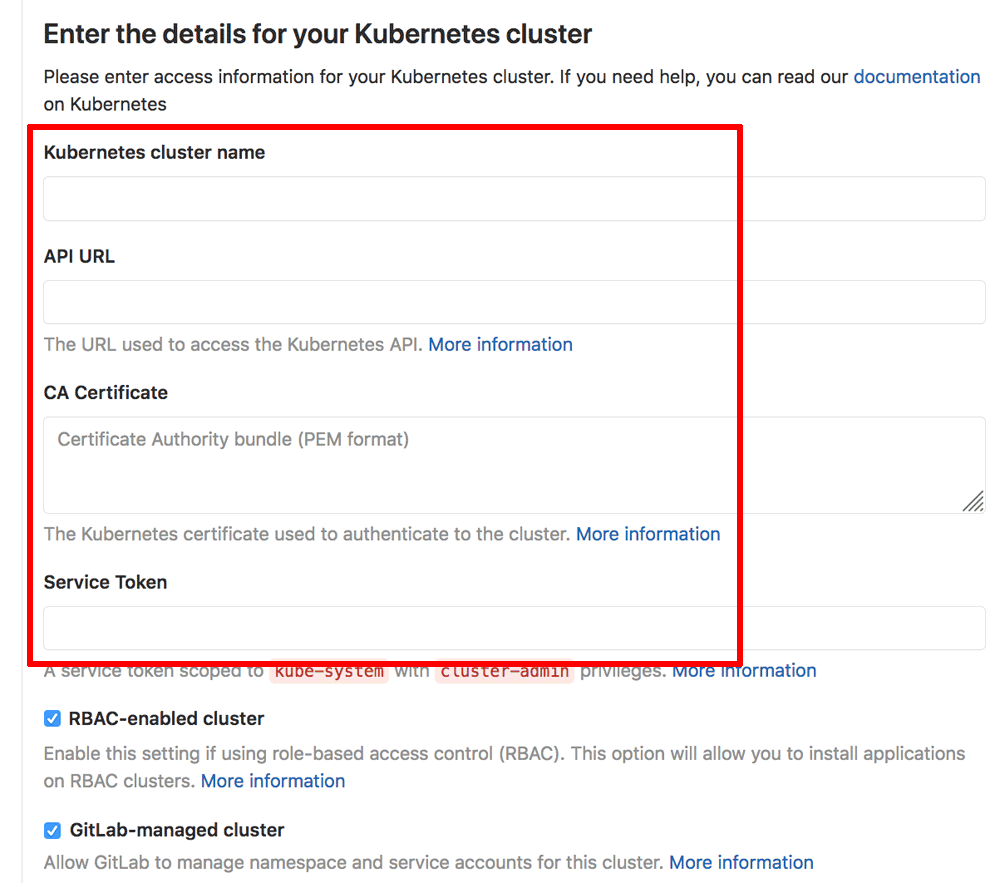
- Enter a name for your cluster with the API URL, CA certificate and server token obtained already. Check the boxes for “RBAC-enabled” cluster and “GitLab-managed cluster”.
- Click the “Add Kubernetes cluster” button to save the changes.
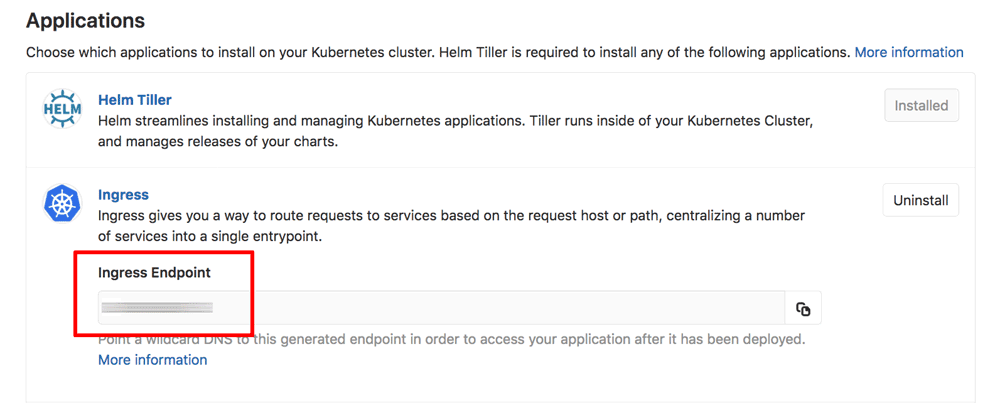
- On the resulting page, find the “Applications” section and install Helm, followed by Ingress. Note the Ingress endpoint IP address generated after installing Ingress.
- Configure a wildcard DNS record for your domain pointing to the Ingress IP address through your DNS provider’s control panel. Learn how to configure wildcard DNS records for popular DNS providers like GoDaddy, NameCheap and AWS Route53.
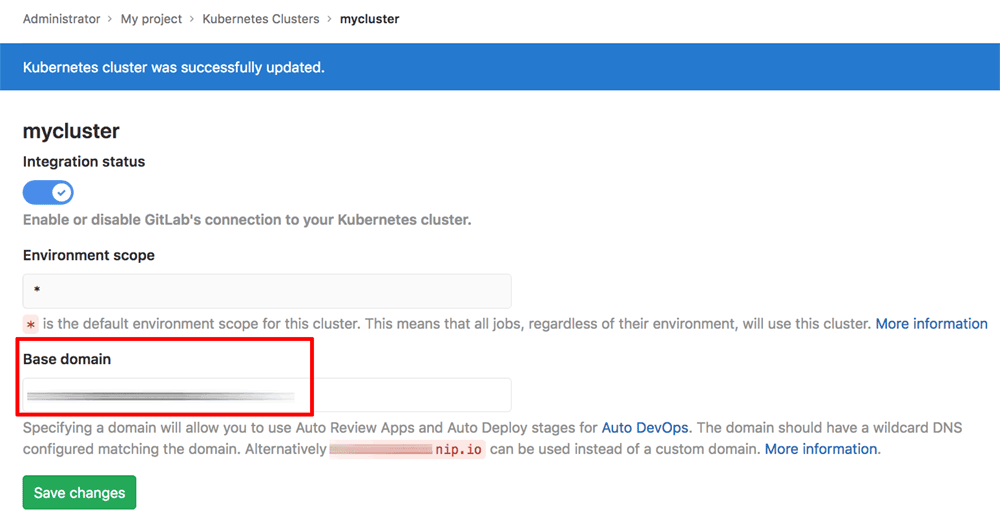
- Enter the base domain name used by the wildcard DNS record in the “Base domain” field in your GitLab Kubernetes cluster configuration. For example, if you configured a wildcard DNS record for *.example.com, use example.com as the base domain name. This will be the base domain used for all Auto DevOps review deployments. Click “Save changes” to save the changes.
- Return to the “Applications” section and install Cert-Manager. Remember to provide a valid email address so that Cert-Manager can correctly associate your certificates with your account.
- From the same “Applications” section, install GitLab Runner.
- Confirm that the runner is successfully installed and activated for the project by navigating to the project’s “Settings -> CI/CD” page and checking the status of the runner in the “Runners” section.

Step 5: Enable Auto DevOps for the project
Once the Kubernetes integration is complete and a runner is active, enable Auto DevOps for the project. Auto DevOps provides a preconfigured CI/CD pipeline which can be used to quickly get started with building, testing and deploying your project. Learn more about Auto DevOps in GitLab.
To enable Auto DevOps for the project:
- Navigate to the project’s “Settings -> CI/CD” page.
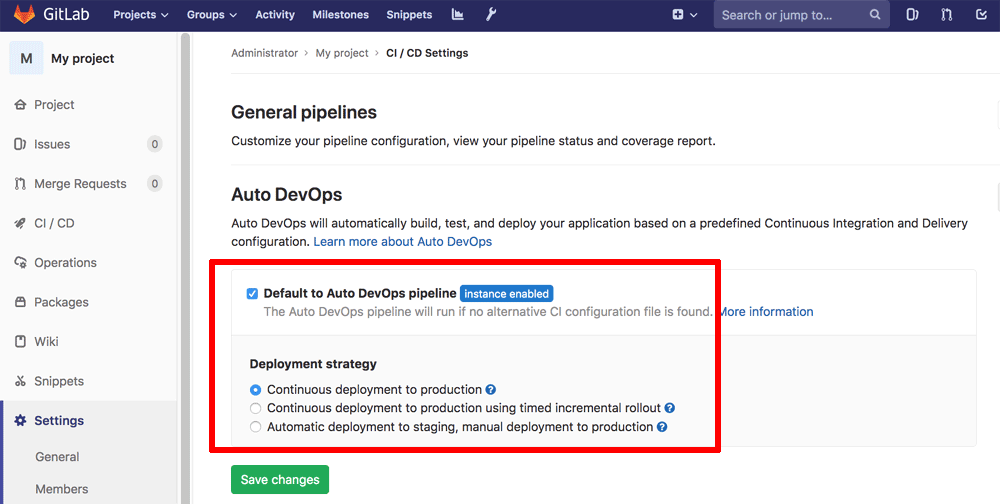
- In the “Auto DevOps” section, check the box for “Default to Auto DevOps pipeline” and select the “Continuous deployment to production” strategy.
- Click “Save changes” to enable the default pipeline.
The default Auto DevOps pipeline comes with various stages already configured, depending on which version of GitLab you are running. For example, there are stages to build, run tests, check code quality, scan for dependencies, review code, deploy code and test performance. This default pipeline is fully customizable and stages can be added or removed depending on your requirements, simply by adjusting pipeline variables. Learn about the available variables.
This tutorial will focus on creating a very simple pipeline consisting of only two stages: build and deploy. To turn off the other stages included in the default pipeline, follow these steps:
-
Navigate to the project’s “Settings -> CI/CD” page.
-
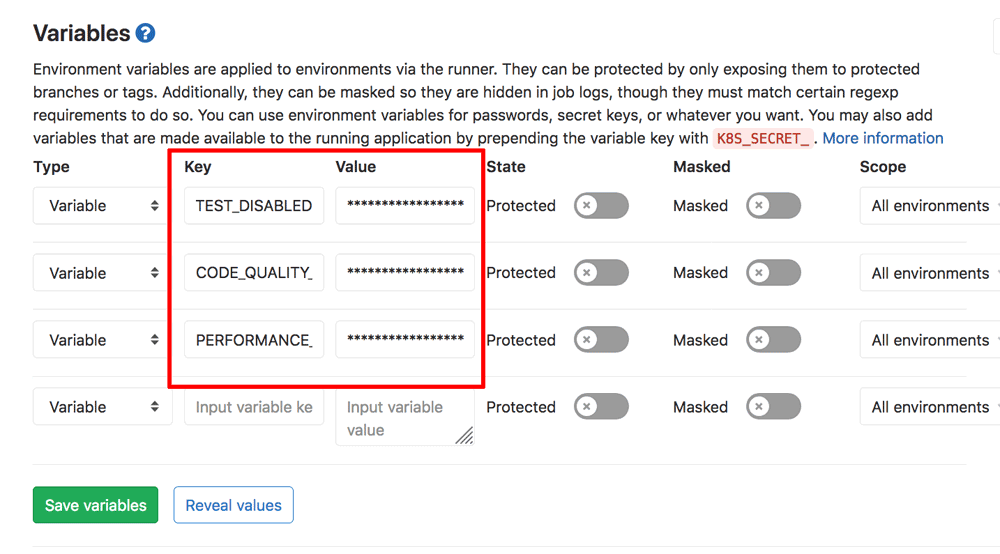
In the “Variables” section, add the following three variables and values:
TEST_DISABLED: true CODE_QUALITY_DISABLED: true PERFORMANCE_DISABLED: true -
Click “Save variables”.
Step 6: Commit, test and repeat
At this point, you are ready to commit some code to the project and have GitLab test and deploy it. This tutorial will create a simple “Hello, world” application in Node.js and then configure a Dockerfile to run it with Bitnami’s Node.js development container image.
Follow these steps:
-
Create a working directory for the application on your local host:
mkdir myproject cd myproject -
Create a package.json file listing the dependencies for the project:
{ "name": "simple-node-app", "version": "1.0.0", "description": "Node.js on Docker", "main": "server.js", "scripts": { "start": "node server.js" }, "dependencies": { "express": "^4.13" } } -
Create a server.js file for the Express application which returns a “Hello world” message on access:
'use strict'; const express = require('express'); // Constants const PORT = process.env.PORT || 3000; // App const app = express(); app.get('/', function (req, res) { res.send('Hello world\n'); }); app.listen(PORT); console.log('Running on http://localhost:' + PORT); -
Create a Dockerfile with the following content:
FROM bitnami/node:9 as builder
ENV NODE_ENV="production"

# Copy app's source code to the /app directory
COPY . /app

# The application's directory will be the working directory
WORKDIR /app

# Install Node.js dependencies defined in '/app/packages.json'
RUN npm install

FROM bitnami/node:9-prod
ENV NODE_ENV="production"
COPY --from=builder /app /app
WORKDIR /app
ENV PORT 5000
EXPOSE 5000

# Start the application
CMD ["npm", "start"]
This multi-stage Dockerfile creates a new image using Bitnami’s Node.js container image as base. It copies the application files to the container’s /app directory and then runs npm install to install Express. It then creates a production-ready container image and configures the application to listen to request on port 5000.
Note: Exposing the application on port 5000 is a requirement of GitLab’s default Helm chart, which is used to deploy the application to the cluster. This can be overridden if needed using a custom Helm chart. Read more in our tutorial on using a custom Helm chart with the Auto DevOps pipeline.
-
Initialize a Git repository and commit and push the application code to GitLab. Replace the NAME and EMAIL-ADDRESS placeholders with your name and email address (if not already configured) and the CLONE-URL placeholder with the repository clone URL obtained in Step 3.
git config --global user.name "NAME"
git config --global user.name "EMAIL-ADDRESS"
git init
git remote add origin CLONE-URL
git add .
git commit -m "Initial commit"
git push origin master
Pushing this commit should automatically trigger the Auto DevOps pipeline in GitLab. To see the pipeline in action, navigate to the project’s “CI/CD -> Pipelines” page and confirm that the pipeline is running, as shown below:

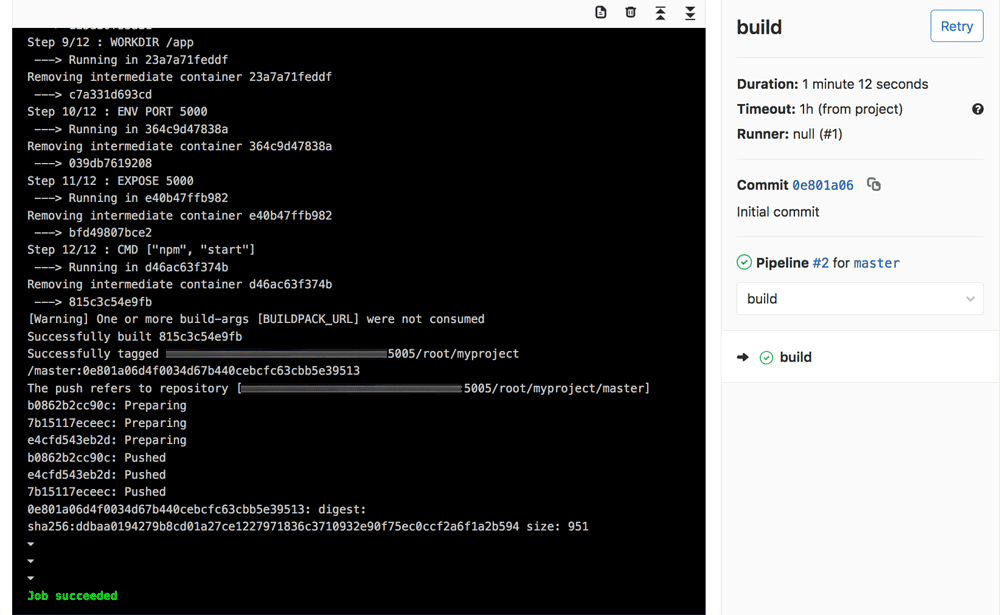
In the first stage, GitLab will attempt to build a container image containing the application code using the provided Dockerfile. The container will be pushed to the internal GitLab registry. Here’s an example of the output you should see in this first stage:
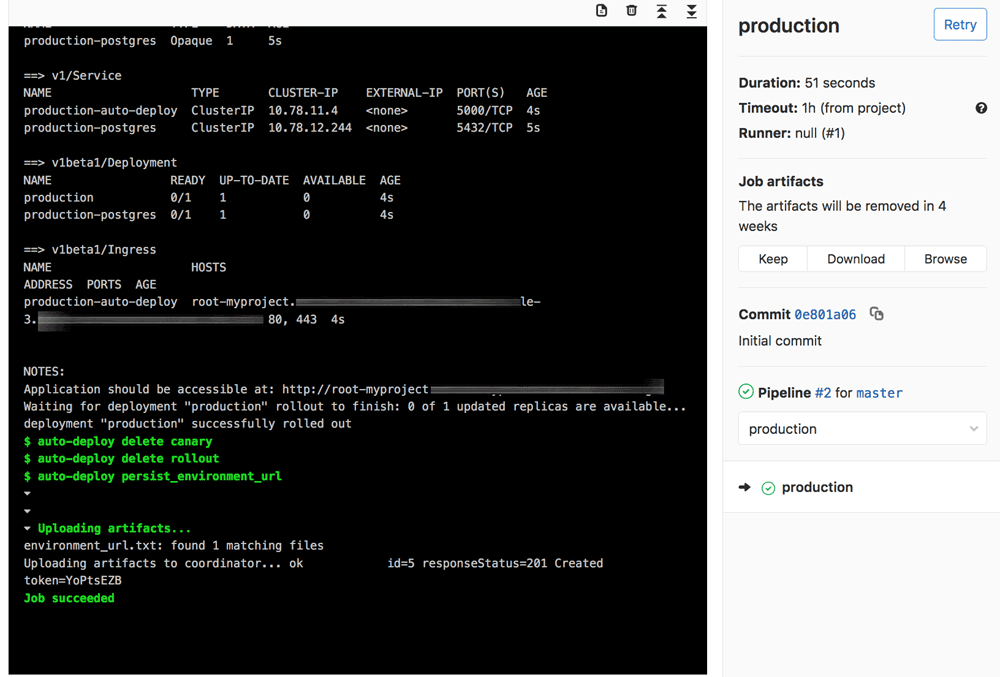
Once the container image has been built and pushed, the second stage of the pipeline will attempt to deploy it to Kubernetes for review. If successful, the stage output will display a URL, which you can browse to in order to see the application in action. Here’s an example of the output you should see in this second stage:
If you browse to the application URL listed in the output, you should see the output of the Node.js app, as shown below:

To test the CI/CD feature, make a change to the application - for example, update the message “Hello world” in the server.js file to “Aloha world” - and push the change to GitLab.
sed -i 's/Hello world/Aloha world/g' server.js
git add .
git commit -m "Modified message text"
git push origin master
The new commit should trigger the pipeline, causing a new build and deployment to take place, and the new application will be deployed on your cluster for review. As before, check pipeline status in GitLab, wait for it to complete and then browse to the application URL listed in the output of the second stage. You should see the revised output, as shown below:

At this point, you have successfully created a simple CI/CD pipeline between GitLab and a Kubernetes cluster. You can now continue to enhance it by adding new stages to the Auto DevOps pipeline, modifying how your code is deployed with a custom deployment Helm chart, or configuring pipelines to run on a schedule.
Useful links
To learn more about the topics discussed in this guide, use the links below:
- Bitnami GitLab CE stack documentation
- Bitnami Node.js container
- Bitnami applications FAQ.
- Bitnami documentation for Kubernetes deployments on different cloud platforms.
- GitLab documentation
- Wildcard DNS records.
- Key generation with PuTTYgen and ssh-keygen.