Building an API with Spring Boot
Brian McClain
Spring Boot is a framework built on top of Spring that focuses on allowing developers to quickly but safely build applications and microservices. It focuses on minimal configuration and “out-of-the-box” functionality. In just a few lines of code, a developer can have an application running on its own embedded web server. This guide will demonstrate how you can quickly build a microservice by building a REST API from scratch. You can also see the completed code on GitHub.
The Design
For this example, you’ll build an API to interact with an inventory system. The inventory tracks every item in a fictitious shop, along with the price and count of each item. Before writing the code, take a few moments to consider the design of the API. The design is, after all, the user experience for the developer, and ensuring it’s clear and simple is just as important as it is when building a frontend user interface.
If you’re familiar with the basics of REST, much of this should look pretty much as you would expect. If you’re a bit newer, or just want a refresher, make sure to check out Basics of REST, which discusses different aspects of REST such as verbs, status codes, and more. For this API, there will be just a handful of endpoints and verbs supported.
GET /items/{id}: The endpoint that likely first comes to mind is getting information about an item in the inventory. This endpoint will take in an item ID (for example,/items/1), look it up by that ID, and return all the relevant information about that specific item.GET /items: If providing an ID returns one item, explicitly omitting an ID could return all items. In a production application, a lot of care should be taken when implementing operations that return an entire database worth of content. It’s expensive to both gather that information from the database as well as transmit it to the requester. In this case, the database will only contain a few items, so it’s not too expensive to perform.POST /items: If you can get items from the inventory, you should probably also be able to create new items in the inventory. Here’s where proper and clear documentation really helps your developer,.as the existence of this endpoint alone does not tell them what they need to provide. In this case, the endpoint will take in a JSON object, and expect an item’s name, price, and count. The API will handle generating an ID for the new item.PUT /items/{id}: An inventory system would be pretty useless if you couldn’t change the price or count of any of the items. In this case, the endpoint expects a JSON object containing either the price, count, or both.DELETE /items/{id}: Not every product is carried forever. You could simply keep the count at zero, but to keep the inventory clean, deleting it from the database will prove to be useful.
With all of the endpoints planned out, we can now begin implementation!
Building the Application
One of the easiest ways to start a Spring Boot application is to use start.spring.io. It will allow you to define the configuration and choose the dependencies specific to your application, then generate all of the boilerplate that surrounds a Spring application. This application assumes that it will be built and run with Maven as well as the default choice of Java and Spring Boot version. What you choose for the group, artifact, name, and description fields doesn’t matter; what does matter is that you add the Spring Web dependency.
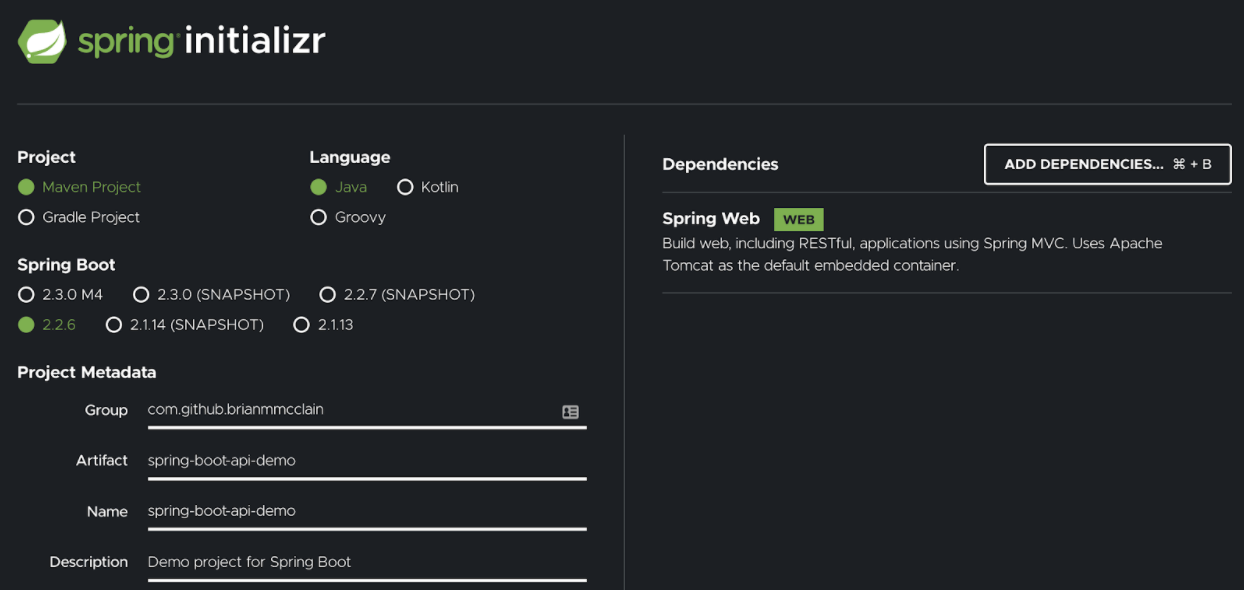
Once everything is configured, click Generate to download a ZIP file containing all of the code for your new project. Extract it and open it with your editor of choice, and you’ll find a handful of files. Most of these will be untouched since all of the code will be added to new files, but it’s important to see what’s generated out of the box.

Notably, the pom.xml file contains all of the configuration on what dependencies your code requires, as well as configuration on how to build it. SpringBootApiDemo.java is where your application will start; it contains the code to start everything a Spring application needs. In this example, you’ll be creating two files: one to define the Item object, and one to build the REST API.
The Item Object
The best place to start is by defining what an Item is. In the same directory as the SpringBootApiDemo.java file, create a new file named Item.java. Consider the code below for what this definition looks like:
public class Item {

  private final long id;
  private String name;
  private double price;
  private int count;

  public Item(long id, String name, double price, int count) {
      this.id = id;
      this.name = name;
      this.price = price;
      this.count = count;
  }

  public long getId() {
      return this.id;
  }

  public String getName() {
      return this.name;
  }

  public double getPrice() {
      return this.price;
  }

  public void setPrice(double price) {
      this.price = price;
  }

  public int getCount() {
      return this.count;
  }

  public void setCount(int count) {
      this.count = count;
  }

}
None of this code is specific to Spring, and in fact if you’re a Java developer, this is probably even routine. This code creates a new class with four fields (id, name, price, and count), a constructor, and a handful of getters and setters. Since the item ID and name will never be changed, only the price and count have setters.
The REST API
Now it’s time to build the API. In the same directory you’ve created the Item.java file, create one more file named InventoryController.java. This is the class that will be what’s referred to in Spring as a RestController. In fact, that’s the exact annotation you’ll add to your class to tell Spring that this is a RestController.
@RestController
public class InventoryController {
Before you can get into the API code, there’s one last thing you need to handle, and that’s how all of the items in the inventory are tracked. In a real application, this would mean connecting to a database as well as writing code to write to and read from that database. There are actually some great solutions provided by Spring for this as well, and if you’re interested in learning more, one great place to start is to read about Spring JPA. But, for the sake of simplicity, with this example the inventory is managed in-memory in an ArrayList collection.
ArrayList<Item> inventory = new ArrayList<Item>(
    Arrays.asList(
        new Item(1, "Keyboard", 29.99, 76),
        new Item(2, "Mouse", 19.99, 43),
        new Item(3, "Monitor", 79.99, 7),
        new Item(4, "PC", 749.99, 2),
        new Item(5, "Headphones", 19.99, 14)
));
To prevent writing the same code to look up items by ID over and over, there’s one helper method you can put together:
private Item findItem(Long id) {
  // Search the list of items for the item of interest.
  // If the item does not exist, return null;
  return inventory.stream()
      .filter(i -> id.equals(i.getId()))
      .findAny()
      .orElse(null);
}
This code uses the Java Stream interface to iterate over all the items in the ArrayList, returning the Item that it matches by the ID. If no item with the given ID is found, it instead returns null.
Get All Of The Items
With this helper code complete, it’s time to start building the actual API! Since there’s already a collection of items in an inventory, why not start by implementing the GET /items endpoint to get all of the items?
@GetMapping("/items")
public ArrayList<Item> getInventory() {
    // Spring Boot will handle the serialization of the ArrayList
    // to a JSON array, so we can return the list directly.
    return inventory;
}
There are two things to note here.. First, this code explicitly tells Spring that it’s the code to run when a GET request is sent to /items by annotating this method with @GetMapping(“/items”). Second, you’ll notice there’s no code to serialize the ArrayList that is our inventory. Spring will see that it’s an ArrayList of Item object, inspect all of the fields that are defined in an Item, and then send a response containing a JSON array. This code alone is enough to start sending requests and getting responses if you’d like to see it in action for yourself. Since this code was generated with Maven in mind, it can be run with:
./mvnw spring-boot:run
In a few moments, the application will be up and running, and you can try out the new endpoint:
$ curl localhost:8080/items

[{"id":1,"name":"Keyboard","price":29.99,"count":76},{"id":2,"name":"Mouse","price":19.99,"count":43},{"id":3,"name":"Monitor","price":79.99,"count":7},{"id":4,"name":"PC","price":749.99,"count":2},{"id":5,"name":"Headphones","price":19.99,"count":14}]
Congratulations! You’ve just built your first REST endpoint using Spring Boot! There’s a few more to implement, but luckily you’ll see the more complicated endpoints aren’t much harder than this one.
Get An Individual Item
Next, take a look at the GET /items/{id} endpoint. This endpoint will return a single item if it exists, or a 404 if it does not exist.
@GetMapping("/items/{id}")
public Item getItem(@PathVariable("id") Long id) {
    Item item = findItem(id);

    if (item == null) {
        // If the item does not exist, return 404
        throw new ResponseStatusException(HttpStatus.NOT_FOUND, "Item Not Found");
    } else {
        return item;
    }

}
Much like the previous endpoint, note the @GetMapping annotation, this time with a templated piece in the path ({id}). This is mapped to an argument in the Java method using one more annotation, @PathVariable(“id”) Long id, which is how Spring will match up the variable data in the request path to the variable in the code. After that, it will call the handy findItem helper method defined previously to look up the ID that the user provides. If the item that’s returned is null, then the code will return 404 by throwing a ResponseStatusException. Otherwise, the code returns an Item object directly. Much like in the previous endpoint, Spring will observe the fields of the Item class to figure out how to serialize it and send the response as a JSON object. Try restarting your code and trying the request out:
$ curl localhost:8080/items/1

{"id":1,"name":"Keyboard","price":29.99,"count":76}
Creating A New Item
So, now you can get the items from the inventory. But what if you want to add a new item? You’ll need some information from the developer, such as the item name.
@PostMapping("/items")
@ResponseStatus(HttpStatus.CREATED)
public Item createItem(@RequestBody Item req) {
    // Since item IDs cannot be changed, generated a new ID, create a new item, add it to the
    // inventory, and then return the new item.
    Long newID = inventory.get(inventory.size() - 1).getId() + 1;
    Item newItem = new Item(newID, req.getName(), req.getPrice(), req.getCount());
    inventory.add(newItem);
    return newItem;
}
If a GET request uses the @GetMapping annotation, then a POST request uses the @PostMappint annotation. Since this is responding to a different HTTP verb, there’s no issue mapping to the same path that was mapped to earlier. There’s one new annotation for the method arguments:
@RequestBody Item req
The @RequestBody annotation tells Spring that we want to load the body of the POST request into the req variable, and that it should expect an object that can be deserialized to an Item object. This is another nice feature of Spring, where this translation between JSON and Java objects is automatically handled for you. The rest of the code creates a new Item (since IDs cannot be changed), saves it to the inventory, and returns the newly created object. Once again, restart your application and give it a try:
$ curl -XPOST http://localhost:8080/items -H "Content-Type: application/json" -d '{"name": "Speakers", "price": 49.99, "count": 30}'

{"id":6,"name":"Speakers","price":49.99,"count":30}
This cURL request specifically sets the Content-Type header to let our application know that it’s being sent JSON, so make sure your client of choice is doing the same.
Update An Existing Item
What good is an inventory system that can’t update the count of an item in an inventory? Take a look at the PUT /items/{id} method. Unlike the POST request, this PUT request tells our REST API that we want to update an existing item:
@PutMapping("/items/{id}")
public Item updateItem(@PathVariable("id") Long id, @RequestBody Map<String, String> req) {
    Item item = findItem(id);

    if (item == null) {
        // If the item does not exist, return 404
        throw new ResponseStatusException(HttpStatus.NOT_FOUND, "Item Not Found");
    } else {
        // Item exists, so update an existing one
        // Iterate over the POSTed JSON fields
        for (String k : req.keySet()) {
            // Update the items price if a price field is provided
            if (k.equals("price")) {
                item.setPrice(Double.parseDouble(req.get(k)));
            // Update the items count if a count field is provided
            } else if (k.equals("count")) {
                item.setCount(Integer.parseInt(req.get(k)));
            }
        }

        // Return the updated item
        return item;
    }
}
As you might have guessed, since this is responding to a PUT call, this method has the @PutMapping(“/items/{id} annotation. The arguments for this method also combine what we’ve seen in two different endpoints, with the @PathVariable annotation pulling the id from the request path, and the @RequestBody annotation pulling the request body. You’ll also notice that the request body is being read as a Map<String, String> this time. You could also read this as an Item object, but remember that you don’t know if the request will define a price, a count, or both. Instead, Spring will read in the JSON as a Map, with both keys and values of type String.
As with the item lookup, if the item doesn’t even exist, a 404 is returned. Otherwise, the code will inspect each key of the Map<String, String> object, and if it finds a key of either price or count, it will update the item that it looked up using the id provided in the request path. Finally, the newly updated item is returned back to the requester. Give it a try for yourself by getting an item, updating, and getting it again to make sure the changes took place:
$ curl http://localhost:8080/items/1
{"id":1,"name":"Keyboard","price":29.99,"count":76}

$ curl -XPUT http://localhost:8080/items/1 -d '{"count": 175, "price": 27.99}' -H "Content-Type: application/json"
{"id":1,"name":"Keyboard","price":27.99,"count":175}

$ curl http://localhost:8080/items/1
{"id":1,"name":"Keyboard","price":27.99,"count":175}
Deleting An Item
All that remains is the DELETE /items/{id} endpoint. This code is actually a bit simpler, as you’ll see:
@DeleteMapping("/items/{id}")
public void deleteItem(@PathVariable("id") Long id) {
    Item item = findItem(id);

    if (item == null) {
        // If the item does not exist, return 404
        throw new ResponseStatusException(HttpStatus.NOT_FOUND, "Item Not Found");
    } else {
        // If the item exists, delete it from the list
        inventory.remove(item);
    }
}
Continuing the trend, this method has the @DeleteMapping(“/items/{id}”) annotation, and maps the id variable in the request path to the id variable in the method arguments. It looks up the item and returns 404 if it doesn’t exist, and if it does, it deletes it from the inventory. One slight difference is that this method doesn’t return anything. By default, if a method in a RestController doesn’t have a return type, the HTTP request will return a 200 status code and an empty body. Give this a shot and see the two different responses you get if you send the same request twice:
$ curl -v -XDELETE http://localhost:8080/items/1
...
< HTTP/1.1 200
...

$ curl -v -XDELETE http://localhost:8080/items/1
...
< HTTP/1.1 404
...
The output has been truncated to be easier to read, but as expected, the first request returned 200 and the second returned 404 since the item had already been deleted.
Testing The Application
You should also be able to test your code, right? Luckily, Spring Boot provides a great way to test the REST APIs that you build. Take a look at the HttpRequestsTest.java file. In this example it’s located in the /src/test/java/com/github/brianmmcclain/springbootapidemo directory, but that will depend on what values you used when generating your code.
The first thing to do is to tell Spring that this class contains tests, as well as to set up MockMvc to mock the HTTP requests and bypass the need to set up the actual web tier to run the tests.
@SpringBootTest
@AutoConfigureMockMvc
public class HttpRequestsTest {

   @Autowired
   private MockMvc mockMvc;
MockMvc is used to perform the actual tests. Take a look at the test for the GET /items endpoint:
@Test
public void getInventoryShouldReturnAllItems() throws Exception {
    this.mockMvc.perform(get("/items"))
    .andExpect(status().isOk())
    .andExpect(jsonPath("$").isArray())
    .andExpect(jsonPath("$.length()").value(5));
}
These tests are fairly verbose, which helps make clear exactly what the tests are checking. This one sends a GET request to /items and ensures that the response is a JSON Array with a length of 5. Consider another one that’s more complicated and take a look at the test for POST /items.
@Test
public void postWithoutIdShouldCreate() throws Exception {
    this.mockMvc.perform(post("/items")
        .contentType(MediaType.APPLICATION_JSON)
        .content("{\"name\": \"Speakers\", \"price\": 39.99, \"count\": 33}"))
        .andExpect(status().isCreated())
        .andExpect(jsonPath("$.id").value(6))
        .andExpect(jsonPath("$.name").value("Speakers"))
        .andExpect(jsonPath("$.price").value(39.99))
        .andExpect(jsonPath("$.count").value(33));
}
This test will send a POST to /items with the data "{"name": "Speakers", "price": 39.99, "count": 33}", setting the Content-Type header to application/json. It will then ensure that the response has a status code of 201 (with status().isCreated(), which is equal to 201), as well as check that all the fields that are returned are what you would expect.
Keep learning
The Spring website has some great guides on writing RESTful APIs with Spring Boot as well as a more in-depth look at Testing the Web Layer, which are wonderful next steps. If you’re new to REST APIs, make sure to check out the Basics of REST.