Deploy a REST API on Kubernetes with Bitnami’s Helm Charts
Vikram Vaswani
In the first part of this series, you developed and integrated a sample REST API with a MongoDB database running on your local system. In this second and concluding part, you will transition your API from your local system to a Kubernetes environment, thereby making it available to a wider audience for review, test and usage.
To achieve this, you will use the following Helm charts and containers:
-
Bitnami’s Node.js Helm chart, which lets you quickly deploy a Node.js application on Kubernetes.
-
Bitnami’s MongoDB Helm chart, which gives you a fully-functional, secure and replicated MongoDB database cluster on Kubernetes.
As with container images, Bitnami’s Helm charts are secure and packaged according to current best practices, so you can use them immediately with your preferred Kubernetes provider or environment.
Assumptions and Prerequisites
This guide makes the following assumptions:
- You have a Docker environment installed and configured. Learn more about installing Docker.
- You have a Docker Hub account. Register for a free account.
- You have a Kubernetes cluster running with Helm v3.x and kubectl installed. Learn more about getting started with Kubernetes and Helm using different cloud providers.
- You have a basic understanding of Node.js and REST API concepts. Learn more about Node.js and REST APIs.
Step 1: Deploy a MongoDB service on Kubernetes
The first step is to deploy MongoDB on your Kubernetes cluster. The easiest way to do this is with Bitnami’s MongoDB Helm chart, which gives you a ready-to-use deployment with minimal effort and within a few minutes.
Use the commands below to deploy MongoDB on your Kubernetes cluster. If you wish, you can also replace the database name and credentials shown below with your own values, but make a note of them as you will need them in subsequent steps.
helm repo add bitnami https://charts.bitnami.com/bitnami
helm install mongodb bitnami/mongodb --set mongodbRootPassword=root --set mongodbUsername=myapp --set mongodbPassword=myapp --set mongodbDatabase=mydb --set replicaSet.enabled=true
The parameters passed to the chart define the MongoDB administrator password and also create a new database named mydb with corresponding user credentials.
Wait for the deployment to complete before proceeding to the next step.
Step 2: Adapt the application source code
Next, you must adapt your application’s source code to read MongoDB connection parameters from the Kubernetes environment. This is a necessary prelude to deploying the application with Bitnami’s Node.js Helm chart.
Edit the myapp/config/datastores.js file and modify the default data store entry to look like this:
default: {
  adapter: 'sails-mongo',
  url: "mongodb://" + process.env.DATABASE_USER + ":" + process.env.DATABASE_PASSWORD + "@" + process.env.DATABASE_HOST + "/" + process.env.DATABASE_NAME
}
These values will be injected into the application’s environment by the Helm chart at deployment time.
Bitnami’s Node.js Helm chart starts the application using the npm start command. By default, this will start the Sails application in production mode. Since this is a development deployment, modify the application’s package.json file so that the start command looks like this:
{
  ...
  "scripts": {
    "start": "node app.js",
  ...
  }
}
Step 3: Create and publish a Docker image of the application
Bitnami’s Node.js Helm chart has the ability to pull a container image of your Node.js application from a registry such as Docker Hub. Therefore, before you can use the chart, you must create and publish a Docker image of the application by following these steps:
-
Create a file named Dockerfile in the application’s working directory, and fill it with the following content:
FROM bitnami/node:13

# Copy the application code
COPY . /app

# Set working directory
WORKDIR /app

# Create a non-root user
RUN useradd -r -u 1001 -g root nonroot
RUN chown -R nonroot /app
USER nonroot

# Set the application port to 3000
ENV PORT="3000"

# Start the application
CMD ["node", "app.js"]
This Dockerfile uses the Bitnami Node.js 13.x development image to copy the application files from the current directory. It also creates a non-root user account that the application will run under. For security reasons, it’s recommended to always run your application using a non-root user account. Finally, it sets the application to run on port 3000 (the default port expected by the Bitnami Node.js Helm chart) and starts the Node.js server.
Note: The Dockerfile used above produces a development image which contains additional development tools and dependencies. For production scenarios, you should instead use Bitnami’s Node.js 13.x production image with a multi-stage build process, as described in this tutorial on creating a production-ready image of a Node.js application.
-
Build the image using the command below. Replace the DOCKER-USERNAME placeholder in the command below with your Docker account username.
docker build -t DOCKER-USERNAME/myapp:1.0 .The result of this command is a development image containing the application, the Node.js runtime and all the related dependencies and development tools.
-
Log in to Docker Hub and publish the image. Replace the DOCKER-USERNAME placeholder in the command below with your Docker account username.
docker login
docker push DOCKER-USERNAME/myapp:1.0
Step 4: Deploy the REST API on Kubernetes
By default, Bitnami’s Node.js Helm chart installs its own preconfigured MongoDB service. While this is useful in some scenarios, it must be disabled in this case, as you will be connecting your Node.js application to the MongoDB deployment created in Step 1. When disabling this default behavior, it is mandatory to pass the chart, as alternative, a Kubernetes secret containing the details of the MongoDB deployment it should use.
Follow the steps below to create the Kubernetes secret.
-
Obtain the cluster IP address of the MongoDB deployment created in Step 1:
kubectl get svc | grep mongodb -
Create a Kubernetes secret containing the MongoDB service’s IP address, port, database name and access credentials. Replace the MONGODB-IP-ADDRESS placeholder with the cluster IP address obtained from the previous command. If you used different database credentials or values when deploying the chart in Step 1, replace the values shown below appropriately.
kubectl create secret generic my-mongodb --from-literal=host=MONGODB-IP-ADDRESS --from-literal=username=myapp --from-literal=password=myapp --from-literal=database=mydb --from-literal=port=27017This will create a Kubernetes secret named my-mongodb with the values needed for the Helm chart to successfully integrate with the MongoDB deployment.
-
Deploy the REST API using Bitnami’s Node.js Helm chart and the MongoDB secret. Replace the DOCKER-USERNAME placeholder in the command below with your Docker account username.
helm install node bitnami/node \
  --set image.repository=DOCKER-USERNAME/myapp \
  --set image.tag=1.0 \
  --set getAppFromExternalRepository=false \
  --set mongodb.install=false \
  --set externaldb.secretName=my-mongodb \
  --set service.type=LoadBalancer
Let’s take a closer look at this command:
- The service.type=LoadBalancer parameter makes the application available at a public IP address.
- The getAppFromExternalRepository=false parameter controls whether the chart will retrieve the application from an external repository. In this case, since the application is already published as a container image, such retrieval is not necessary.
- The image.repository and image.tag parameters tell the chart which container image and version to pull from the registry. The values assigned to these parameters should match the image published in Step 3.
- The mongodb.install=false parameter disables the built-in MongoDB chart, and the externaldb.secretName parameter names the secret holding details of the alternate MongoDB deployment to use.
-
Wait for the deployment to complete. Obtain the public IP address of the load balancer service:
kubectl get svc | grep node
Step 5: Test the REST API
Your REST API is now deployed on Kubernetes. You can proceed to test it by sending it various types of HTTP requests and inspecting the responses. Replace the SERVICE-IP-ADDRESS placeholder in the commands below with the public IP address of the load balancer service obtained at the end of the previous step.
-
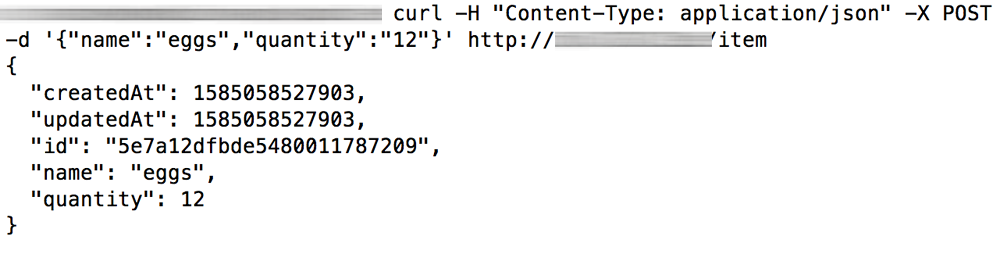
Send a POST request to the API to create a new item record:
curl -H "Content-Type: application/json" -X POST -d '{"name":"eggs","quantity":"12"}' http://SERVICE-IP-ADDRESS/itemYou should see output similar to that shown below:
-
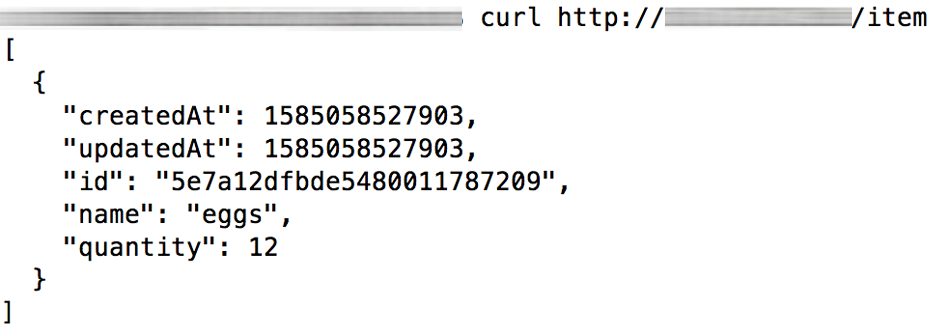
Check if the item record was created with a GET request:
curl http://SERVICE-IP-ADDRESS/itemYou should see output similar to that shown below:
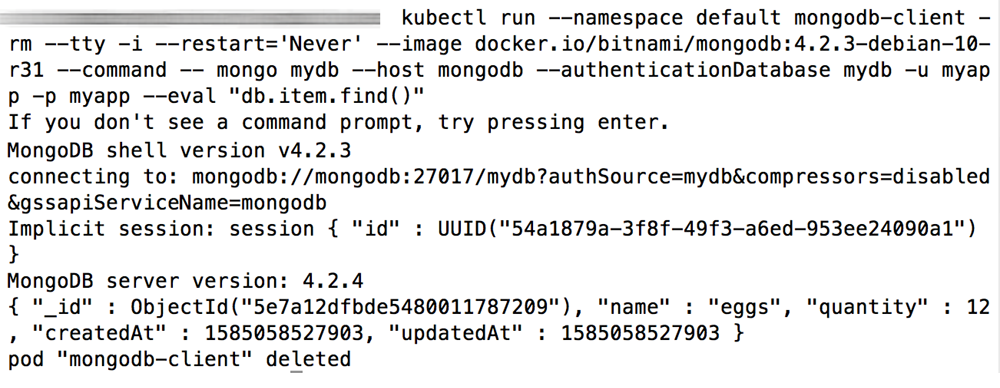
You can also connect to the MongoDB deployment on Kubernetes to confirm that the record exists. If you used different database credentials or values when deploying the chart in Step 1, replace the values shown below appropriately.
kubectl run --namespace default mongodb-client --rm --tty -i --restart='Never' --image docker.io/bitnami/mongodb:4.2.3-debian-10-r31 --command -- mongo mydb --host mongodb --authenticationDatabase mydb -u myapp -p myapp --eval "db.item.find()"You should see output similar to that shown below:
Your Node.js REST API is now running on Kubernetes and available for public review. You can now continue adding features to your API, upgrading the application and scaling out the database using normal Kubernetes procedures, which you can learn more about in our tutorial on deploying, scaling and upgrading applications on Kubernetes.
Note: As you continue developing and deploying your REST API, consider using a tool like Skaffold, which continuously monitors your application source code and deploys the latest version automatically on Kubernetes. Learn more about building a continuous development pipeline for a Node.js application with Skaffold.