Microservices with Spring Cloud Kubernetes Reference Architecture
Andriy Kalashnykov
This Reference Architecture demonstrates design, development, and deployment of Spring Boot microservices on Kubernetes. Each section covers architectural recommendations and configuration for each concern when applicable.
High-level key recommendations:
- Consider Best Practices in Cloud Native Applications and The 12 Factor App
- Keep each microservice in a separate Maven or Gradle project
- Prefer using dependencies when inheriting from parent project instead of using relative path
- Use Spring Initializr a web application that can generate a Spring Boot project structure, fill in your project details, pick your options, and download a bundled up project
This architecture demonstrates a complex Cloud Native application that addresses following concerns:
- Externalized configuration using ConfigMaps, Secrets, and PropertySource
- Kubernetes API server access using ServiceAccounts, Roles, and RoleBindings
- Health checks using Application Probes
- readinessProbe
- livenessProbe
- startupProbe
- Reporting application state using Spring Boot Actuators
- Service discovery across namespaces using DiscoveryClient
- Exposing API documentation using Swagger UI
- Building a Docker image using best practices
- Layering JARs using the Spring Boot plugin
- Observing the application using Prometheus exporters
Reference Architecture
The reference architecture demonstrates an organization where each unit has its own application designed using a microservices architecture. Microservices are exposed as REST APIs utilizing Spring Boot in an embedded Tomcat server and deployed on Kubernetes.
Each microservice is deployed in its own namespace. Placing microservices in separate namespaces allows logical grouping that makes it easier to manage access privileges by assigning them only to a team responsible for a particular application. Spring Cloud Kubernetes Discovery Client makes internal communication between microservices seamless. It communicates with the Kubernetes API to discover the IPs of all services, running in Pods.
The application implemented in this Reference Architecture is built with several open source components, commonly found in most Spring Boot microservices deployments. These include:
-
Spring Cloud Kubernetes: Provides integration with the Kubernetes API server to allow service discovery, configuration and load balancing used by Spring Cloud.
-
Spring Cloud: provides tools for developers to quickly build common patterns in distributed systems.
- OpenFeign - Java to HTTP client binder
- Ribbon (via Kubernetes services) - client-side load balancing in calls to another microservice
- Zuul - routing and filtering requests to a microservice
- Sleuth - a distributed tracing tool
- Swagger - a set of open-source tools built around the OpenAPI Specification that can design, build, document and consume REST APIs
- Swagger UI - provides interaction and visualization of API resources without writing custom logic.
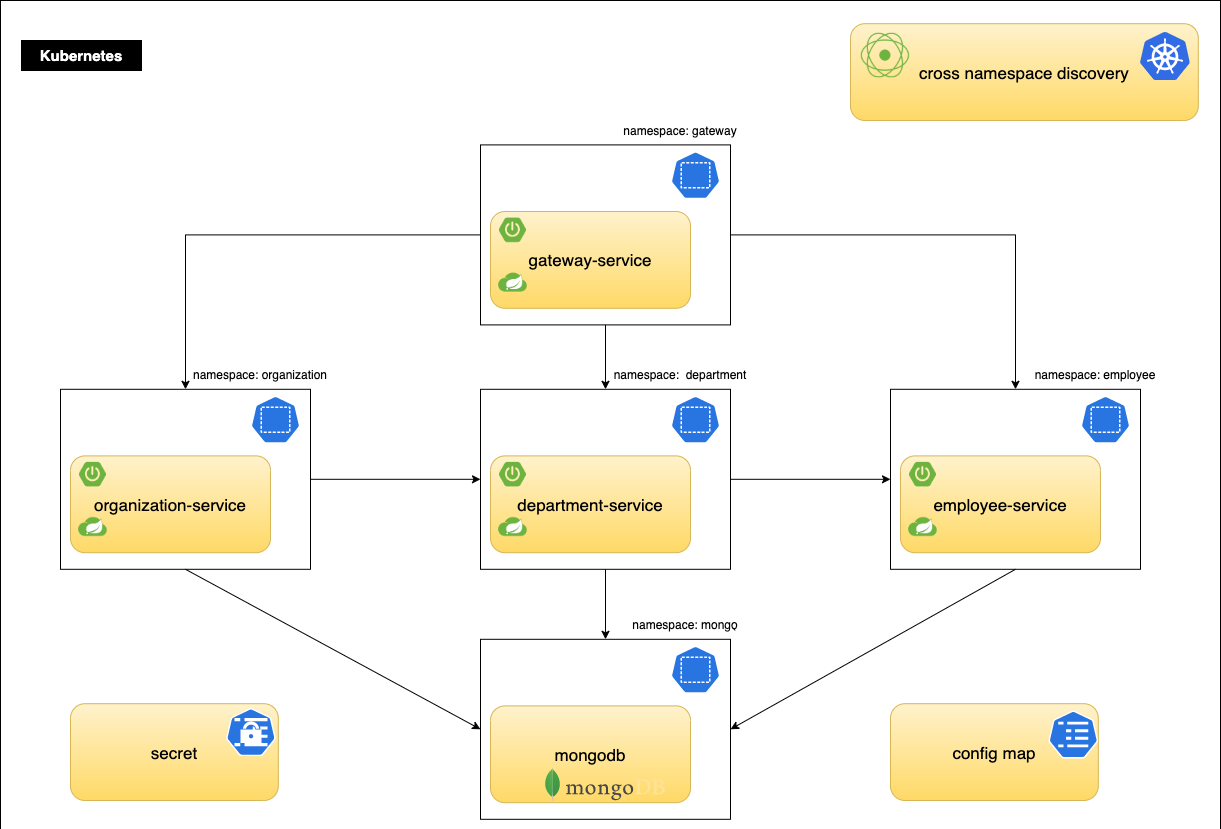
Reference Architecture Environment
Each microservice runs in its own container, one container per pod and one pod per service replica. The application is built using a microservices architecture and represented by replicated containers calling each other.
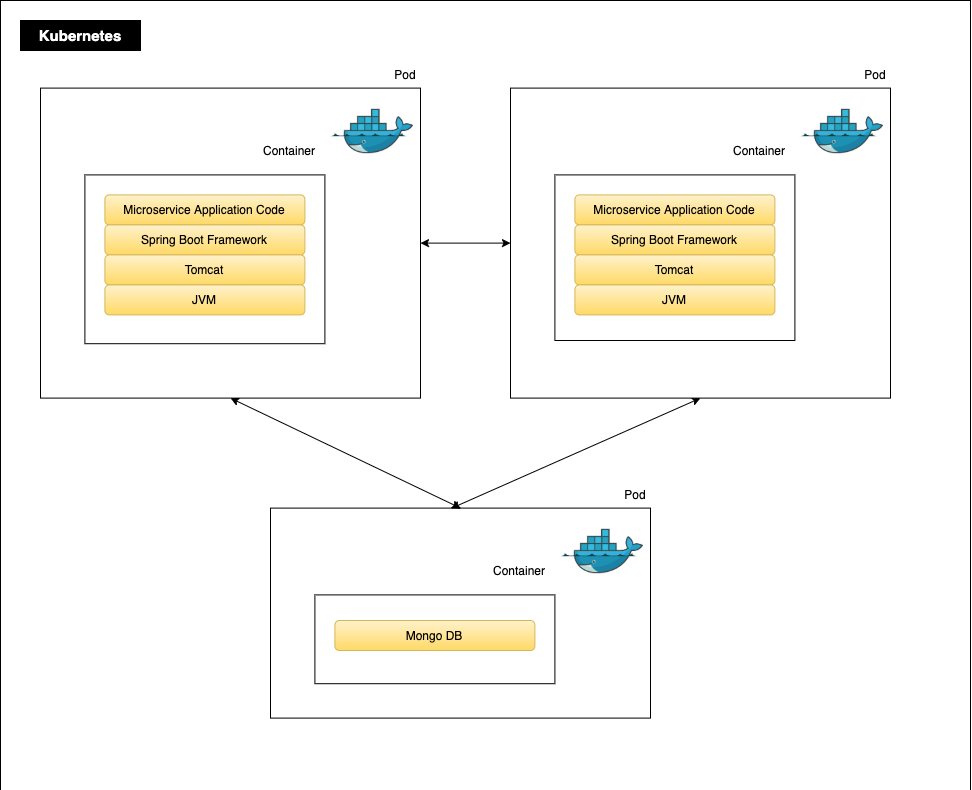
Spring Cloud Kubernetes
Spring Cloud Kubernetes provides Spring Cloud implementations of common interfaces that consume Kubernetes native services. Its objective is to facilitate integration of Spring Cloud and Spring Boot applications running inside Kubernetes.
Spring Cloud Kubernetes integrates with the Kubernetes API and allows service discovery, configuration, and load balancing. This Reference Architecture demonstrates the use of the following Spring Cloud Kubernetes features:
- Discovering services across all namespaces using the Spring Cloud DiscoveryClient
- Using ConfigMap and Secrets as Spring Boot property sources with Spring Cloud Kubernetes Config
- Implementing health checks using Spring Cloud Kubernetes pod health indicator
Get source code
The sample application’s source code is located at
git@github.com:AndriyKalashnykov/spring-microservices-k8s.git and is available
under the master branch.
Run the following command to clone the repository:
git clone git@github.com:AndriyKalashnykov/spring-microservices-k8s.git
cd spring-microservices-k8s
git checkout tags/1.0.1
Source Code Directory Structure
The application’s source code is structured as follows:
$ tree -d -L 2
.
├── department-service    # department microservice project
│   └── src
├── employee-service      # employee microservice project
│   └── src
├── gateway-service       # gateway project
│   └── src
├── k8s                   # kubernetes YAML manifests
├── organization-service  # organization microservice project
│   └── src
└── scripts               # shell scripts to create, build, install, and deploy microservices

10 directories
Enable Spring Cloud Kubernetes
Add the following dependency to enable Spring Cloud Kubernetes features in the project. The library contains modules for service discovery, configuration, and Ribbon load balancing.
<dependency>
  <groupId>org.springframework.cloud</groupId>
  <artifactId>spring-cloud-starter-kubernetes-all</artifactId>
</dependency>
Enable Service Discovery Across All Namespaces
Spring Cloud Kubernetes achieves Kubernetes service discovery with Spring Boot applications by providing an implementation of DiscoveryClient. Ribbon client communicates directly to pods rather than through Kubernetes services. This enables more complete balancing as opposed to round robin, which is forced when going through Kubernetes services. Ribbon is used by a higher-level HTTP client, OpenFeign. MongoDB is used for data storage. Swagger2 is an open source project used to generate the REST API documents for RESTful web services.
/spring-microservices-k8s/department-service/src/main/java/vmware/services/department/DepartmentApplication.java
@SpringBootApplication
@EnableDiscoveryClient
@EnableFeignClients
@EnableMongoRepositories
@EnableSwagger2
@AutoConfigureAfter(RibbonAutoConfiguration.class)
@RibbonClients(defaultConfiguration = RibbonConfiguration.class)
public class DepartmentApplication {

    public static void main(String[] args) {
        SpringApplication.run(DepartmentApplication.class, args);
    }

    @Bean
    public Docket swaggerApi() {
        return new Docket(DocumentationType.SWAGGER_2)
                .select()
                .apis(RequestHandlerSelectors.basePackage("vmware.services.department.controller"))
                .paths(PathSelectors.any())
                .build()
                .apiInfo(new ApiInfoBuilder().version("1.0").title("Department API").description("Documentation Department API v1.0").build());
    }
}
To enable discovery across all namespaces, the all-namespaces property needs
to be set to true
/spring-microservices-k8s/k8s/department-configmap.yaml
kind: ConfigMap
apiVersion: v1
metadata:
  name: department
data:
  spring.cloud.kubernetes.discovery.all-namespaces: "true"
  # other config removed for brevity.
Feign is a declarative web service client. In order to communicate with
employee-service from department-service we need to create an interface and
use the @FeignClient annotation. In the @FeignClient annotation the String
value "employee" is an arbitrary client name, which is used to create a Ribbon
load balancer. The name of the bean in the application context is the fully
qualified name of the interface. At run-time, employee will be resolved with a
look up in the discovery server to a IP address of employee service in Kubernetes.
/spring-microservices-k8s/department-service/src/main/java/vmware/services/department/client/EmployeeClient.java
@FeignClient(name = "employee")
public interface EmployeeClient {

    @GetMapping("/department/{departmentId}")
    List<Employee> findByDepartment(@PathVariable("departmentId") String departmentId);

}
Create Kubernetes namespaces
Create Kubernetes namespaces for each microservice
kubectl create namespace department
kubectl create namespace employee
kubectl create namespace gateway
kubectl create namespace organization
kubectl create namespace mongo
Configure Spring Cloud Kubernetes to access Kubernetes API
Spring Cloud Kubernetes requires access to the Kubernetes API in order to be
able to retrieve the list of IP addresses of the pods that are fronted by a
single service. The simplest way to do that is to define a ClusterRole with
list of resources and verbs.
/spring-microservices-k8s/k8s/rbac-cluster-role.yaml
kind: ClusterRole
apiVersion: rbac.authorization.k8s.io/v1
metadata:
  namespace: default
  name: microservices-kubernetes-namespace-reader
rules:
  - apiGroups: [""] # "" indicates the core API group
    resources: ["configmaps", "pods", "services", "endpoints", "secrets"]
    verbs: ["get", "list", "watch"]
Then create it in the default namespace
kubectl apply -f ../k8s/rbac-cluster-role.yaml -n default
create service accounts api-service-account
kubectl create serviceaccount api-service-account -n department
kubectl create serviceaccount api-service-account -n employee
kubectl create serviceaccount api-service-account -n gateway
kubectl create serviceaccount api-service-account -n organization
kubectl create serviceaccount api-service-account -n mongo
bind Service Accounts api-service-account from each namespace to
ClusterRole
kubectl create clusterrolebinding service-pod-reader-department --clusterrole=microservices-kubernetes-namespace-reader --serviceaccount=department:api-service-account
kubectl create clusterrolebinding service-pod-reader-employee --clusterrole=microservices-kubernetes-namespace-reader --serviceaccount=employee:api-service-account
kubectl create clusterrolebinding service-pod-reader-gateway --clusterrole=microservices-kubernetes-namespace-reader --serviceaccount=gateway:api-service-account
kubectl create clusterrolebinding service-pod-reader-organization --clusterrole=microservices-kubernetes-namespace-reader --serviceaccount=organization:api-service-account
kubectl create clusterrolebinding service-pod-reader-mongo --clusterrole=microservices-kubernetes-namespace-reader --serviceaccount=mongo:api-service-account
and make sure that deployment manifests for microservices reference service account
api-service-account
-
/spring-microservices-k8s/k8s/department-deployment.yaml -
/spring-microservices-k8s/k8s/employee-deployment.yaml -
/spring-microservices-k8s/k8s/organization-deployment.yaml# other config removed for brevity. serviceAccountName: api-service-account
Kubernetes Service Naming
Every Service defined in the cluster (including the DNS server itself) is
assigned a DNS name. “Normal” (not headless) Services are assigned a DNS A or
AAAA record, depending on the IP family of the service, for a name of the form
my-svc.my-namespace.svc.cluster-domain.example. This resolves to the cluster
IP of the Service.
The DNS records for each service are as follows.
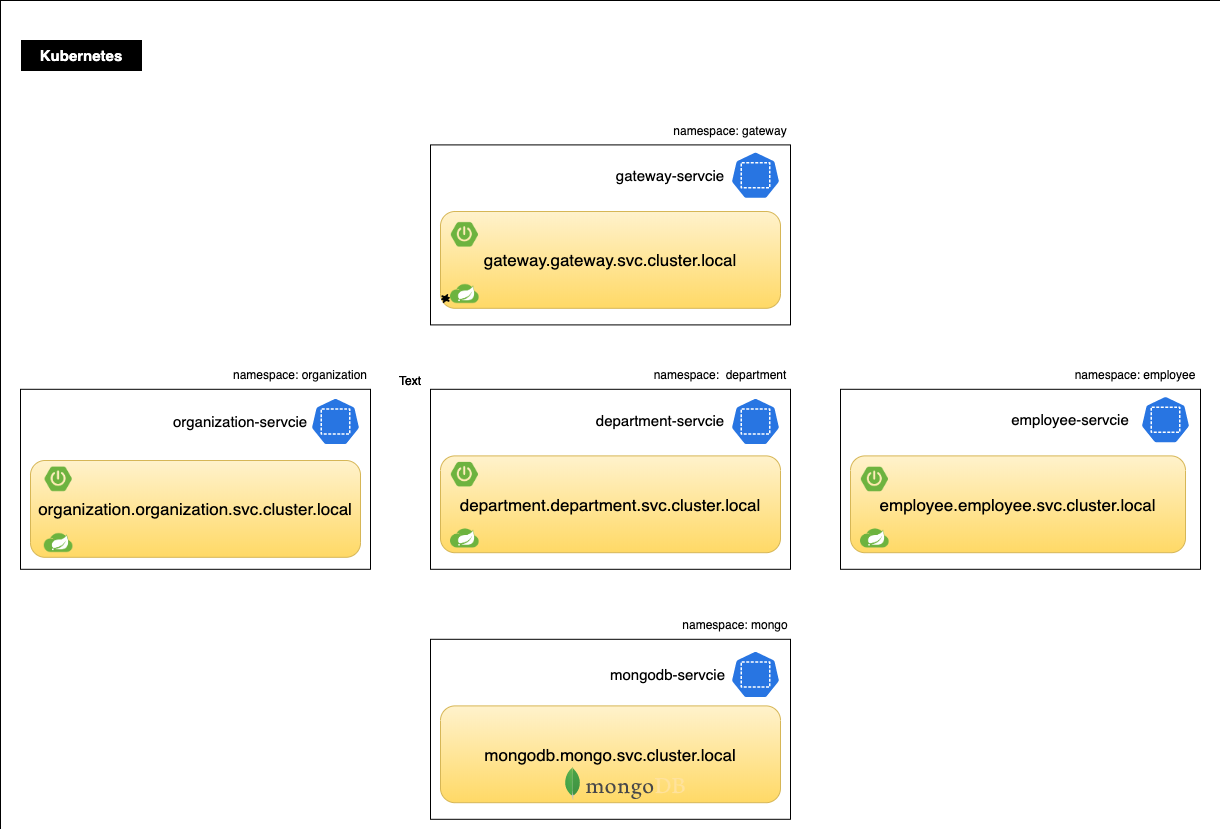
Configure MongoDB
MongoDB deployment
The MongoDB deployment is instructed to read a ConfigMap to get the database-name
and read the Secret to get database-user and database-password
apiVersion: apps/v1
kind: Deployment
metadata:
  name: mongodb
  labels:
    app: mongodb
spec:
  replicas: 1
  selector:
    matchLabels:
      app: mongodb
  template:
    metadata:
      labels:
        app: mongodb
    spec:
      containers:
        - name: mongodb
          image: mongo:4.2.3
          ports:
            - containerPort: 27017
          env:
            - name: MONGO_INITDB_DATABASE
              valueFrom:
                configMapKeyRef:
                  name: mongodb
                  key: database-name
            - name: MONGO_INITDB_ROOT_USERNAME
              valueFrom:
                secretKeyRef:
                  name: mongodb
                  key: database-user
            - name: MONGO_INITDB_ROOT_PASSWORD
              valueFrom:
                secretKeyRef:
                  name: mongodb
                  key: database-password
          resources:
            requests:
              cpu: "0.2"
              memory: 300Mi
            limits:
              cpu: "1.0"
              memory: 300Mi
          readinessProbe:
            tcpSocket:
              port: 27017
            initialDelaySeconds: 50
            timeoutSeconds: 2
            periodSeconds: 20
            failureThreshold: 5
          livenessProbe:
            tcpSocket:
              port: 27017
            initialDelaySeconds: 50
            timeoutSeconds: 2
            periodSeconds: 20
            failureThreshold: 5
    serviceAccountName: api-service-account
MongoDB ConfigMap
In a ConfigMap the name of the Mongo database is set under database-name.
apiVersion: v1
kind: ConfigMap
metadata:
  name: mongodb
data:
  database-name: admin
MongoDB Secret
The username and password is set under database-user and database-password
respectively. Since this is a Secret object, the values must be base64 encoded.
apiVersion: v1
kind: Secret
metadata:
  name: mongodb
type: Opaque
data:
  database-user: bW9uZ28tYWRtaW4=
  database-password: bW9uZ28tYWRtaW4tcGFzc3dvcmQ=
Use Spring Cloud Kubernetes ConfigMap PropertySource
By using the Spring Cloud Kubernetes PropertySources you’re coupling the application to Kubernetes. Without PropertySources, Kubernetes provides mechanisms like mounting configurations and secrets to the containers file system. This enables an application to ingest configuration without knowledge of where it is running.
It’s advised you consider these trade-offs before proceeding. We use PropertySource to access ConfigMap for demonstration purposes, thinking that it will be used by many Spring developers because of it ease of use and convenience.
The Spring Cloud Kubernetes PropertySource feature enables consumption of
ConfigMap
and Secret
objects directly in the application without injecting them into a
Deployment.
The default behavior is based on metadata.name inside ConfigMap or Secret,
which has to be the same as an application name defined by spring.application.name property.
For example, the department-service breaks down as follows.
-
/spring-microservices-k8s/department-service/src/resources/bootstrap.ymlspring: application: name: department # other config removed for brevity. -
/spring-microservices-k8s/k8s/department-configmap.yamlkind: ConfigMap apiVersion: v1 metadata: name: department data: logging.pattern.console: "%clr(%d{yy-MM-dd E HH:mm:ss.SSS}){blue} %clr(%-5p) %clr(${PID}){faint} %clr(---){faint} %clr([%8.15t]){cyan} %clr(%-40.40logger{0}){blue} %clr(:){red} %clr(%m){faint}%n" spring.cloud.kubernetes.discovery.all-namespaces: "true" spring.data.mongodb.database: "admin" spring.data.mongodb.host: "mongodb.mongo.svc.cluster.local" spring.output.ansi.enabled: "ALWAYS"data.logging.pattern.console: define log patterndata.spring.cloud.kubernetes.discovery.all-namespaces: allow multi-namespace discoveryspring.data.mongodb.database: Mongo DB namespring.data.mongodb.host: Mongo DB locationspring.output.ansi.enabled: Enforce ANSI output
Use Secret through mounted volume
Kubernetes has the notion of Secrets for storing sensitive data such as passwords, OAuth tokens, etc.
While there are several ways to share secrets with a container, we recommend sharing secrets through mounted volumes. If you enable consuming secrets through the API, we recommend limiting access with RBAC authorization policies.
NOTE: secrets are not secure, they are merely an obfuscation
In this example, a secret named department is mounted to the file
/etc/secretspot via volume mongodb for the following microservices:
department-service, employee-service, organization-service.
/spring-microservices-k8s/department-service/src/main/resources/bootstrap.yaml
spring:
application:
  name: department
cloud:
  kubernetes:
    secrets:
      enabled: true
      paths:
        - /etc/secretspot
      enableApi: false
      # other config removed for brevity.
/spring-microservices-k8s/k8s/department-deployment.yaml
apiVersion: apps/v1
kind: Deployment
metadata:
  name: department
  labels:
    app: department
spec:
  replicas: 1
  selector:
    matchLabels:
      app: department
  template:
    metadata:
      labels:
        app: department
    spec:
      containers:
        volumeMounts:
          - name: mongodb
            mountPath: /etc/secretspot
      volumes:
        - name: mongodb
          secret:
            secretName: department
      # other config removed for brevity.
Mongo credentials are defined inside Secret object /spring-microservices-k8s/k8s/department-secret.yaml
apiVersion: v1
kind: Secret
metadata:
  name: department
type: Opaque
data:
  spring.data.mongodb.username: bW9uZ28tYWRtaW4=
  spring.data.mongodb.password: bW9uZ28tYWRtaW4tcGFzc3dvcmQ=
Use Spring Boot Actuator to export metrics for Prometheus
Prometheus is an open-source monitoring system. Spring
Boot uses Micrometer, an application metrics facade to
integrate Spring Boot
Actuator
metrics with external monitoring systems. It supports several monitoring systems
like Prometheus, Netflix Atlas, AWS CloudWatch, Datadog, InfluxData, SignalFx,
Graphite, Wavefront, etc. The
spring-boot-starter-actuator
module provides all of Spring Boot’s production-ready
features.
To integrate Actuator with Prometheus, you need to add following dependencies in maven project for each microservice:
<dependency>
  <groupId>org.springframework.boot</groupId>
  <artifactId>spring-boot-starter-actuator</artifactId>
</dependency>
<dependency>
  <groupId>io.micrometer</groupId>
  <artifactId>micrometer-registry-prometheus</artifactId>
</dependency>
configure metrics and prometheus endpoints in ConfigMap for each project
(department-configmap.yaml, employee-configmap.yaml, organization-configmap.yaml):
kind: ConfigMap
apiVersion: v1
# removed for brevity
data:
  # removed for brevity
  management.endpoints.web.exposure.include: "health,info,metrics,prometheus"
  management.metrics.enable.all: "true"
and add MeterRegistryCustomizer for Grafana Spring Boot 2.1
Statistics dashboard in following
@SpringBootApplication classes: DepartmentApplication,
EmployeeApplication, GatewayApplication, OrganizationApplication make sure
to set .commonTags("applicsation", "<microservice_name>") to actual
microservice name:
import io.micrometer.core.instrument.MeterRegistry;
// removed for brevity
public class DepartmentApplication {
  // removed for brevity
  @Bean
  MeterRegistryCustomizer meterRegistryCustomizer(MeterRegistry meterRegistry){
    return registry -> {
      meterRegistry.config().commonTags("application", "department");
    };
  }
}
Exposed endpoints are available at http://<host>:<port>/actuator/metrics and
http://<host>:<port>/actuator/prometheus with metrics data formatted specifically for Prometheus.
Build Spring Applications
Building department-service
As of Spring Boot 2.3.1.RELEASE, Spring Boot can help you package up Spring Boot applications into Docker images with Layered Jars
<build>
  <plugins>
    <plugin>
      <groupId>org.springframework.boot</groupId>
      <artifactId>spring-boot-maven-plugin</artifactId>
      <configuration>
        <layers>
          <enabled>true</enabled>
        </layers>
      </configuration>
    </plugin>
  </plugins>
</build>
After building the project with layered JARs using jarmode support, install the
package using Maven.
cd /spring-microservices-k8s/department-service/
mvn clean install
The resulting JAR can be tested to check that layers were added.
cd /spring-microservices-k8s/department-service/
java -Djarmode=layertools -jar target/department-service-1.1.jar list
The commands above will produce the following output and create the following directories. they should be added:
- dependencies
- snapshot-dependencies
- spring-boot-loader
- application

Build Docker Images for Spring Applications
To create images compliant with best practices, Dockerfiles must
consider the following.
- Removing build dependencies from runtime
- via multi-stage builds
- Putting dependencies (JARs) in their own layer
- Layering the application JAR
- Ensuring image pushes only contain changed files
- Running as non-root and using a minimal runtime image
- via use of the distroless image
ARG MVN_VERSION=3.6.3
ARG JDK_VERSION=11

FROM maven:${MVN_VERSION}-jdk-${JDK_VERSION}-slim as build

WORKDIR /build
COPY pom.xml .
# creates layer with maven dependencies
# first build will be significantly slower than subsequent
RUN mvn dependency:go-offline

COPY ./pom.xml /tmp/
COPY ./src /tmp/src/
WORKDIR /tmp/
# build the project
RUN mvn clean package

# extract JAR Layers
WORKDIR /tmp/target
RUN java -Djarmode=layertools -jar *.jar extract

# runtime image
FROM gcr.io/distroless/java:${JDK_VERSION} as runtime

USER nonroot:nonroot
WORKDIR /application

# copy layers from build image to runtime image as nonroot user
COPY --from=build --chown=nonroot:nonroot /tmp/target/dependencies/ ./
COPY --from=build --chown=nonroot:nonroot /tmp/target/snapshot-dependencies/ ./
COPY --from=build --chown=nonroot:nonroot /tmp/target/spring-boot-loader/ ./
COPY --from=build --chown=nonroot:nonroot /tmp/target/application/ ./

EXPOSE 8080

ENV _JAVA_OPTIONS "-XX:MinRAMPercentage=60.0 -XX:MaxRAMPercentage=90.0 \
-Djava.security.egd=file:/dev/./urandom \
-Djava.awt.headless=true -Dfile.encoding=UTF-8 \
-Dspring.output.ansi.enabled=ALWAYS \
-Dspring.profiles.active=default"

# set entrypoint to layered Spring Boot application
ENTRYPOINT ["java", "org.springframework.boot.loader.JarLauncher"]
Build the Docker image for department-service application
cd /spring-microservices-k8s/department-service/
docker build -t vmware/department:1.1 .
and build the other microservices: employee-service, gateway-service,
organization-service.
List Docker images
docker images

The Dive tool can be used to explore and
analyze Docker images and layers. The below displays the build image. Docker
Image Id can be used to explore details of the image.
dive 258a7b40a719
As you can see all 98MB of Maven dependencies have been pushed to a separate layer and can be reused later.
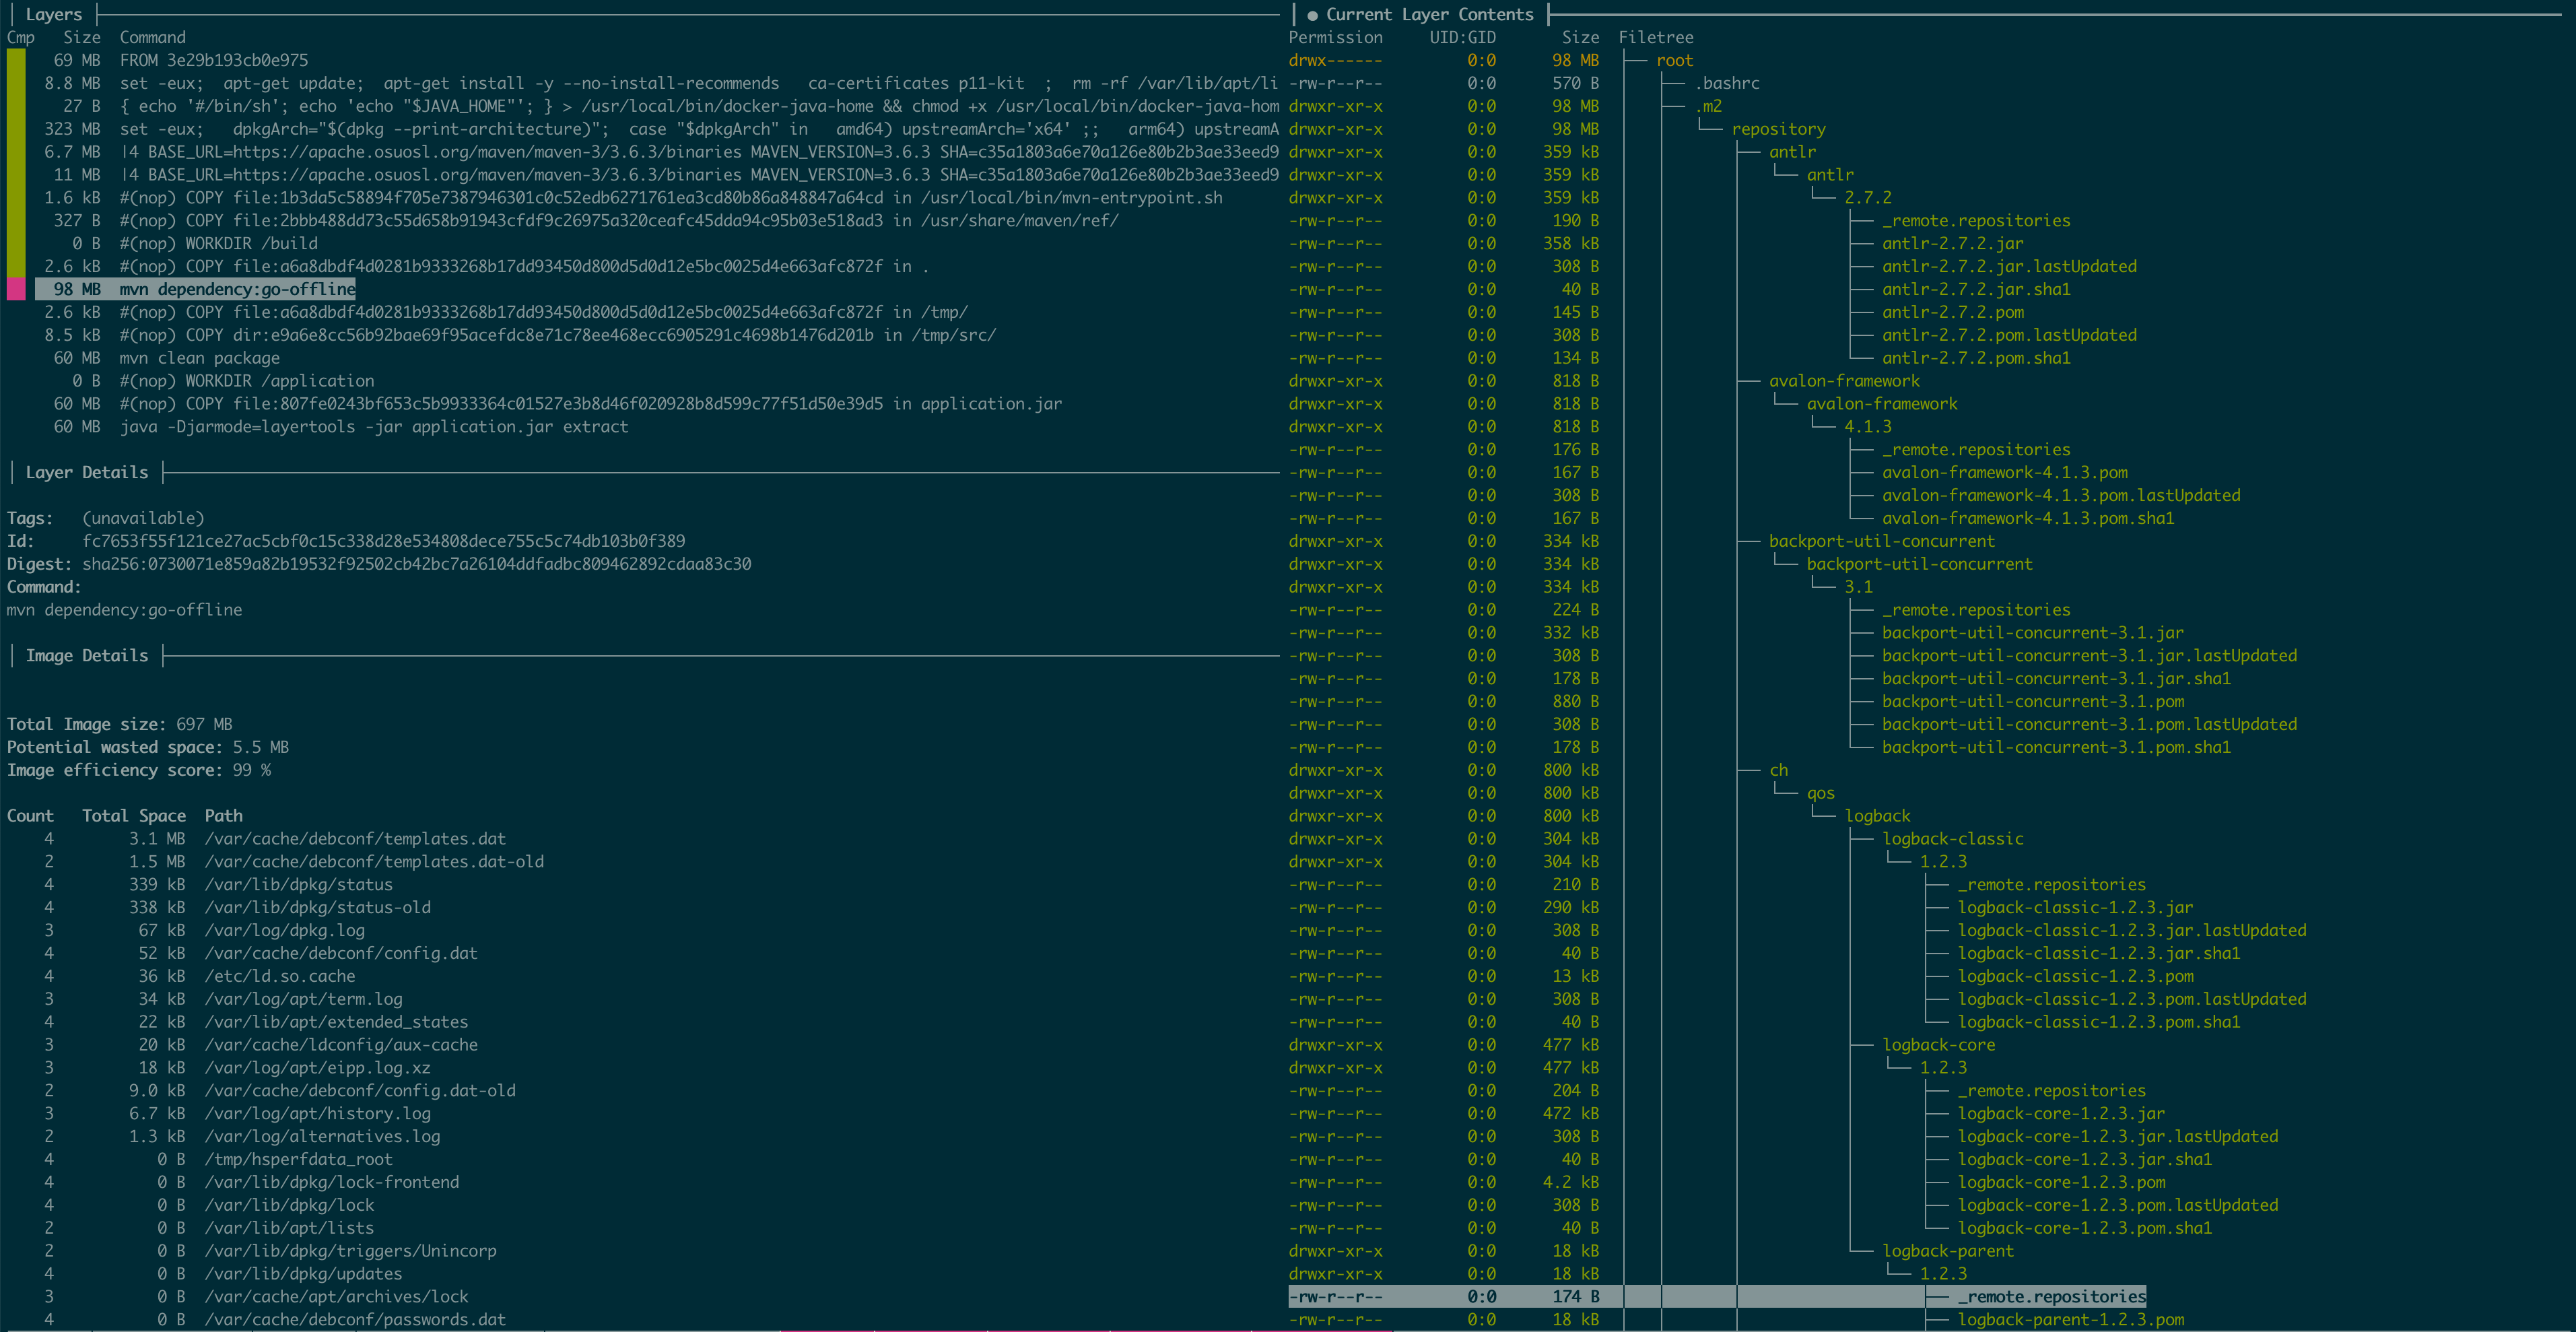
A similar evaluation can be performed for the runtime image. This can be seen below.
dive vmware/department:1.1
All JAR layers created by Spring Boot have been copied to the runtime image.

Deploy a Spring Boot Application
We have created department namespace, assigned cluster-admin and built
Docker images in previous steps.
department-service Kubernetes deployment manifest
apiVersion: apps/v1
kind: Deployment
metadata:
  name: department
  labels:
    app: department
spec:
  replicas: 1
  selector:
    matchLabels:
      app: department
  template:
    metadata:
      labels:
        app: department
    spec:
      containers:
        - name: department
          image: vmware/department:1.1
          ports:
            - containerPort: 8080
          resources:
            requests:
              cpu: "0.2"
              memory: 300Mi
            limits:
              cpu: "1.0"
              memory: 300Mi
          readinessProbe:
            httpGet:
              port: 8080
              path: /actuator/health
            initialDelaySeconds: 60
            timeoutSeconds: 2
            periodSeconds: 20
            failureThreshold: 5
          livenessProbe:
            httpGet:
              port: 8080
              path: /actuator/info
            initialDelaySeconds: 60
            timeoutSeconds: 2
            periodSeconds: 20
            failureThreshold: 5
      serviceAccountName: api-service-account
Workloads should always explicitly specify
spec.template.spec.containers.resources.requests and
spec.template.spec.containers.resources.limits and keep
spec.template.spec.containers.resources.requests.memory and
spec.template.spec.containers.resources.limits.memory equal since RAM is not a
compressible resource like CPU.
Application probes recommendations:
readinessProbe: Always; makes app available to traffic after checks pass.livenessProbe: Usually; should only check for conditions where restarting the application is an appropriate solution. Be sure to not link this check to external dependencies, such as database connectivity, or it may introduce cascading failures. A good check can be hitting an endpoint, allocating some memory (e.g. byte array) and returning200.startupProbe: Rarely; Readiness and liveness probes (with a delay) can typically solve the use case startupProbes attempt to solve for. If a specific check is appropriate for an application that has a slow startup and the check should never be run again, astartupProbemay be justified.
Kubernetes leverages probes to determine if the app is ready to accept traffic and whether the app is alive
- If
readinessProbedoes not return code 200 - no traffic will be routed to it - If
livenessProbedoes not return code 200 - Kubernetes restarts the Pod
Spring Boot has a built-in set of endpoints from the Actuator module:
- /actuator/health : provides basic application health information
- /actuator/info: provides arbitrary application info
To add the Actuator to a Maven based project, add the following ‘Starter’ dependency.
<dependencies>
    <dependency>
        <groupId>org.springframework.boot</groupId>
        <artifactId>spring-boot-starter-actuator</artifactId>
    </dependency>
</dependencies>
To deploy department-service onto Kubernetes execute following command.
kubectl apply -n department -f ./spring-microservices-k8s/k8s/department-configmap.yaml
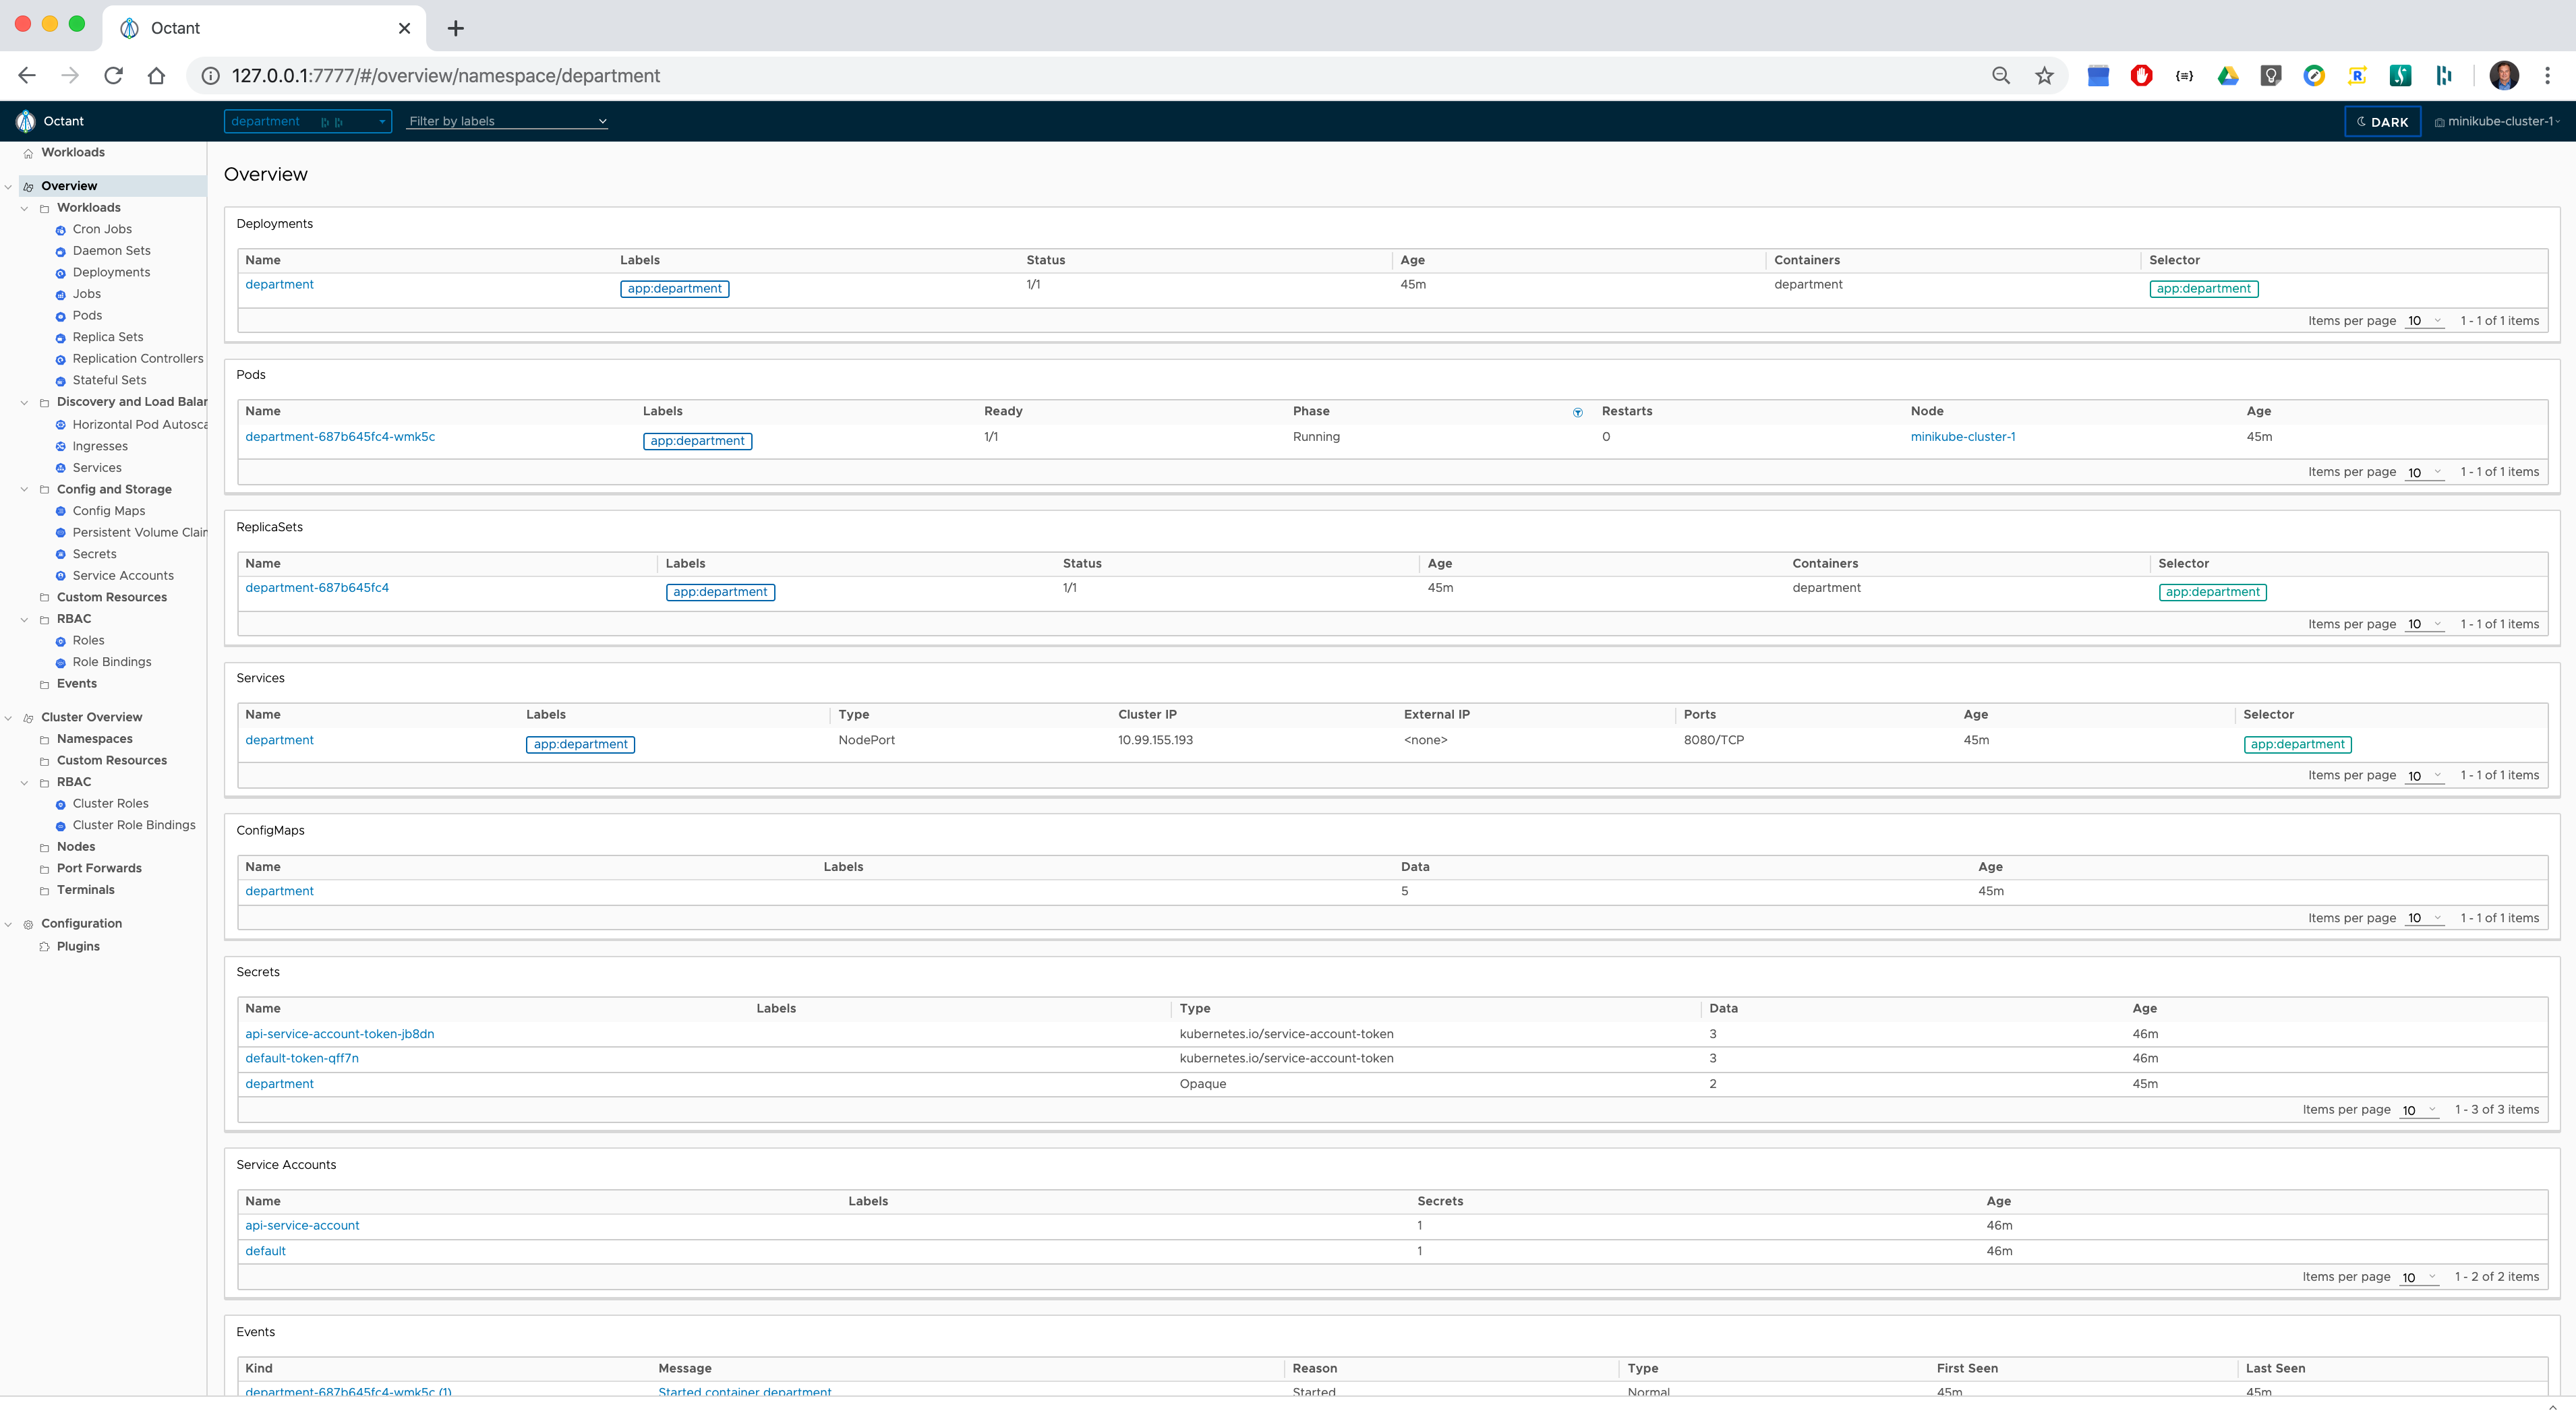
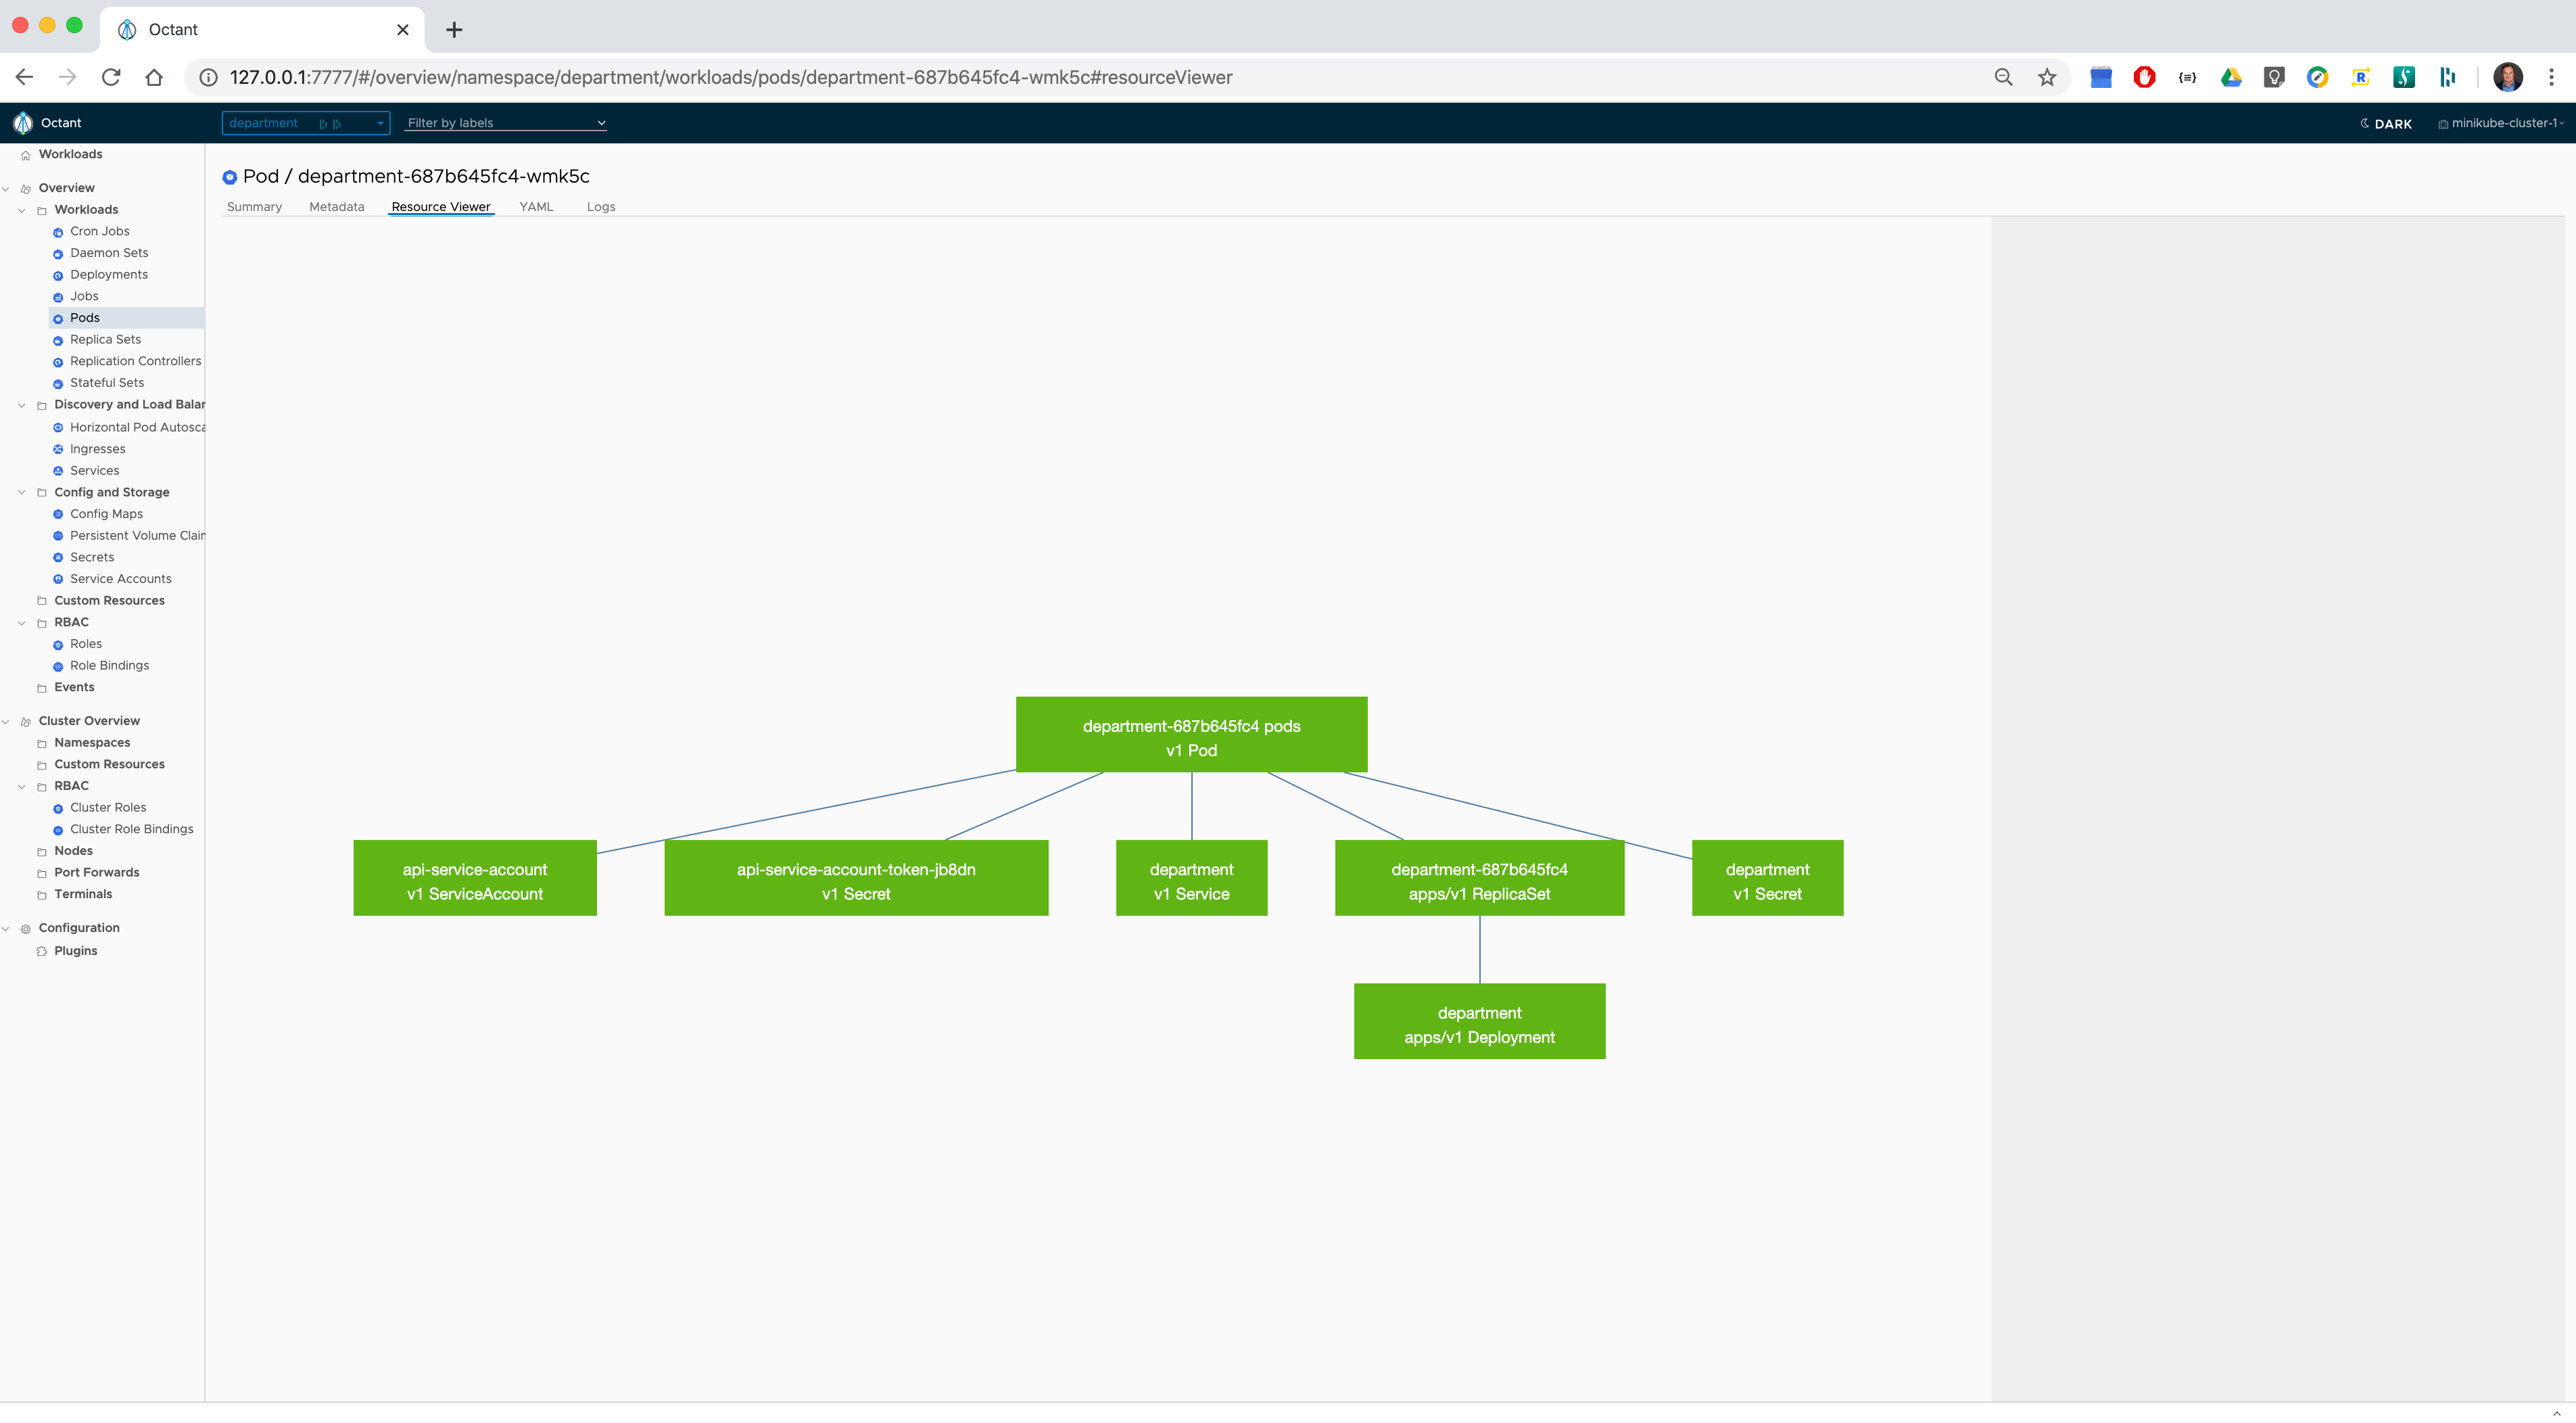
Octant - is a great open-source tool that can can graphically visualize Kubernetes objects dependencies, forward local ports to a running pod, inspect pod logs, navigate through different clusters and help developers to understand how applications run on a Kubernetes.
Overview of the department namespace
Resources associated with the pod deployed in the department namespace
Expose a Service
We use port 8080 and NodePort type to expose all microservices. The following service definition groups all pods labeled with the field app equal to department
apiVersion: v1
kind: Service
metadata:
  name: department
  labels:
    app: department
spec:
  ports:
    - port: 8080
      protocol: TCP
  selector:
    app: department
  type: NodePort
Configure Gateway service
We use gateway-service service to expose auto-generated Swagger documentation
via Swagger UI web interface for all microservices distributed across multiple
namespaces. To do that we use Spring Cloud Netflix Zuul which integrates with
Kubernetes discovery via Ribbon client.
Required dependencies:
<dependencies>
    <dependency>
        <groupId>org.springframework.cloud</groupId>
        <artifactId>spring-cloud-starter-netflix-zuul</artifactId>
    </dependency>
    <dependency>
        <groupId>org.springframework.cloud</groupId>
        <artifactId>spring-cloud-starter-kubernetes-all</artifactId>
    </dependency>
    <dependency>
        <groupId>org.springframework.cloud</groupId>
        <artifactId>spring-cloud-starter-sleuth</artifactId>
    </dependency>
    <dependency>
        <groupId>io.springfox</groupId>
        <artifactId>springfox-swagger-ui</artifactId>
        <version>2.9.2</version>
    </dependency>
    <dependency>
        <groupId>io.springfox</groupId>
        <artifactId>springfox-swagger2</artifactId>
        <version>2.9.2</version>
    </dependency>
</dependencies>
Configuration of the routes is straightforward and uses Spring Cloud Kubernetes Discovery.
apiVersion: v1
kind: ConfigMap
metadata:
  name: gateway
data:
  logging.pattern.console: "%d{HH:mm:ss} ${LOG_LEVEL_PATTERN:-%5p} %m%n"
  spring.cloud.kubernetes.discovery.all-namespaces: "true"
  zuul.routes.department.path: "/department/**"
  zuul.routes.employee.path: "/employee/**"
  zuul.routes.organization.path: "/organization/**"
Since Zuul proxy is automatically integrated with DiscoveryClient it is easy to configure dynamic resolution of microservices endpoints by Swagger.
@Configuration
public class GatewayApi {

    @Autowired
    ZuulProperties properties;

    @Primary
    @Bean
    public SwaggerResourcesProvider swaggerResourcesProvider() {
        return () -> {
            List<SwaggerResource> resources = new ArrayList<>();
            properties.getRoutes().values().stream()
                    .forEach(route -> resources.add(createResource(route.getId(), "2.0")));
            return resources;
        };
    }

    private SwaggerResource createResource(String location, String version) {
        SwaggerResource swaggerResource = new SwaggerResource();
        swaggerResource.setName(location);
        swaggerResource.setLocation("/" + location + "/v2/api-docs");
        swaggerResource.setSwaggerVersion(version);
        return swaggerResource;
    }

}
Configure Ribbon client to allow discovery across all namespaces:
public class RibbonConfiguration {

    @Autowired
    private DiscoveryClient discoveryClient;

    private String serviceId = "client";
    protected static final String VALUE_NOT_SET = "__not__set__";
    protected static final String DEFAULT_NAMESPACE = "ribbon";

    public RibbonConfiguration () {
    }

    public RibbonConfiguration (String serviceId) {
        this.serviceId = serviceId;
    }

    @Bean
    @ConditionalOnMissingBean
    public ServerList<?> ribbonServerList(IClientConfig config) {

        Server[] servers = discoveryClient.getInstances(config.getClientName()).stream()
                .map(i -> new Server(i.getHost(), i.getPort()))
                .toArray(Server[]::new);

        return new StaticServerList(servers);
    }

}
Ribbon configuration needs to be applied in the main class of the application:
@SpringBootApplication
@EnableDiscoveryClient
@EnableZuulProxy
@EnableSwagger2
@AutoConfigureAfter(RibbonAutoConfiguration.class)
@RibbonClients(defaultConfiguration = RibbonConfiguration.class)
public class GatewayApplication {

    public static void main(String[] args) {
        SpringApplication.run(GatewayApplication.class, args);
    }

}
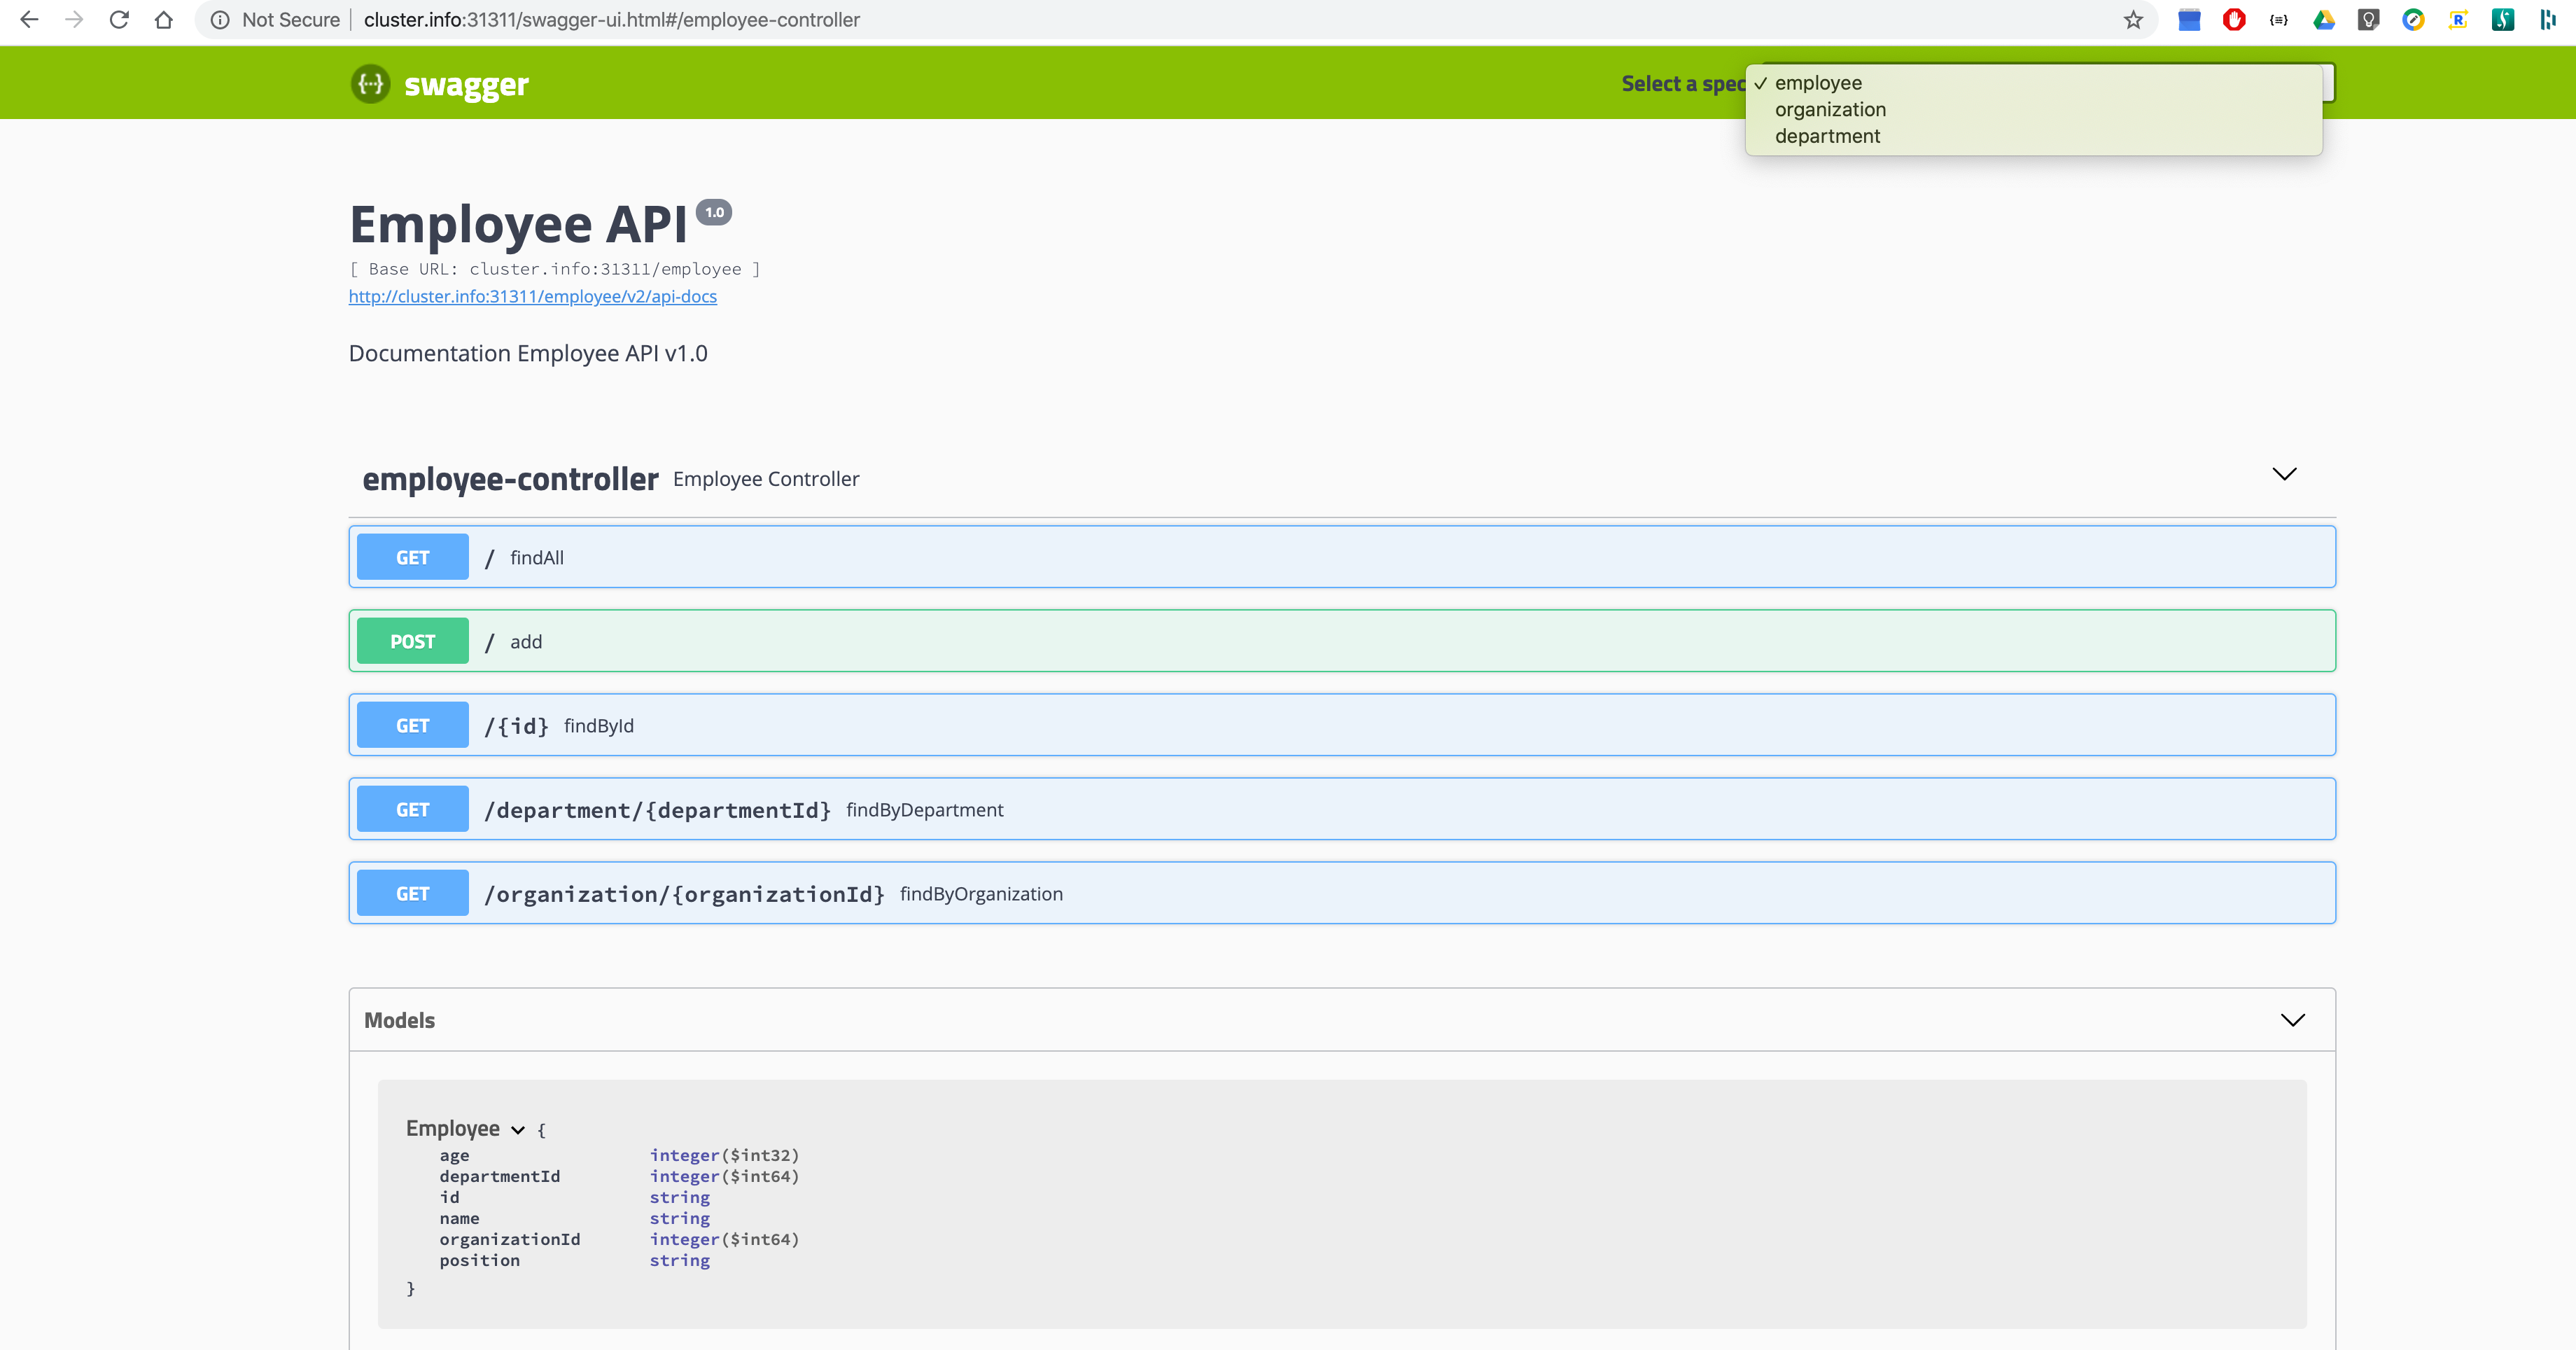
Gateway Swagger UI
Swagger UI is exposed on the Gateway service and showcases an advantage of cross
namespace discovery where employee-service, department-service add
organization-service are available via gateway-service
Configure Ingress
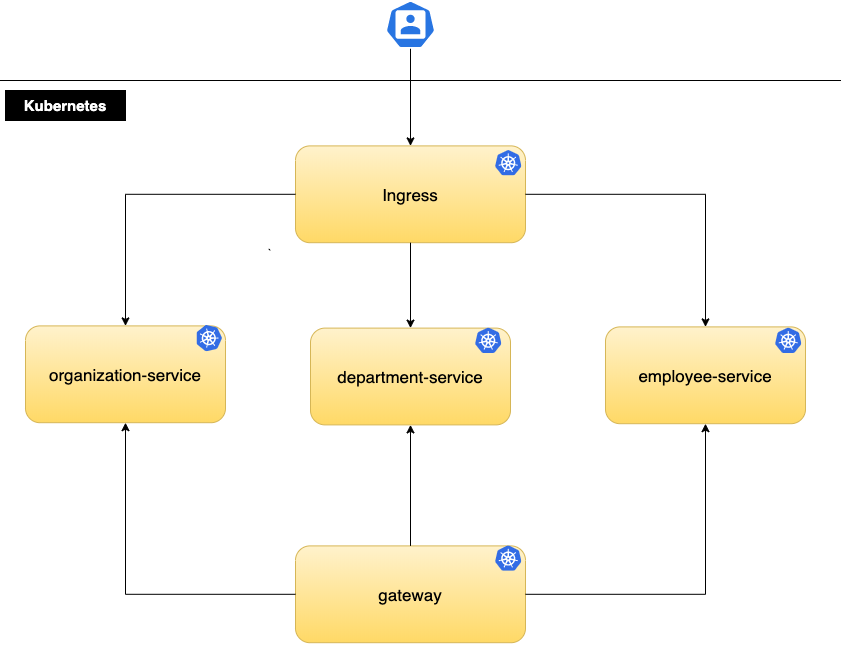
Kubernetes Ingress is a collection of rules that allow incoming requests to
reach the downstream services. It works almost as a service with type
LoadBalancer, but you can set custom routing rules. YAML manifest needs to set
host to a hostname under which the gateway will be available. In our
microservices architecture, Ingress has a role of an API gateway.
apiVersion: networking.k8s.io/v1beta1
kind: Ingress
metadata:
  name: gateway-ingress
  annotations:
    nginx.ingress.kubernetes.io/rewrite-target: /
spec:
  backend:
    serviceName: default-http-backend
    servicePort: 80
  rules:
    - host: microservices-cluster.info
      http:
        paths:
          - path: /employee
            backend:
              serviceName: employee
              servicePort: 8080
          - path: /department
            backend:
              serviceName: department
              servicePort: 8080
          - path: /organization
            backend:
              serviceName: organization
              servicePort: 8080
Execute the following commands to apply the configuration above to the Kubernetes cluster
cd /spring-microservices-k8s/k8s/
kubectl apply -f ingress.yaml
Testing Ingress
Execute following commands to populate MongoDB with test data
cd /spring-microservices-k8s/scrips/
./populate-data.sh
Execute following command to check that department-service is available via Ingress
curl http://microservices-cluster.info/department/1/with-employees | jq
Example output from department-service
{
  "address": "Main Street",
  "id": "1",
  "name": "MegaCorp"
  "departments": [
    {
      "employees": [
        {
          "age": 25,
          "id": 1,
          "name": "Smith",
          "position": "engineer"
        },
        {
        "age": 45,
        "id": 2,
        "name": "Johns",
        "position": "manager"
        }
      ],
      "id": 1,
      "name": "RD Dept."
    }
  ],
  "employees": [
    {
      "age": 25,
      "id": 1,
      "name": "Smith",
      "position": "engineer"
    },
    {
      "age": 45,
      "id": 2,
      "name": "Johns",
      "position": "manager"
    }
  ],
}