Getting Started with Velero
Tiffany Jernigan
What do you do if you lose state in your cluster, or something went very wrong and you need to revert it or move my resources to another cluster? Are you out of luck?
That’s where Velero comes in. Velero is an open source tool to safely backup and restore, perform disaster recovery, and migrate Kubernetes cluster resources and persistent volumes. This guide will show you how to deploy Velero to your Kubernetes cluster, create backups, and recover from a backup after something goes wrong in the cluster.
Prerequisites
Before you get started you will need to do the following:
- Create a Kubernetes cluster: You need a Kubernetes cluster, v1.10 or later, with DNS and container networking enabled. This guide uses a Google Kubernetes Engine (GKE) Linux cluster with Kubernetes version 1.16.5 and Velero 1.5.3. As of the writing of this guide, Velero does not officially support Windows.
- Install
kubectlon our local machine: You probably already have this one if you’re working with Kubernetes. - Verify the cluster has a
storage class:
Check if you have a storage class with
kubectl get storageclasses. You need one to create persistent volumes. - Install the
veleroCLI: There are a few options to install Velero. This guide usesbrew install veleroandvelerov1.5.3 . Enabling shell autocompletion can be very helpful too.
You can also look at the Velero Basic Install documentation.
Setup
Now that you have your Kubernetes cluster and the Velero CLI installed, we can move to the next step.
First you need to install Velero server components in your cluster. To do this, you need a storage provider for Velero to store your resources and volumes. In this guide, since we use GKE, we will use Google Cloud Storage as the object store. If you’re deploying Velero in a different environment, check the providers documentation for specific setup instructions.
You can either use the velero install CLI command with the required storage
provider flags or the
Velero Helm chart. We will use
the CLI in this guide.
Initial Setup
There are quite a few different storage provider options such as vSphere, AWS, and GCP. This guide uses the setup for GCP.
If you run Google Kubernetes Engine (GKE), make sure that your current IAM user is a cluster-admin. This role is required to create RBAC objects. See the GKE documentation for more information.
-
First we need to create an object storage bucket for Velero to save backups in:
BUCKET=<your-bucket-name>
gsutil mb gs://$BUCKET/
With GCP you can set Velero permissions using a service account or optionally using Workload Identity to set up Velero GCP permissions. This guide will use a service account.
-
Get the current GCP project:
PROJECT_ID=$(gcloud config get-value project) echo $PROJECT_ID -
Create a service account for Velero:
gcloud iam service-accounts create velero \
    --display-name "Velero service account"
Tip: If you’ll be using Velero to back up multiple clusters with multiple GCS buckets, you may want to create a unique name per cluster instead of just
velero. -
Set
SERVICE_ACCOUNT_EMAILto the email attached to your new service account:SERVICE_ACCOUNT_EMAIL=$(gcloud iam service-accounts list \ --filter="displayName:Velero service account" \ --format 'value(email)') -
Attach the IAM policies Velero needs to interact with the object store bucket:
ROLE_PERMISSIONS=( compute.disks.get compute.disks.create compute.disks.createSnapshot compute.snapshots.get compute.snapshots.create compute.snapshots.useReadOnly compute.snapshots.delete compute.zones.get ) # Create an IAM role, Velero Server, with the above role permissions gcloud iam roles create velero.server \ --project $PROJECT_ID \ --title "Velero Server" \ --permissions "$(IFS=","; echo "${ROLE_PERMISSIONS[*]}")" gcloud projects add-iam-policy-binding $PROJECT_ID \ --member serviceAccount:$SERVICE_ACCOUNT_EMAIL \ --role projects/$PROJECT_ID/roles/velero.server gsutil iam ch serviceAccount:$SERVICE_ACCOUNT_EMAIL:objectAdmin gs://${BUCKET} -
Create a service account key. The following command will store it locally in a file called
credentials-velero.gcloud iam service-accounts keys create credentials-velero \ --iam-account $SERVICE_ACCOUNT_EMAIL
Install Velero
OK, now it’s time to install Velero. We need to give velero install the
provider, provider plugin, storage bucket, and IAM credentials.
velero install \
    --provider gcp \
    --plugins velero/velero-plugin-for-gcp:v1.1.0 \
    --bucket $BUCKET \
    --secret-file ./credentials-velero
It will then display the resources that are being created. If you’re interested in looking further, you can view Velero’s server-side components by running:
kubectl -n velero get all
Velero also uses a number of CRDs (Custom Resource Definitions) to represents its own resources like backups, backups schedules, etc.
Run Apps
As an example, we will deploy an instance of Ghost. Ghost is a personal blog, similar to WordPress. We will be using the Ghost Helm Chart.
-
Create a file containing configuration values for the Ghost Helm Chart. Ghost uses MariaDB for storage. For simplicity, we are going to hard-code in that file the database credentials, as well as the login credentials (so that we know these passwords). The
ghostPasswordandghostEmailwill be used to log into the admin account to create blogs.CautionThese are sample, insecure passwords. Please don’t use these outside of a demo! Instead of a values YAML file, we could also use multiple
--setflags when invokinghelm installbelow.# Create a file called ghost-values.yaml in the current dir # And add the following variables # ghostPassword has a minimum of 10 characters cat <<EOF > ghost-values.yaml ghostUsername: admin ghostPassword: "0123456789" ghostEmail: admin@example.com mariadb: auth: rootPassword: "root_password" password: "db_password" EOF -
Add the
bitnamirepository of Helm charts.helm repo add bitnami https://charts.bitnami.com/bitnami -
Create the
ghostnamespace and install the Helm chart.For Helm 3:
Tip for Helm 3.2.0 and laterAs of Helm 3.2.0 you can add a
--create-namespaceflag to thehelmcommand instead of using kubectl to create the namespace first.kubectl create namespace ghost helm install ghost bitnami/ghost -n ghost \ --version 12.1.0 \ --values ./ghost-values.yamlYou should see an error message telling you that you “did not provide an external host”; so we’re going to address that.
-
Check if the load balancer is up and running. It should have an
EXTERNAL_IPlisted.# The -w flag is for watching changes. You need to do ctrl-c to exit. kubectl -n ghost get svc -wYou should see a service for
ghost(the app) andghost-mariadb(the database).kubectl -n ghost get svc NAME TYPE CLUSTER-IP EXTERNAL-IP PORT(S) AGE ghost LoadBalancer 10.108.8.228 35.233.219.60 80:31603/TCP 2m2s ghost-mariadb ClusterIP 10.108.8.42 <none> 3306/TCP 2m2s -
Once it’s running, get the load balancer’s external IP and add it to our ghost-values.yaml and upgrade the Helm chart to get the deployment to start:
# Set the APP_HOST to the ghost service's EXTERNAL-IP. You could also copy-paste export APP_HOST=$(kubectl get svc --namespace ghost ghost \--template "{{ range (index .status.loadBalancer.ingress 0) }}{{ . }}{{ end }}") # Add ghostHost to ghost-values.yaml echo "ghostHost: $APP_HOST" >> ghost-values.yaml # Check the file to see it got added and isn't blank cat ghost-values.yaml # To complete the Ghost deployment, we will run upgrade with the ghostHost helm upgrade ghost bitnami/ghost -n ghost \ --version 12.1.0 \ --values ./ghost-values.yaml -
Helm will show us our blog URL, and the admin URL that we will use in a minute to create some content. The IP address is the
EXTERNAL_IPof the load balancer.So right now you should be seeing these resources. Your IP addresses will be different; and if the pods are not both
RunningandREADYyet, give them a minute to come up.kubectl -n ghost get all NAME READY STATUS RESTARTS AGE pod/ghost-86b56c9d44-gk2f8 1/1 Running 0 44m pod/ghost-mariadb-0 1/1 Running 0 50m NAME TYPE CLUSTER-IP EXTERNAL-IP PORT(S) AGE service/ghost LoadBalancer 10.108.8.228 35.233.219.60 80:31603/TCP 50m service/ghost-mariadb ClusterIP 10.108.8.42 <none> 3306/TCP 50m NAME READY UP-TO-DATE AVAILABLE AGE deployment.apps/ghost 1/1 1 1 44m NAME DESIRED CURRENT READY AGE replicaset.apps/ghost-86b56c9d44 1 1 1 44m NAME READY AGE statefulset.apps/ghost-mariadb 1/1 50m -
Now open your
Admin URLin a web browser. If it doesn’t load, double-check that the pods shown in the previous section show up as1/1in theREADYcolumn. Sign in the admin interface with the email and password that we entered earlier in the values file. You should now see the following screen, which will let us create a blog: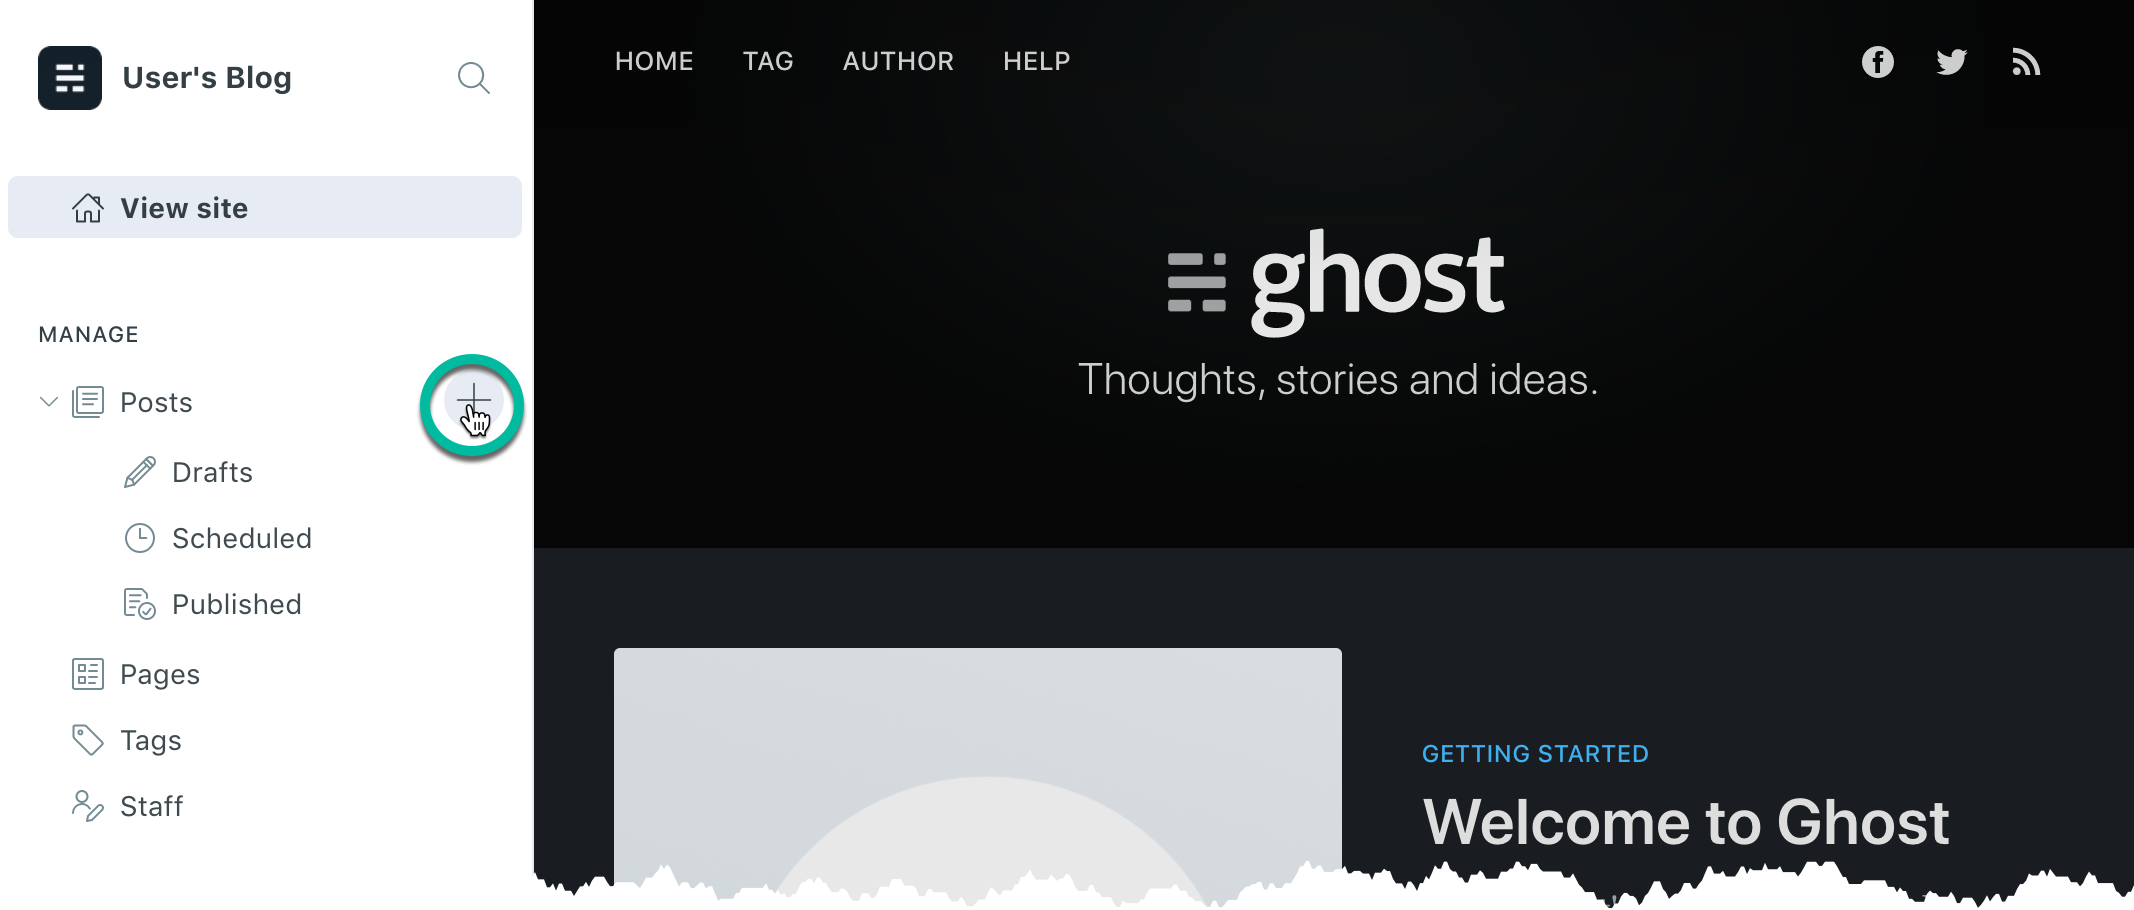
Click on the
+next to Posts to create your first post. Enter a title and some content, then click Publish in the top right.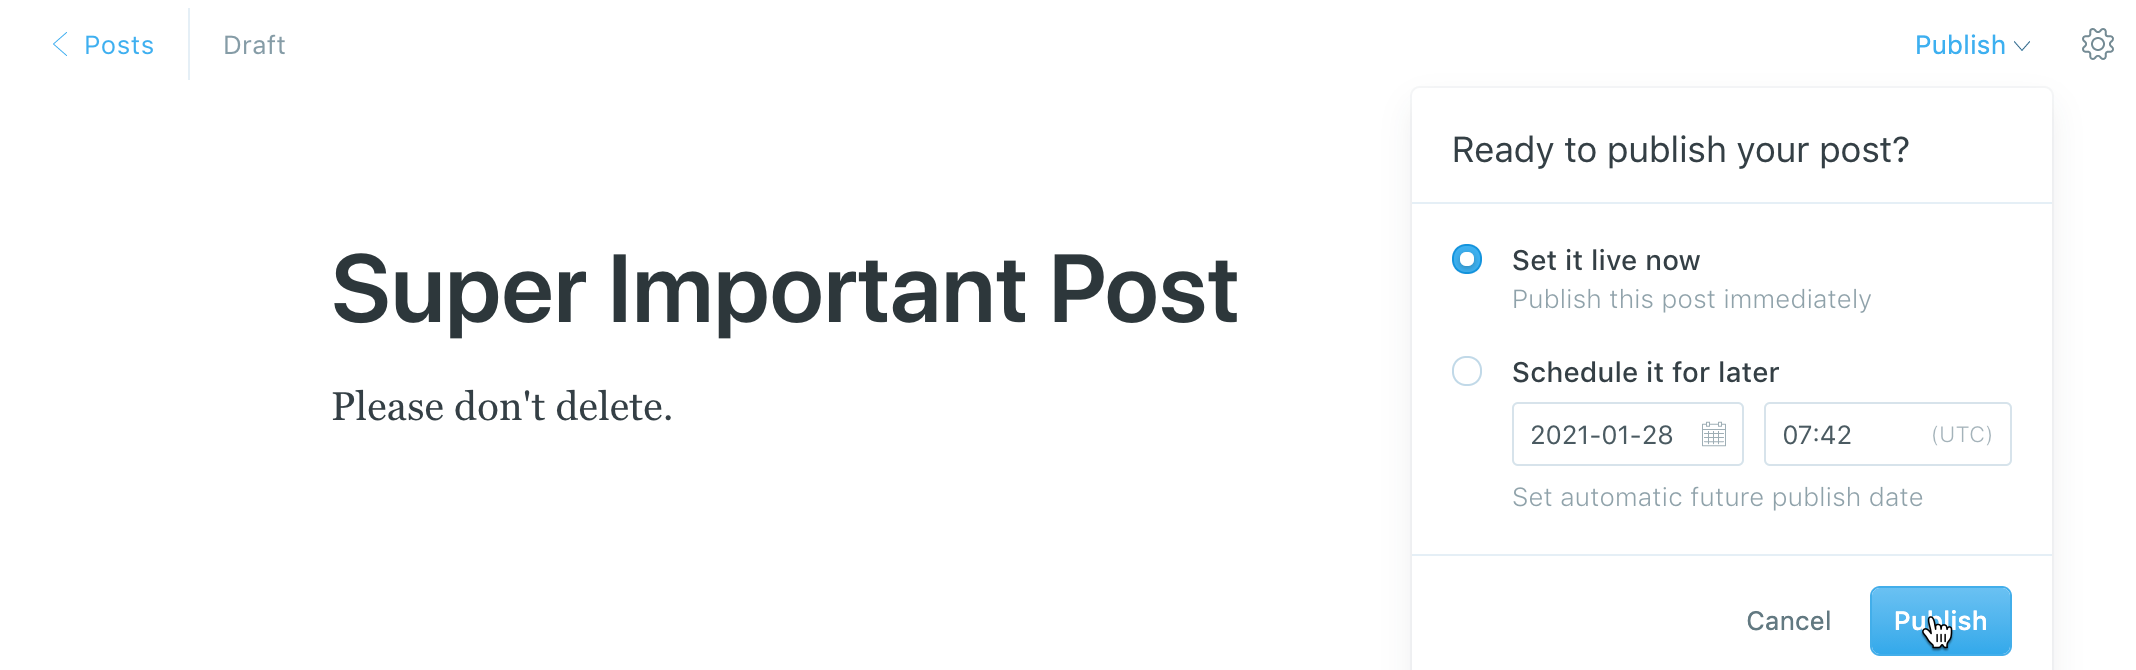
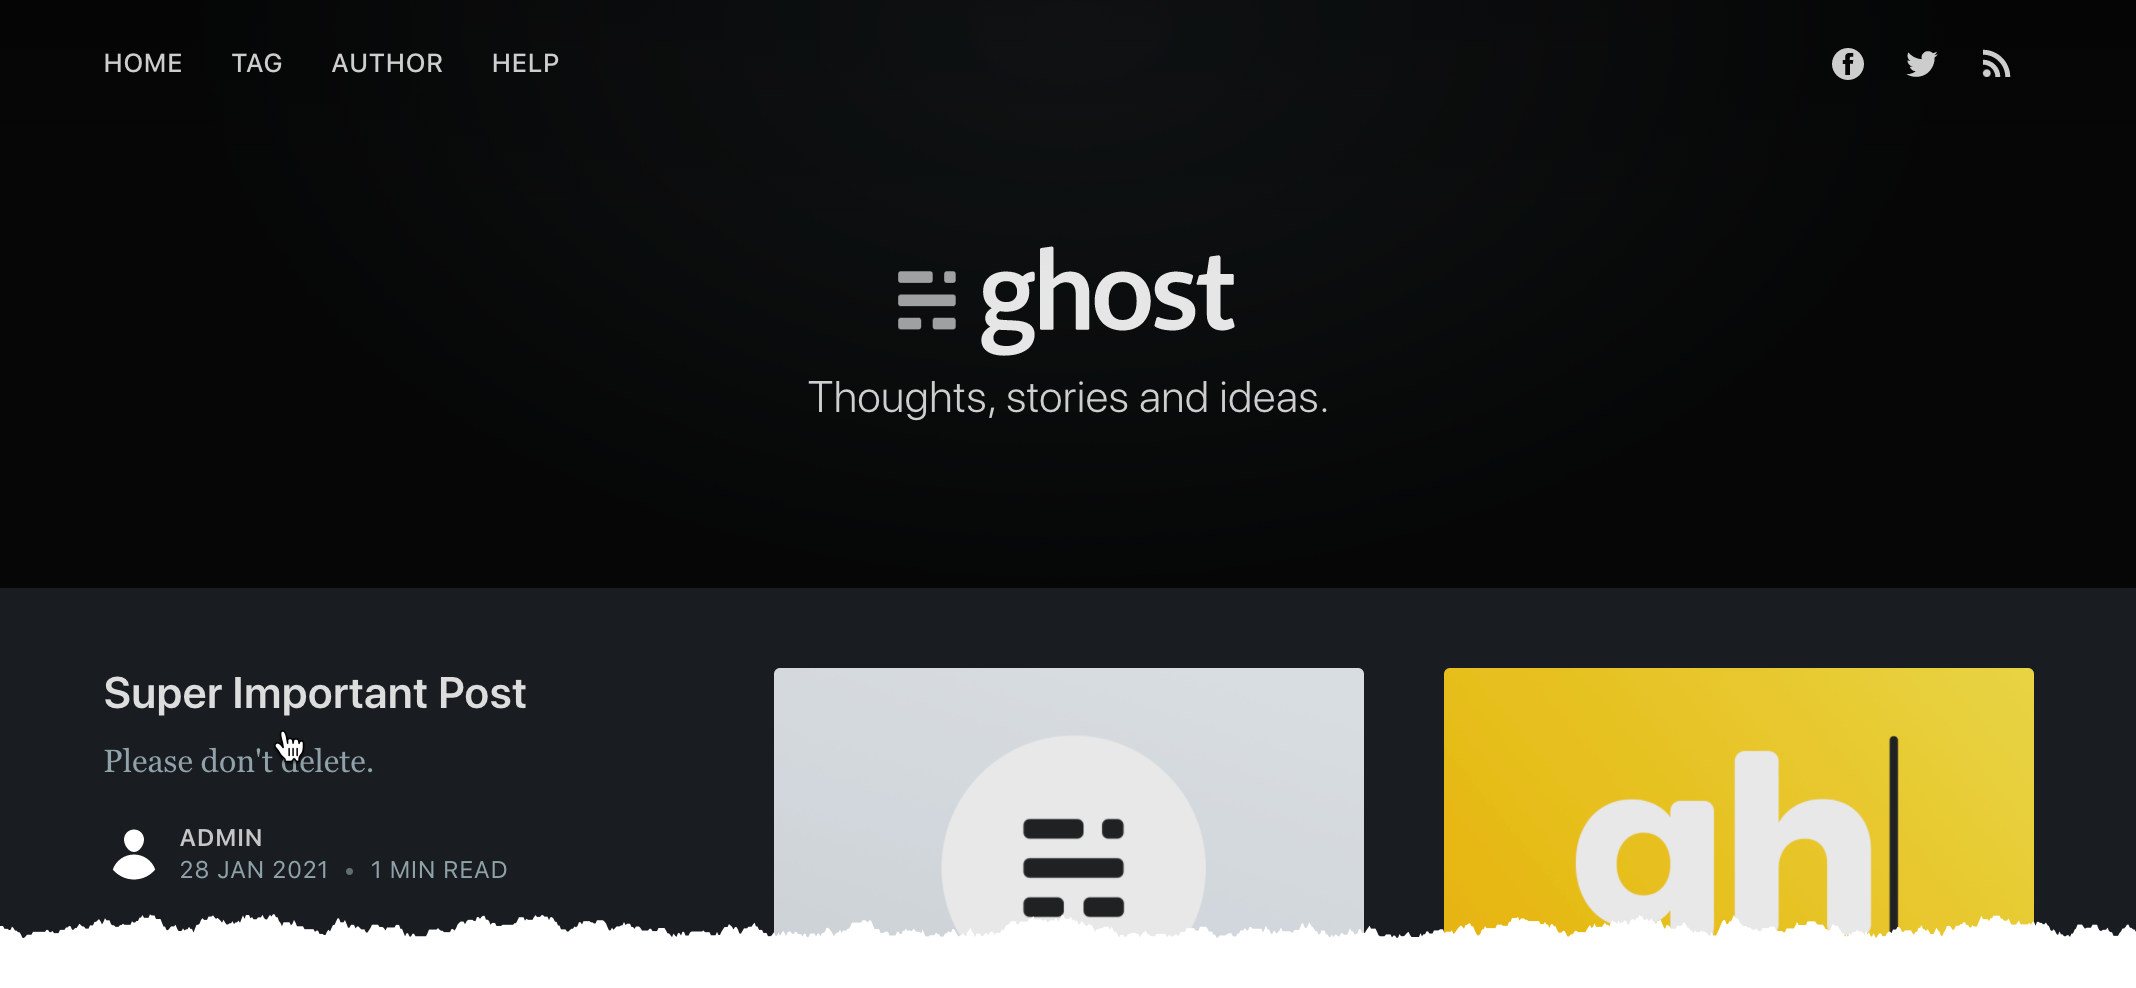
The home page should now look like this:
Backup
Now, let’s look into backups in case something happens to the blog. Backups are for Kubernetes resources and persistent volumes. You can back up your entire cluster, or optionally choose a namespace or label selector to back up.
They can be run one off or scheduled. It’s a good idea to have scheduled backups so you are certain you have a recent backup to easily fall back to. You can also create backup hooks if you want to execute actions before or after a backup is made.
By default, the backup retention is 30 days, but you can change it with the --ttl flag.
-
[Optional] To see what all you can do with backups run:
velero backup -h -
Let’s start with the most basic option: creating a one off backup. It’s a good idea to give it a meaningful name so you remember what it was for unlike what is done here.
BACKUP=gastly
velero backup create $BACKUP --include-namespaces ghost
If we wanted to do a backup with all namespaces we can remove the
--include-namespacesflag. And to include all namespaces except specific ones we could use--exclude-namespaceswith the namespace(s) we don’t want. -
Let’s create a backup from a schedule.
SCHEDULE=minute velero schedule create $SCHEDULE --schedule="@every 1m" --include-namespaces ghost # You could also use schedule="*/1 * * * *" velero backup create minute --from-schedule $SCHEDULE -
See all of the backups created:
velero backup get NAME STATUS ERRORS WARNINGS CREATED EXPIRES STORAGE LOCATION SELECTOR gastly Completed 0 0 2021-01-28 00:19:44 -0800 PST 29d default <none> minute-20210128081949 Completed 0 0 2021-01-28 00:19:49 -0800 PST 29d default <none> minute-20210128081849 Completed 0 0 2021-01-28 00:18:49 -0800 PST 29d default <none> … -
[Optional] For both curiosity and debugging, it’s useful to do a
describeandlogson your backups:velero backup describe $BACKUP velero backup logs $BACKUP
🔥Wreak Havoc🔥
Now that we have a happy cluster state and that most excellent blog you created…let’s nuke Ghost.
Let’s say that someone (you) “accidentally” (definitely intentionally) deleted the Ghost Helm chart and the persistent volume claim (PVC) by running the following:
helm delete --namespace ghost ghost
kubectl -n ghost delete pvc data-ghost-mariadb-0
Try to connect to Ghost again. Shoot… Now the blog site is down and so is that super important blog post you just made. What now?
Restore
Well, it’s a good thing you have backups! Now it’s time to look into restoring from a backup.
-
To see what all you can do with restore run:
velero restore -h -
Let’s now wait for all of the resources to be gone. First check the output of
get all:kubectl -n ghost get allAnd the Ghost and MariaDB persistent volumes claims (PVCs) as well:
kubectl get pvcNote: It might take a minute until everything is properly deleted; so you may run these commands above until they give you a (somewhat ominous)
No resources foundoutput. -
Now to perform a restore:
To take a look at what backups you have you can run the following again:
velero backup getTo restore from the specific backup we created first:
velero restore create --include-namespaces ghost --from-backup $BACKUP -
So the big questions are:
-
Did all the resources come back up and therefore the Ghost site?
-
Is the super important blog back, or only the default blogs?
-
Let’s find out. First let’s check to see if our resources are back and running.
kubectl -n ghost get all

NAME                         READY   STATUS    RESTARTS   AGE
pod/ghost-86b56c9d44-gk2f8   1/1     Running   0          2m13s
pod/ghost-mariadb-0          1/1     Running   0          2m13s

NAME                    TYPE           CLUSTER-IP      EXTERNAL-IP      PORT(S)        AGE
service/ghost           LoadBalancer   10.108.14.225   34.105.103.109   80:30353/TCP   2m12s
service/ghost-mariadb   ClusterIP      10.108.5.14     <none>           3306/TCP       2m12s

NAME                    READY   UP-TO-DATE   AVAILABLE   AGE
deployment.apps/ghost   1/1     1            1           2m12s

NAME                               DESIRED   CURRENT   READY   AGE
replicaset.apps/ghost-86b56c9d44   1         1         1       2m12s

NAME                             READY   AGE
statefulset.apps/ghost-mariadb   1/1     2m12s
Again, wait until all the pods above are
Runningwith counts of1/1pods inREADYstate. -
-
Now get the
EXTERNAL_IPfrom your service:kubectl get svc --namespace ghost ghost --template "{{ range (index .status.loadBalancer.ingress 0) }}{{ . }}{{ end }}"Double check your IPNote: Your IP address may have changed from earlier. For the depth of this specific demo it doesn’t cause problems. However, to ensure all links work properly, update the
ghostHostinghost-values.yamland run the previoushelm upgradecommand again. If we were usingexternal-dnsand hostnames, it would automatically resolve itself.Now head to you the IP address in your browser and your blog should be up with the post you wrote!
-
[Optional] For both curiosity and debugging, it’s useful to do a
describeandlogson your restores:velero restore describe <restore-name> velero restore logs <restore-name>
As of Velero 1.5 Restore Hooks are also available.
For cluster migration (restoring from one cluster’s backup into another cluster) you can follow the cluster migration documentation.
Cleanup
To delete the app resources, you can use helm uninstall and then delete the
namespace:
helm uninstall --namespace ghost ghost
kubectl delete ns ghost
If you would like to remove Velero from your cluster, you can use:
kubectl delete namespace/velero clusterrolebinding/velero
kubectl delete crds -l component=velero
Now, if you’d like to remove the GCP resources that we created earlier:
# Remove the velero service account
gcloud iam service-accounts delete $SERVICE_ACCOUNT_EMAIL

# Delete the velero role
gcloud iam roles delete velero.server --project $PROJECT_ID
# We don't need to delete the key or the policy binding, as they get removed automatically.

# Finally, remove the storage bucket.
gsutil -m rm -r gs://$BUCKET
Learn More
Hopefully you found this guide helpful. Here are some other resources to help you learn more.
- Velero
- Velero Documentation
- Velero GitHub
- Introduction to Velero Blog
- Quick start evaluation install with Minio