Autoscaling Reference Architecture
This reference provides guidance, trade-off considerations and implementation details for autoscaling application workloads and the cluster’s compute resources that host them. It includes a variety of approaches to the practice of using software to monitor usage and manage capacity for application workloads.
Use Cases
If the following conditions are present, autoscaling may be advisable:
- Workloads can readily scale: The architectural nature of the application
workload lends itself to scaling by:
- Adding replicated instances
- Taking advantage of added compute resources
- Compute can scale: In environments such as the public cloud where new compute resources can be brought online programmatically, the capacity of the underlying infrastructure can be dynamically managed.
- Bursting usage: If the load on your application is prone to sharp increases, such as eCommerce workloads, the ability to respond immediately using automated systems may be important.
- High utilization needs: If cost management and efficient utilization are important for a workload with varying load, using automated scaling mechanisms may provide the most cost-effective solution.
Where autoscaling may be less effective or inadvisable:
- Predictable: In the situation where you have predictable load, the underlying purpose for autoscaling is absent.
- Utilization is low priority: If high utilization is not a priority and cost constraints are not present, you may be better served by sufficiently over-provisioning software and hardware resources to accommodate increases in load.
- Resource constrained environment: In an environment where you cannot readily provision more compute, scaling of workloads may be possible within those compute constraints but will have hard limits that cannot be dynamically moved.
- Not failure tolerant: autoscaling workloads involves removing or restarting application units so if your application does not handle termination signals or otherwise handle shut-downs well, it will not be well-suited.
General Trade-Offs
Pros:
- lower operational toil in managing capacity
- ability to better utilize compute
- dynamic responsiveness to changing load and consumption
Cons:
- added complexity
- potentially unpredictable behavior
- may overspend if not tuned well or capped appropriately
Horizontal Scaling
Horizontal scaling involves changing the replicated number of instances of something. In application terms this often is simply increasing and decreasing app instances. This is feasible for stateless operations where adding identical replicas to a load-balanced pool can increase capacity or for stateful applications that are designed to achieve similar capabilities. In infrastructure terms, it involves adding more virtual or physical machines to adjust the pool of underlying compute. This is feasible in a Kubernetes-based platform that can dynamically utilize changes to the pool of worker nodes.
Vertical Scaling
Vertical scaling refers to changes in the allocated resources for a given unit. For an application, this means giving it more or less CPU, memory or other resources in response to actual usage by the workload. Vertical infrastructure scaling is not covered in this reference since mutating infrastructure is far less manageable than horizontally scaling the underlying machines.
Workload Autoscaling
Horizontal Pod Autoscaling
The Horizontal Pod Autoscaler (HPA) manages the number of replicas of a workload based on the consumption of some measurable resource. A common example is to declare a target percentage of CPU request. You declare what the target usage is for your workload, and the HPA controller will add or remove replicas based on actual usage compared to that target.
The HPA desired state is defined by the HorizontalPodAutoscaler API kind in
the autoscaling group. The latest version of the API is v1 and is the
version addressed in this reference, but versions v2beta1 and v2beta2 also
exist. The state is reconciled by a control loop in the kube-controller-manager.
Periodically, the HPA control loop will query the metric used to determine
workload scale. By default, this controller will query the metric every 15
seconds but this can be adjusted with the
--horizontal-pod-autoscaler-sync-period flag on the kube-controller-manager.
Using the metric and the desired state defined in the HorizontalPodAutoscaler
resource, the desired number of replicas will be calculated and updated on the
target workload as needed. The target may be a ReplicaSet, Deployment or
StatefulSet resource.
Resource Metrics
A simple, common method for autoscaling with HPAs is using pod CPU usage. For workloads that consume more CPU as their load increases, this may be a good solution. It is not a good solution if, for example, CPU remains relatively constant but memory consumption grows with increased load.
If using this method, you will need the Metrics
Server deployed in your
cluster. The Metrics Server will collect metrics from the various Nodes'
kubelets and create metrics.k8s.io/v1beta1/PodMetrics resources for each
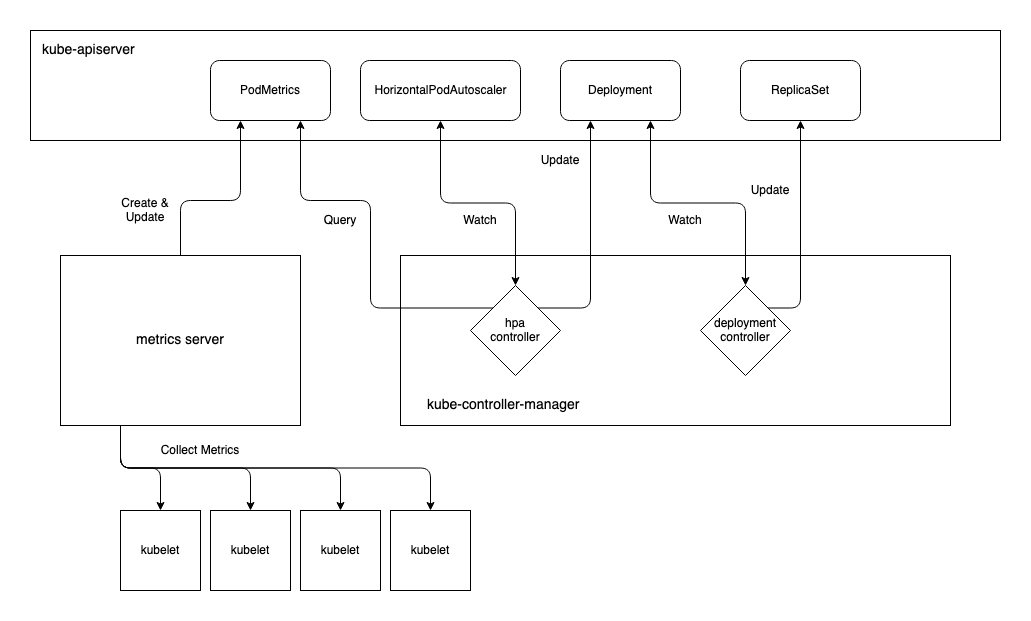
running pod. The HPA controller will use the HorizontalPodAutoscaler to
determine which PodMetrics to query. According to the metrics observed and the
desired state defined in the HPAs, it will update the replicas in the relevant
resource, e.g. Deployment, which will, in turn, alter the number of pods
running.
When using HPAs it is important to understand how your workload is going to
scale in response to changes in resource usage. In the following sample
manifest, the Deployment requests 100m CPU for each pod. Note that replicas
are not set on the Deployment spec. Normally this would result in zero replicas
being created, however the HPA is managing the number of replicas and has
minReplicas set which will ensure at least one replica is running at all
times. Note also that if CPU resource requests aren’t set for the Deployment,
the HPA will have no effect.
apiVersion: apps/v1
kind: Deployment
metadata:
  name: sample
spec:
  selector:
    matchLabels:
      app: sample
  template:
    metadata:
      labels:
        app: sample
    spec:
      containers:
        - name: sample
          image: sample-image:1.0
          resources:
            requests:
              cpu: "100m" # must be set
---
apiVersion: autoscaling/v1
kind: HorizontalPodAutoscaler
metadata:
  name: sample
spec:
  scaleTargetRef:
    apiVersion: apps/v1
    kind: Deployment
    name: sample
  minReplicas: 1 # will not scale below this value
  maxReplicas: 3 # will not scale above this value
  targetCPUUtilizationPercentage: 50 # will scale based on this percentage of usage
The formula used to determine replica count is:
desiredReplicas = ceil( currentReplicas * ( currentMetricValue / desiredMetricValue ) )
desiredReplicas is the value that will be set on the target resource’s
replicas when it has changed.
ceil is the ceiling function that rounds up to the nearest integer.
currentReplicas is the existing replica count on the target resource.
currentMetricValue is the aggregate CPU usage for all relevant pods as queried
from the PodMetrics resource for the pods in question.
desiredMetricValue is the targetCPUUtilizationPercentage of the CPU request
(50% of 100m, in this example) multiplied by the currentReplicas
In order to illustrate how the replicas will scale, consider these examples:
-
There is one replica running. The HPA controller queries the PodMetrics for that pod and finds the currentMetricValue is 120m.
ceil( 1 * (120/50) ) = 3In this case, it will scale the replicas out to the maximum of 3.
-
There is one replica running. The HPA controller queries the PodMetrics for that pod and finds the currentMetricValue is 52m.
ceil( 1 * (52/50) ) = 2In this case, the recommendation from the formula output will not be used since the ratio
52/50is less than the default tolerance of 0.1. This tolerance prevents scaling when the amount of CPU usage change doesn’t warrant it. This default tolerance can be adjusted with the--horizontal-pod-autoscaler-toleranceflag on the kube-controller-manager. -
There are two replicas running. The HPA controller queries the PodMetrics for them and finds the currentMetricValues are 15m and 25m (40m combined).
ceil( 2 * (40/100) ) = 1In this case, it will scale the replicas in to 1 if a scaledown has been the calculated outcome for the last 5 minutes. This 5 minute period prevents scaledowns due to temporary drops in metric values. This default stabilization period can be adjusted with the
--horizontal-pod-autoscaler-downscale-stabilizationflag on the kube-controller-manager.
Custom Metrics
If the Metrics Server is insufficient in providing metrics there are other custom metrics implementations available. Of these, the Prometheus Adapter is the most generally useful. It is not vendor-specific and leverages a common open-source metrics solution.
Vertical Pod Autoscaling
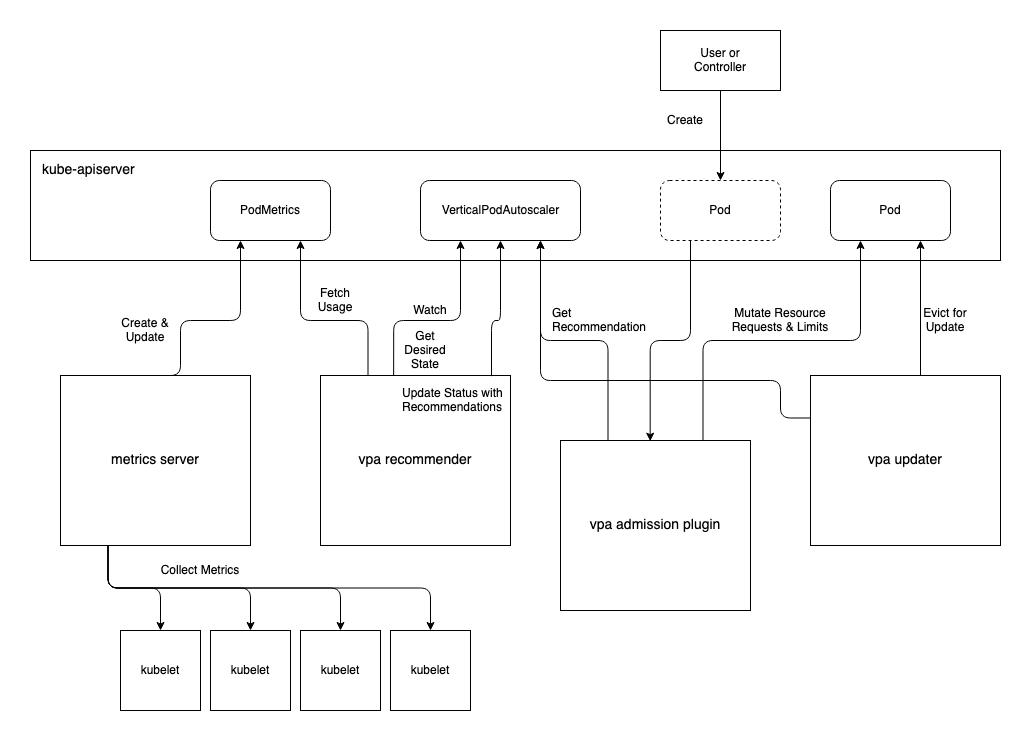
The vertical pod autoscaler is a community-managed project in the Kubernetes autoscaler repo. Unlike the HPA, it is not bundled into the kube-controller-manager. It consists of three distinct components that run in the cluster and uses two custom resources. As with the HPA, the VPA relies on the Metrics Server to provide CPU and memory usage metrics.
Components:
- Recommender: recommends CPU and/or memory request values based on observed
consumption. Fetches metrics once a minute by default which can be adjusted
with the
--recommender-intervalflag. Is the core component that is active in all modes. - Admission Plugin: sets resource requests on new pods as determined by the
Recommender. Is active in all modes except the
Offmode. - Updater: evicts pods that have requested resources that differ significantly
from the values determined by the Recommender. Is active in
RecreateandAutomodes; dormant inOffandInitialmodes.
CustomResources:
- VerticalPodAutoscaler: the resource where you provide the desired state for your vertical autoscaling.
- VerticalPodAutoscalerCheckpoint: used internally by the Recommender to checkpoint VPA state. It is used for recovery if the Recommender restarts.
There are different modes the VPA can run in. Technically there are four modes, but in effect there are just three since two are functionally equivalent at this time:
-
Off: The dry-run mode. Recommendations are calculated and can be queried usingkubectl describefor the VPA resource in question, but are never applied. -
Initial: The safe mode. Recommendations are calculated and can be queried. They are applied when new pods are created, but running pods are never evicted in order to update them. -
Recreate: The active mode. Recommendations are calculated and are applied when they differ significantly from the current requested resources. The recommendations are applied by evicting the running pods so that the new pod gets the recommendations. Only use this mode if your pods can safely be evicted and restarted when the VPA determines they should be updated. If using this mode, and when availability is important, you should also apply a PodDisruptionBudget to ensure all of your pods are not evicted at once. -
Auto: Is currently (in v1) equivalent toRecreate. May take advantage of restart-free updates in future.
The sample manifests below represent a Deployment that will create 4 pods and a
VerticalPodAutoscaler that will vertically scale the pods if resource usage
increases significantly above the CPU or memory requests. The VPA will not
increase requests beyond the maxAllowed of 1 CPU and 500Mi memory. If using
the Recreate mode, the Updater will evict pods in order to scale them but the
PodDisruptionBudget will ensure that only one pod at a time is evicted.
apiVersion: apps/v1
kind: Deployment
metadata:
  name: sample
spec:
  selector:
    matchLabels:
      app: sample
  replicas: 4
  template:
    metadata:
      labels:
        app: sample
    spec:
      containers:
        - name: sample
          image: sample-image:1.0
          resources:
            requests:
              cpu: 100m
              memory: 50Mi
---
apiVersion: "autoscaling.k8s.io/v1beta2"
kind: VerticalPodAutoscaler
metadata:
  name: sample
spec:
  targetRef:
    apiVersion: "apps/v1"
    kind: Deployment
    name: sample
  resourcePolicy:
    containerPolicies:
      - containerName: "*"
        minAllowed:
          cpu: 100m
          memory: 50Mi
        maxAllowed:
          cpu: 1
          memory: 500Mi
        controlledResources: ["cpu", "memory"]
  updatePolicy:
    updateMode: Recreate
---
apiVersion: policy/v1beta1
kind: PodDisruptionBudget
metadata:
  name: sample
spec:
  minAvailable: 3
  selector:
    matchLabels:
      app: sample
Limit:Request Ratio
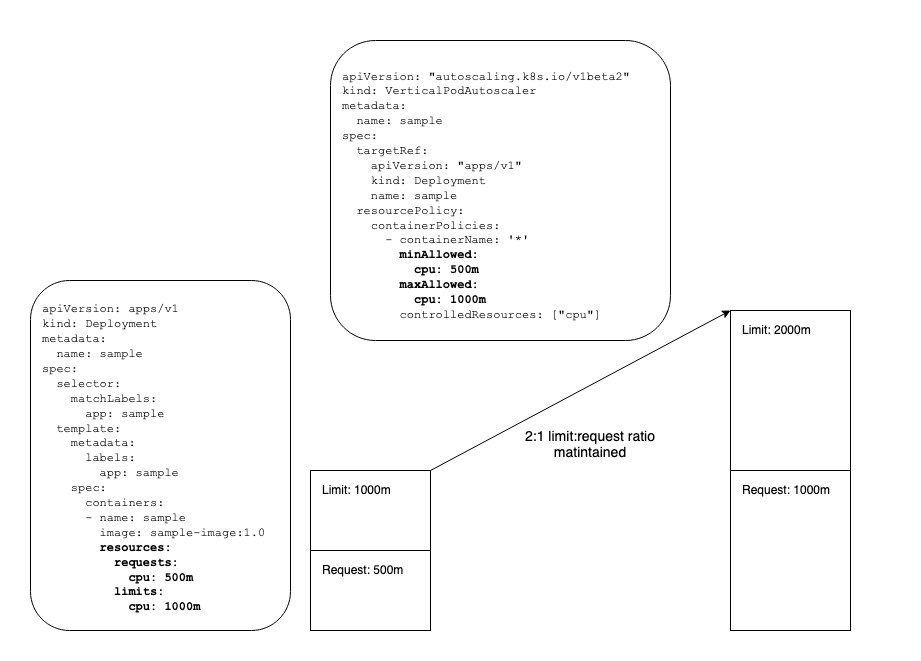
The VPA will maintain the limit:request ratio specified in the original pod
template spec. This is important to keep in mind for capacity planning since
the VPA will increase the limits beyond what you specify in the original
deployment spec. The resourcePolicy in the VPA below applies to resource
requests. The workload starts with a CPU request of 500m and a limit of 1000m.
The VPA indicates the CPU request may be scaled as high as 1000m. Maintaining
the limit:request ratio in the Deployment template, the VPA Recommender will set
the CPU limit to 2000m if scaled up to the maximum CPU request of 1000m.
Limit Range Constraint
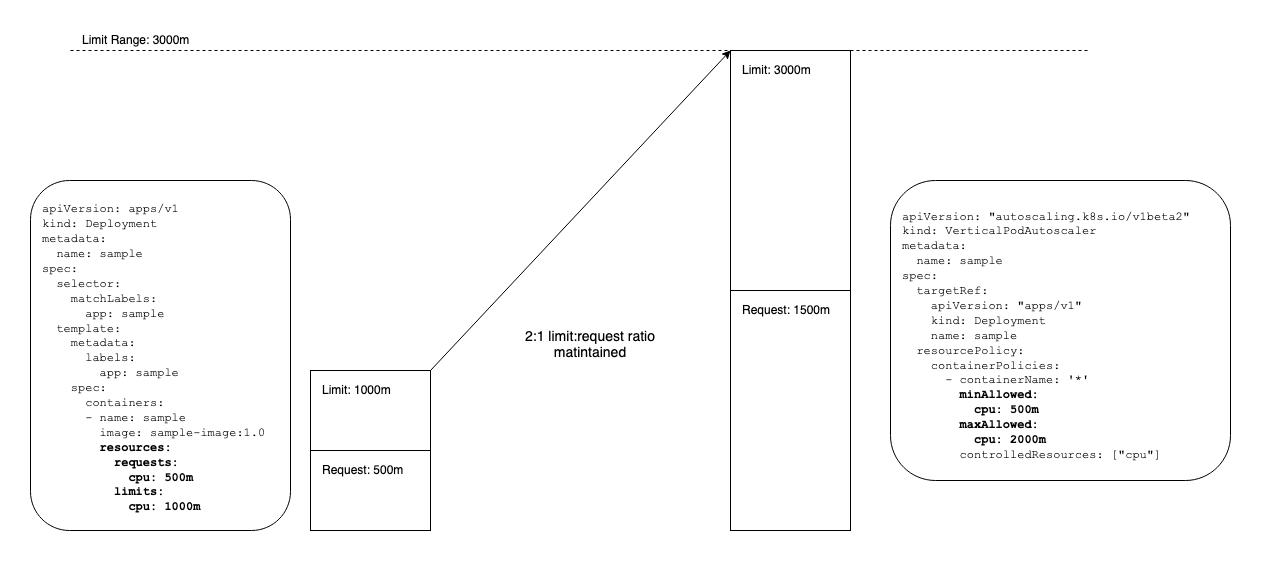
The VPA will respect Limit Ranges unless the VPAs resource policy overrides it.
Limit
Range
resources allow cluster admins to set minimum and/or maximum values for resource
consumption in a Namespace. In the following example, the Limit Range will be
respected. The minAllowed value in the VPA resourcePolicy allows for the
limit:request ratio to be respected without violating the Limit Range. The
maxAllowed value of 2000m will not be reached since it will hit the Limit
Range at a request of 1500m due to the limit:request ratio which is set in the
pod spec.
Limit Range Override
If, on the other hand, the minAllowed value in the VPA resourcePolicy causes
the Limit Range to be violated in order to maintain the limit:request ratio set
in the pod spec, the Limit Range will be overridden.
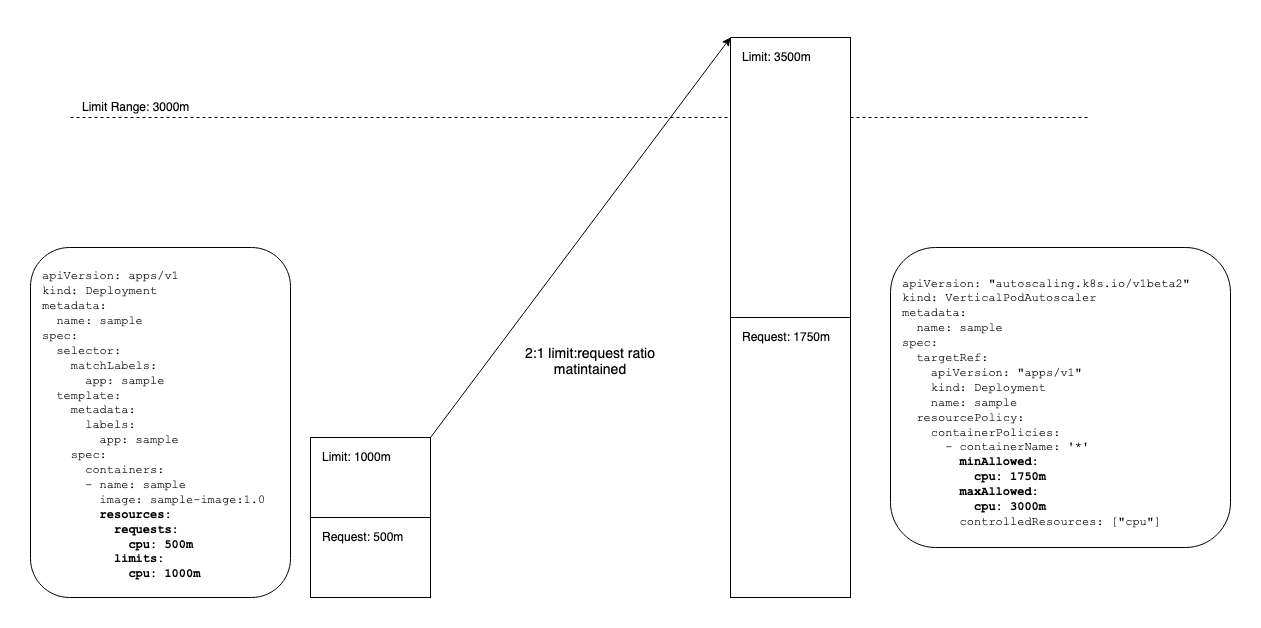
Because this could lead to unintended or unauthorized Limit Range violations, you should use admission control to prevent this. Two possible ways to achieve this are:
-
Simple: enforce that the
minAllowedin the VerticalPodAutoscaler matches the resource requests in the pod spec. -
Complex: have the admission controller fetch the applicable Limit Range, calculate the limit:request ratio in the pod spec, calculate the projected limit based on the VPA’s
minAllowedvalue, and check to see if the projected limit violates the Limit Range.
Cluster Proportional Autoscaling
If you have a workload that needs to scale in proportion to the size of the cluster itself, the cluster-proportional-autoscaler may be appropriate to use. While it has a narrower use-case and is generally useful only for cluster services like DNS, it has a very simple operating model and fewer dependencies.
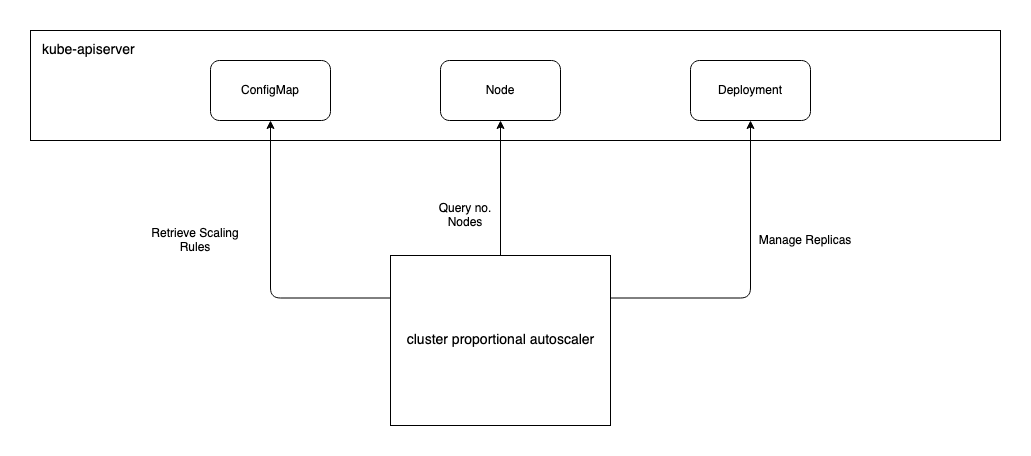
By default, every 10 seconds, the Cluster Proportional Autoscaler (CPA) will
check the number nodes in the cluster and autoscale the target workload as
needed. The default poll period can be changed using the --poll-period-seconds
on the CPA. If you would like to scale a workload based on a subset of nodes you
may use the --nodelabels flag on the CPA which will instruct it to count only
those nodes with particular labels. The target workload that will be scaled by
the CPA is defined with the --target flag. The scaling parameters to use are
defined in a configmap which is specified by the --configmap flag. Because
only one target and configmap may be provided, if you have multiple workloads
for which you would like to use the CPA, you will need to deploy and configure
an instance of the CPA for each.
The replicas are set by either a cores:replicas ratio provided by
coresPerReplica or nodes:replicas with nodesPerReplica. You can provide
one method or both. If both are given, the larger of the two values will be
applied to the target.
There are two modes to provide scaling parameters. The first example below
denotes the linear mode. In this case there will never be less than one
replica, and never more than 100 replicas. Within that range, the
coresPerReplica or the nodesPerReplica will determine the replicas set on
the target workload. The evaluation that returns the highest value will be used.
In this case, given 20 nodes with 16 cores each, 16 cores * 20 nodes = 320 cores the coresPerReplica will be used which will set 80 replicas on the
target. Alternatively if the nodes have 4 cores each, the nodesPerReplica will
produce the higher value of 20 replicas at one node per replica so the target
workload will be set to 20 replicas. In this case
"includeUnschedulableNodes": true will exclude non-schedulable nodes that have
been cordoned, for example. Also, "preventSinglePointFailure": true will
effectively increase the minimum to 2 if there are multiple nodes.
data:
  linear: |-
    {
      "coresPerReplica": 4,
      "nodesPerReplica": 1,
      "min": 1,
      "max": 100,
      "preventSinglePointFailure": true
      "includeUnschedulableNodes": true
    }
The other mode is the ladder mode which allows for a stepping function that
provides for more granular control. Re-using the example of 20 nodes with 16
cores each, 320 cores would result in 3 replicas due to [ 64, 3 ]. If the
nodes increase to 40, 640 cores passes the 512 threshold so [ 512, 5 ] would
cause 5 replicas to be set on the target.
data:
  ladder: |-
    {
      "coresToReplicas":
      [
        [ 1, 1 ],
        [ 64, 3 ],
        [ 512, 5 ],
        [ 1024, 7 ],
        [ 2048, 10 ],
        [ 4096, 15 ]
      ],
    }
In this ladder mode example, a 40 node cluster would lead to 5 replicas on the
target. If the node count increases above 64, the replicas will be increased to 6.
data:
  ladder: |-
    {

      "nodesToReplicas":
      [
        [ 1, 1 ],
        [ 4, 2 ],
        [ 8, 3 ],
        [ 16, 4 ],
        [ 32, 5 ],
        [ 64, 6 ]
      ]
    }
Cluster Autoscaling
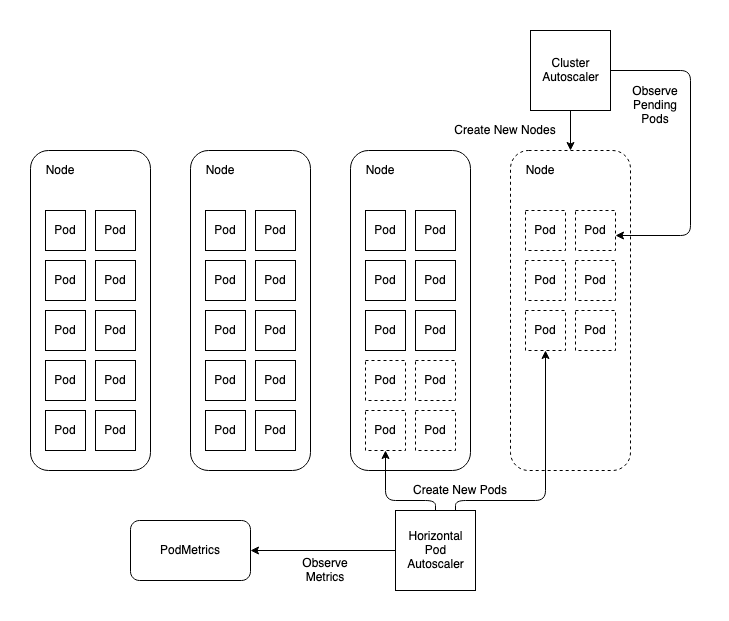
When horizontally autoscaling applications, as the workload pod replicas increase, it may run out of worker nodes to run on. Scaling the cluster around the workload solves this problem. Using Cluster Autoscaler (CA) you can ensure your worker node pool will increase in response to pods being unschedulable due to a lack of worker nodes.
In the following example diagram, the HPA queries metrics and determines the replica count needs to be scaled from 26 to 36. This exceeds the capacity of the cluster’s worker nodes which is 30. That leaves 6 pods in a Pending state. They are unschedulable due to a lack of compute available. The CA observes this condition and determines that one more worker node will satisfy the shortage of node resources and provisions a new node using the underlying infrastructure provider. The workload pods will remain Pending until the node joins the cluster and at that time they will be scheduled to the new node satisfying the workload’s scaling requirements.
Provider Support
At this time, Cluster Autoscaler supports the following cloud providers:
- Google Compute Engine
- Google Kubernetes Engine
- Amazon Web Services
- Microsoft Azure
- Alibaba Cloud
- OpenStack Magnum
- Digital Ocean
- Cluster API
Note: Cluster Autoscaler uses specific resource types in the infrastructure provider that will need to be in use in order to leverage CA. If your cluster infra management does not use these resource types, you will not be able to leverage CA. For example:
- Amazon Web Services: Autoscaling Groups (ASGs) are used for scaling worker nodes in AWS. So if you leverage ASGs to manage your worker node pool, CA may be a viable option. On the other hand, if you are provisioning individual EC2 instances for worker nodes, CA will not work.
- Azure: Virtual Machine Scale Sets (VMSS) are used in Azure. So in order to use CA in a cluster running in Azure, you’ll need to use VMSS to manage your node pools.
An important consideration when deploying Cluster Autoscaler is ensuring it does not get evicted or that the node it’s running on does not get decommissioned during a scaling event. Consider:
- Run on Master Node: When using CA, worker nodes may be decommissioned to scale in. Running the CA itself on a master node solves this potential problem.
- Run in
kube-system: CA doesn’t decommission nodes with non-mirroredkube-systempods running on them. - Use a Priority Class: Set
priorityClassName: system-cluster-criticalon the CA to prevent eviction.
Cluster API
Cluster API extends the Kubernetes API to manage clusters' underlying infrastructure using Kubernetes controllers. This has relevance to CA since the autoscaler needs to implement controls over a subset of cluster infrastructure as well. A Cluster API provider was recently added to CA. It is different to the other providers in that Cluster API is an abstraction of the cloud provider rather than an actual provider. Note that there are currently important limitations that should be understood. For example, CA only supports using Cluster API when the cluster used serves as the both management and workload cluster.
Node Scaling
The CA will check for unschedulable pods every 10 seconds by default. This value
can be altered with the --scan-interval flag on the CA. If it finds
unschedulable pods, it will calculate how many nodes of the kind in the relevant
node group will be required to satisfy the Pending pods. Then it will increase
the node group by that amount.
The node groups are configured with the --nodes flag. The configuration is
provided in the form of [node minimum count]:[node maximum count]:[node group name]. The node group name will match the name of the autoscaling resource
(e.g. autoscaling group in AWS or VMSS in Azure). So in the following example,
two node groups will be managed. The worker-asg-1 node group will not be
scaled higher than 10 or lower than 1. The worker-asg-2 will be kept between 1
and 3 nodes.
--nodes=1:10:worker-asg-1
--nodes=1:3:worker-asg-2
When using multiple node groups. the expander will determine which of the node
groups is scaled. If using a single node group, the expander is irrelevant.
Supply the --expander flag to denote the expander you need to use. The
available expanders are:
-
random- The node group will be selected at random. This is the default and is not very useful. If using multiple node groups, use a more useful expander. -
most-pods- The node group that will allow for the most pods to be scheduled. For example, if the unschedulable pods usenodeSelectorthis expander will scale the node group that will allow for the pods to be scheduled. -
least-waste- Will scale the node group that is the best fit for the unschedulable pods and will have the least idle resources once provisioned and the pods scheduled. -
price- Chooses the most effective option. Currently only compatible with GCE and GKE providers. -
priority- Uses a priority configuration supplied as a configmap which must be namedcluster-autoscaler-priority-expanderand run in the same namespace as the CA. The configmap is watched by the CA and can be dynamically updated. The CA will load configuration changes on the fly. The following example includes three priority groups. Each group accepts a list of regular expressions. The group with the highest value with a match is used. In the following example, if there is a m4.4xlarge node group, it will be used and is the most preferred. Failing that, the t2.large or t3.large nodes will be used. If no node group name matches any of these, the lowest priority is any other group.apiVersion: v1 kind: ConfigMap metadata: name: cluster-autoscaler-priority-expander namespace: kube-system data: priorities: |- 1: - .* 10: - .*t2\.large.* - .*t3\.large.* 50: - .*m4\.4xlarge.*
When Cluster Autoscaler finds nodes that have been under-utilized for a
significant amount of time, the CA will remove that node. Nodes that are removed
are deleted in the underlying infra. Deleting the Node resource in Kubernetes is
the responsibility of the node controller in the cloud-controller-manager. If
there are high-priority workloads that you do not want the CA to remove nodes
for, use disruption budgets or annotations to protect them. You can use the
annotation "cluster-autoscaler.kubernetes.io/scale-down-disabled": "true" on a
Node and then use nodeSelector to assign workloads to those protected nodes.
Because the CA performs calculations to determine the number of new nodes to provision when adding nodes, and because the operation can be time-sensitive, request a full core of CPU for CA so it has sufficient compute capacity reserved and can perform calculations quickly. Also note that using pod affinity and anti-affinity can have a significant performance impact on the CA, especially in larger clusters, so if using in conjunction with CA, do appropriate testing to ensure CA will meet your service level objectives.
Cluster Overprovisioning
One concern that should be considered when using CA is that, since it is triggered by Pending pods, it will only begin scaling the number of Nodes when you are out of capacity. This means you will be out of capacity for the amount of time it takes for the following to happen:
- CA recognizes the cluster is out of capacity and calls the infra provider to provision more worker nodes
- The new machines boot up
- The new machines join the Kubernetes cluster
If this process is relatively short and you build in sufficient headroom to your workload autoscaling, i.e. you scale the number pods well before the workload is at full capacity, this may not be a problem. However, if you do find that cluster scaling cannot meet the demands of a rapidly scaling application, cluster overprovisioning may be a useful solution.
Cluster overprovisioning involves using a placeholder workload with a PriorityClass lower than that used by the autoscaling workloads. The placeholder workload does nothing but request enough resources to trigger the CA to add standby worker nodes. To extend the cluster autoscaling example used above, this diagram shows a workload with 26 replicas. Additionally, the overprovisioner is holding an additional node on standby for scaling events.
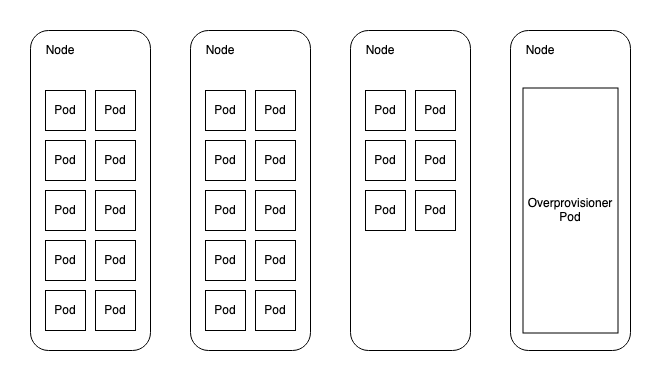
Now, when the HPA scales the replicas for the workload to 36, there is a node ready to accept new pods immediately. Provided the workload pods use a higher PriorityClass than the overprovisioner, the overprovisioner pod will be evicted to make way for the 6 pods that couldn’t otherwise be scheduled elsewhere in the cluster. Meanwhile, the overprovisioner will fall into a Pending state which will trigger the CA to provision a new standby node for the overprovisioner to live.
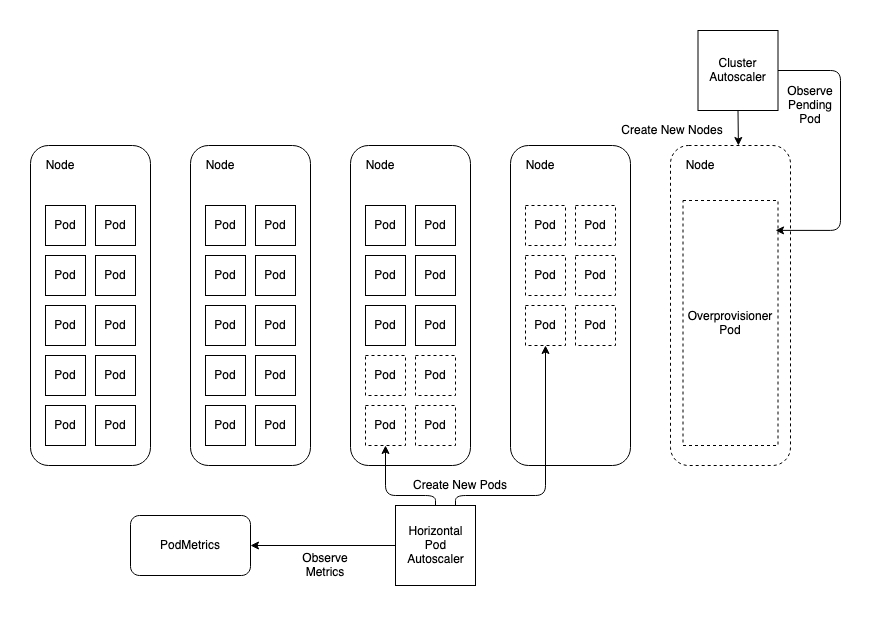
There is a helm chart that can be used to deploy the overprovisioner, but these sample manifests demonstrate the principle:
First you need to create a PriorityClass for your autoscaling workloads. If you are already using PriorityClasses, you need only ensure the overprovisioner’s PriorityClass value is lower. If you’re not using PriorityClasses, create a default that will be used if one is not specified:
apiVersion: scheduling.k8s.io/v1
kind: PriorityClass
metadata:
  name: default
value: 0
globalDefault: true
description: "This priority class will be used by all pods that do not specify one."
Next create a PriorityClass for your overprovisioner. This priority class will
work provided you have not altered the CA’s default priority cutoff of -10. If
you set the --expendable-pods-priority-cutoff flag to 0, for example, the CA
will not provision standby nodes for the overprovisioner using a PriorityClass
of -1.
apiVersion: scheduling.k8s.io/v1
kind: PriorityClass
metadata:
  name: overprovisioner
value: -1
globalDefault: false
description: "This priority class will be used the overprovisioner to create standby worker nodes."
Now Create a deployment that acts as the placeholder workload:
apiVersion: apps/v1
kind: Deployment
metadata:
  name: overprovisioner
spec:
  strategy:
    type: Recreate
  replicas: 3 # helps determine standby nodes
  selector:
    matchLabels:
      app: overprovisioner
  template:
    metadata:
      labels:
        app: overprovisioner
    spec:
      priorityClassName: overprovisioner # specifies priority class
      containers:
        - name: overprovisioner
          image: k8s.gcr.io/pause:3.1 # workload consumes no resources
      resources:
        requests:
          cpu: 31 # helps determine standby nodes
An important consideration with this strategy is the relationship between this deployment’s CPU requests, replicas and the standby nodes it creates. In this example we have asked for 3 replicas that request 31 CPU each. In a cluster that uses 32 core worker nodes, the objective is for the CA to provision 3 standby nodes. It is generally not going to work to request all CPU for the node. If there are any DaemonSet pods that request resources, the overprovisioner will not get scheduled at all. So, determine the aggregate CPU request for the pods that every node runs such as your CNI provider pod, kube-proxy, and any other DaemonSets. Then set the CPU requests for your overprovisioner to just below that. If you set it too low, workloads will be provisioned alongside the overprovisioner and you will not get new standby nodes added to the cluster when you otherwise might expect to.
This system has the benefit that you can scale the number of replicas for the overprovisioner and get a corresponding number of standby nodes. It has the disadvantage that if you add DaemonSets without adjusting the overprovisioner CPU request, or if you adjust the number of cores for your worker nodes, your overprovisioner may stop working as expected.